Calendar Subscriptions – ICal & Google calendar!
With one swift click of a button under Personal Calendar, Jobs and Planning Calendar the ICal and Google Calendars can be synced with ICloud Mail, Microsoft Outlook (ICal) and Google Calendar (G).
Google Calendar
Once the button named: G has been clicked, an email will arrive with the google calendar link and the option to Add this calendar. By clicking the link and Adding to calendar the Google Calendar page opens displaying the Job / Project.
A Sync button can be seen when opening a Job / Project entry in Google Calendar. Click Sync to see the latest changes.
ICal
Copy and paste ICal link in ICloud Mail, Microsoft Office etc. to sync the Job / Project with other email providers. Go to the calendar section of the email provide and subscribe from web using the pasted ICal link.
For more info. check:
Sending and replying is made easy with the new AI integration! It can support with drafting the body of the email, auto-correcting, rephrasing in different tones and languages.
Type in a prompt and the AI will draft an email which can be Accepted and used or further edited.
Summarize an already existing long email chain with the summarize AI feature.
Click here to video video tutorial:
Mobile users can receive Company documents and Rate Card documents via Mobile Documents page.
User rights
In order for the Mobile Documents page to be visible under the mobile app the company role Mobile Documents needs to be assigned to a function. This would be given to the client that receives the documents and needs to be able to view them. Whoever sends the documents needs Edit Company Documents rights in order to access company settings and set the flag next to the documents so that the client can receive the documents.

Company Settings – Company documents
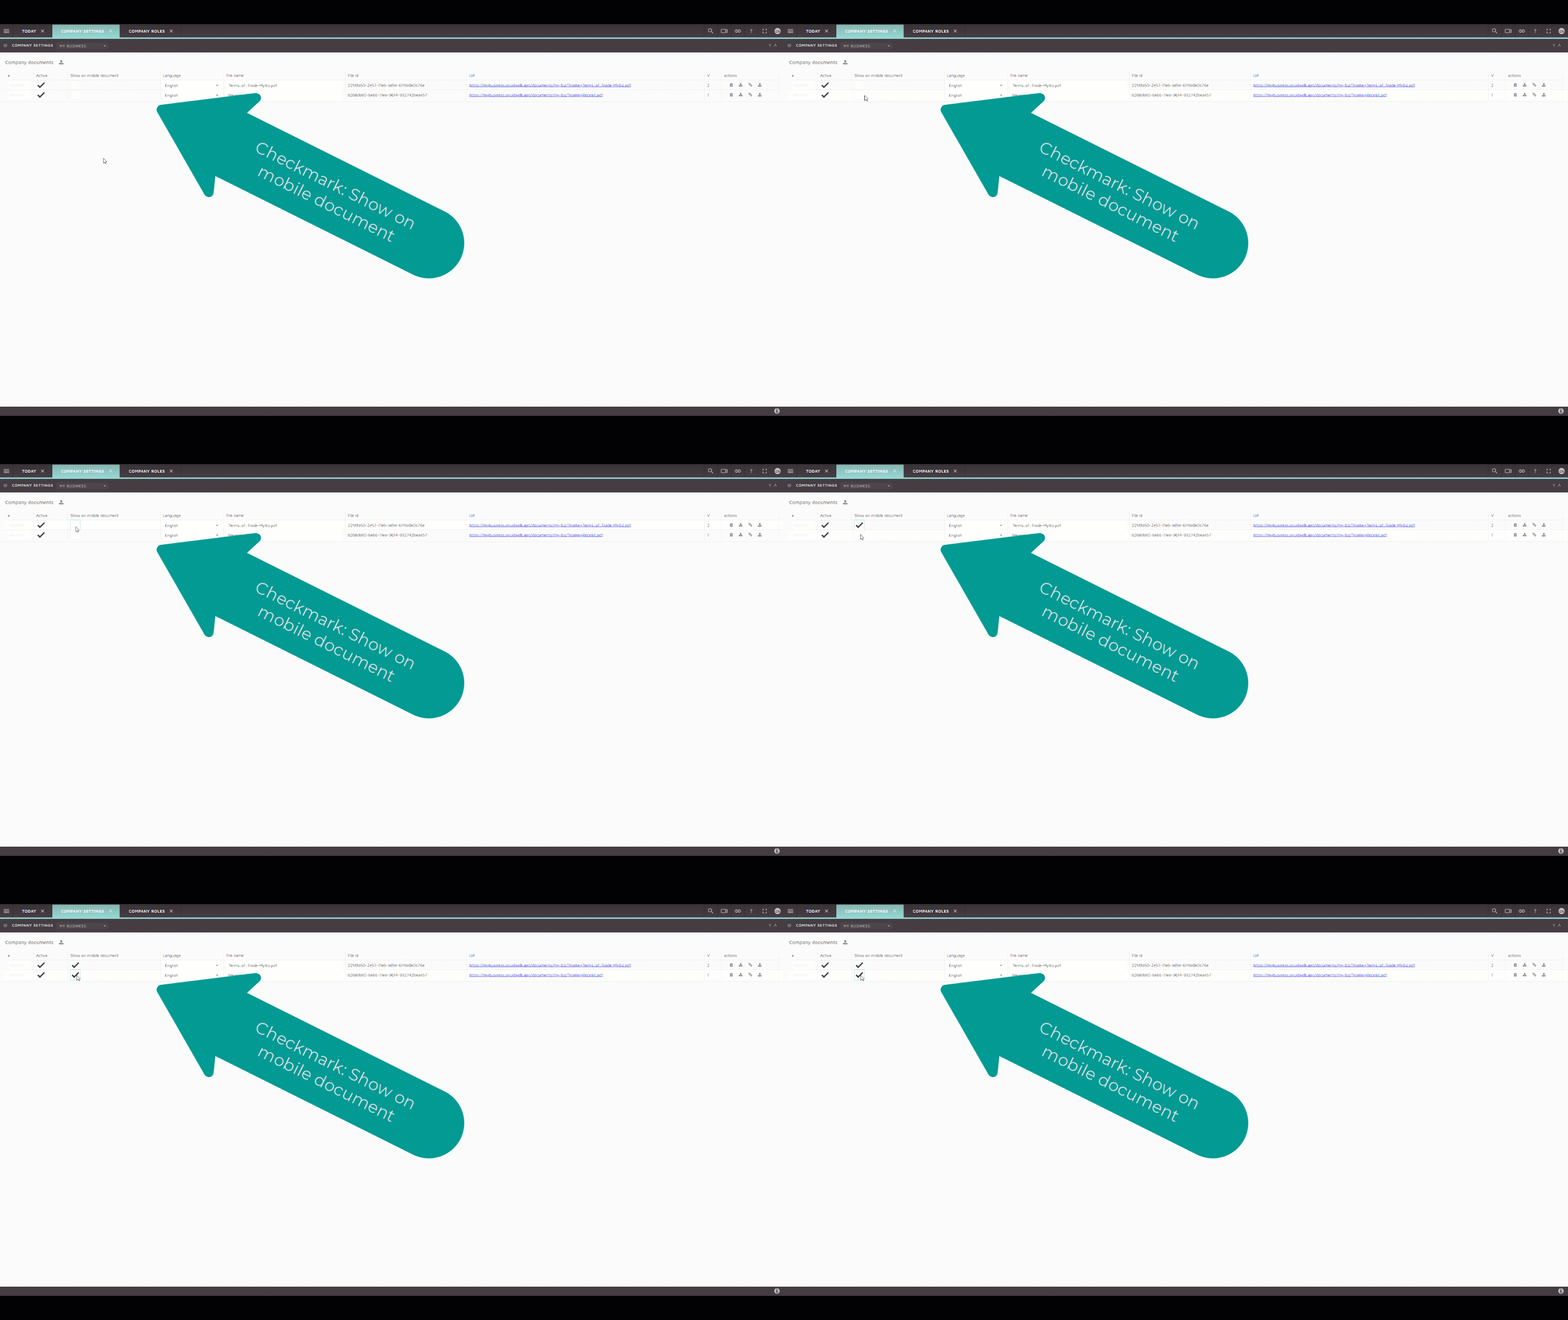
Once the rights have been given the company documents which should be displayed to the users need to be checkmarked under Company Settings
Rate Card Documents
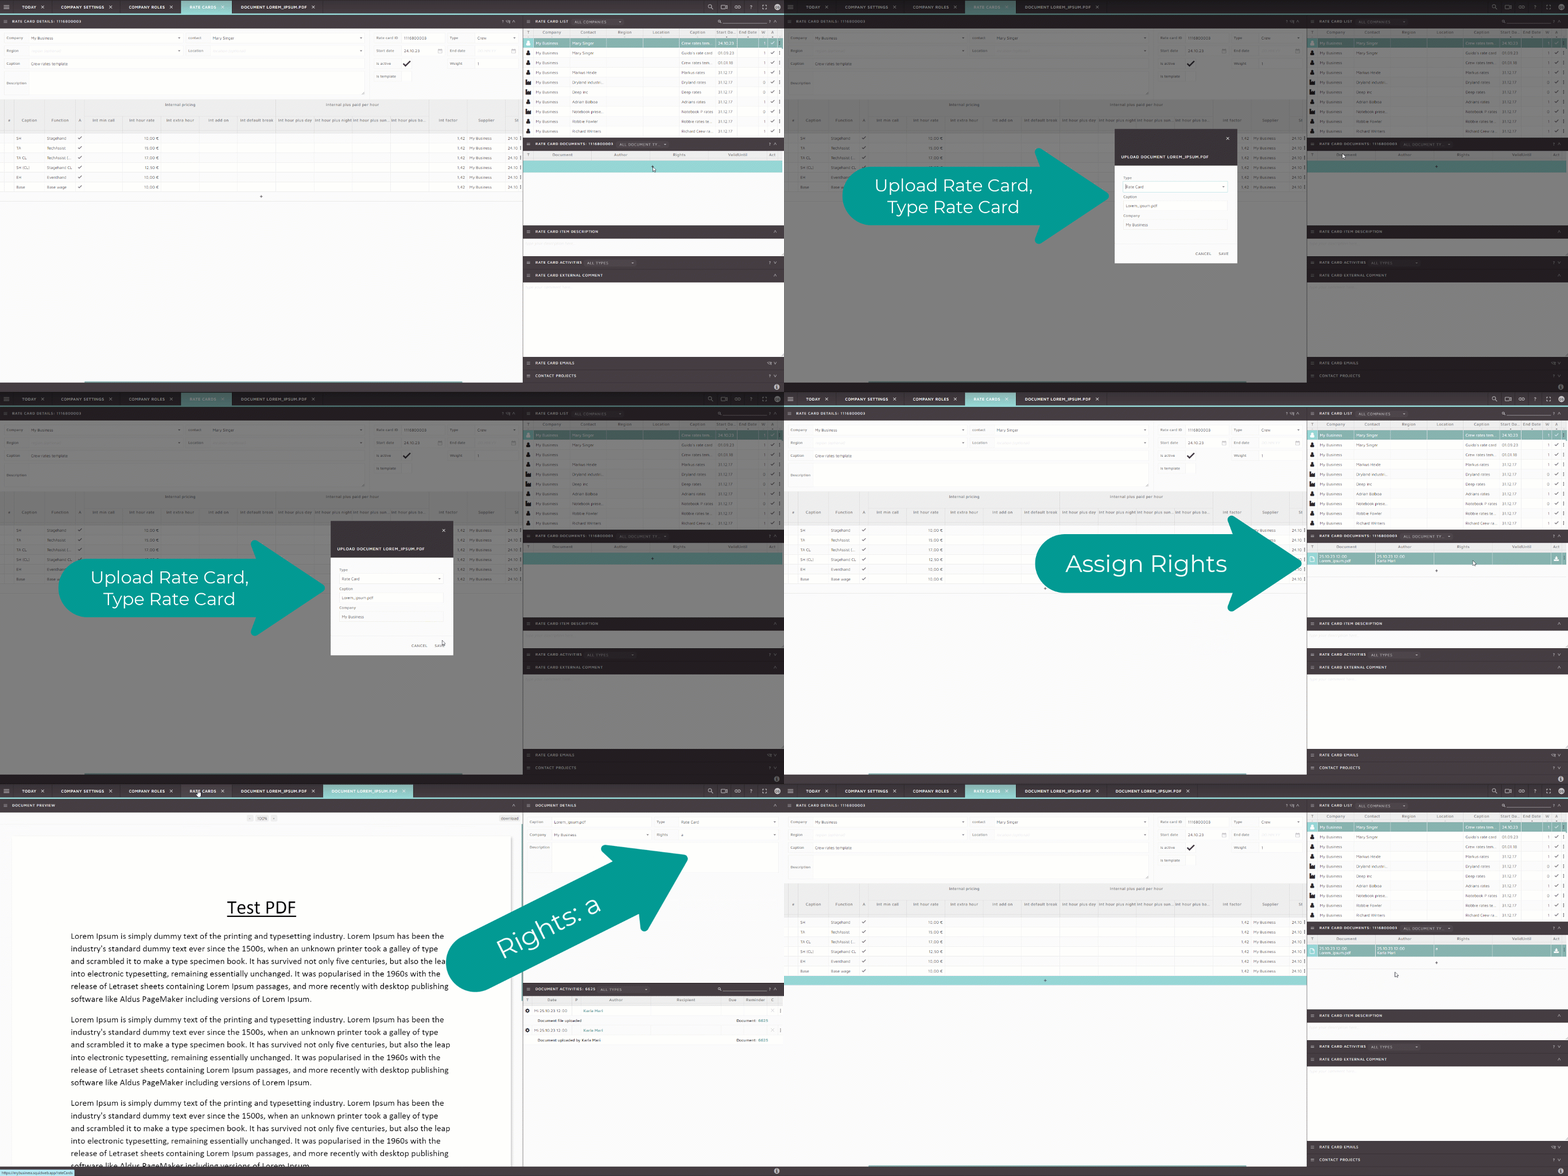
Under rate card documents container, the document can be uploaded and the rights must be given under column: Rights (assign:a). When uploading a new document the selection under Type must be Rate Card. In order for the Rate Card Assignments to be viewed the permission Read Rate Cards need to be given.
Viewing Documents under Mobile App – Mobile Documents
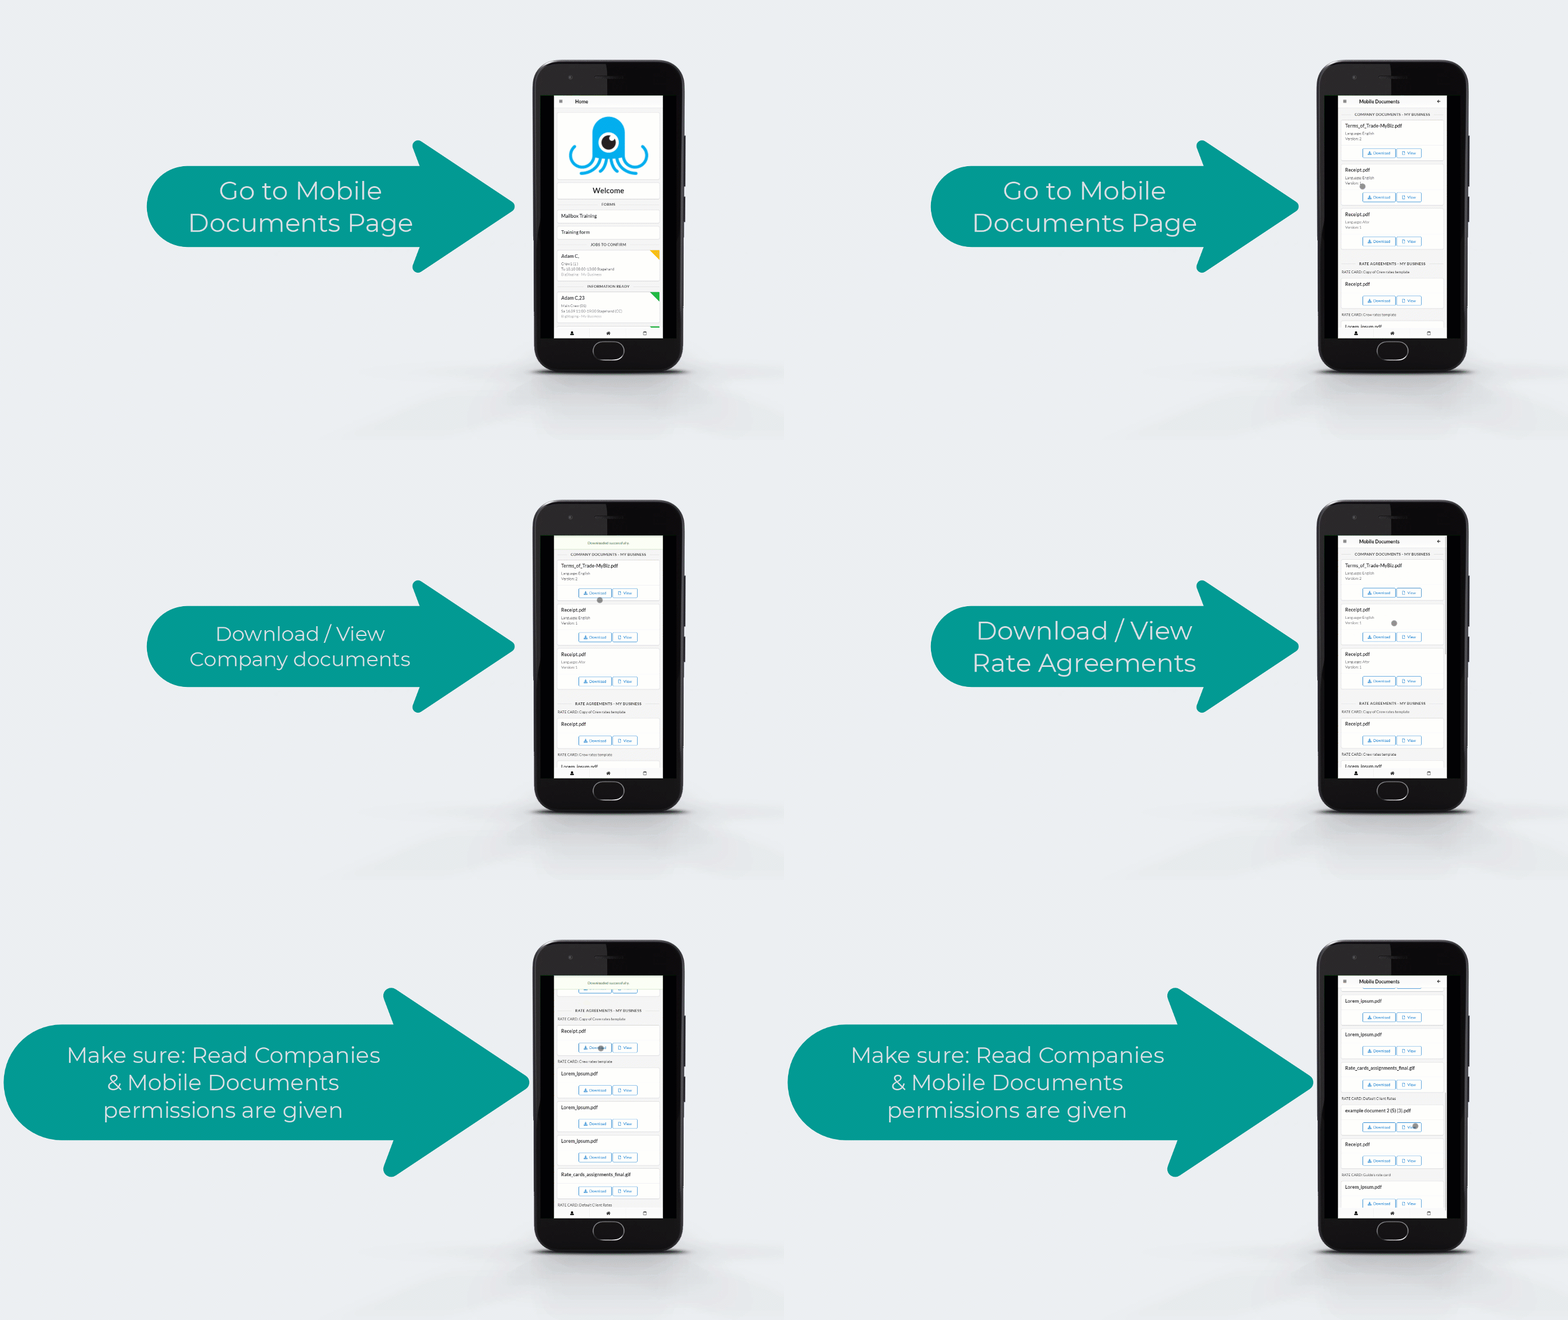
Once the appropriate rights are given (read Companies& Mobile Documents) and the documents checkmarked the crew member can view the documents under Mobile Documents. The documents can be downloaded or viewed directly via mobile app
Crew member expenses upload
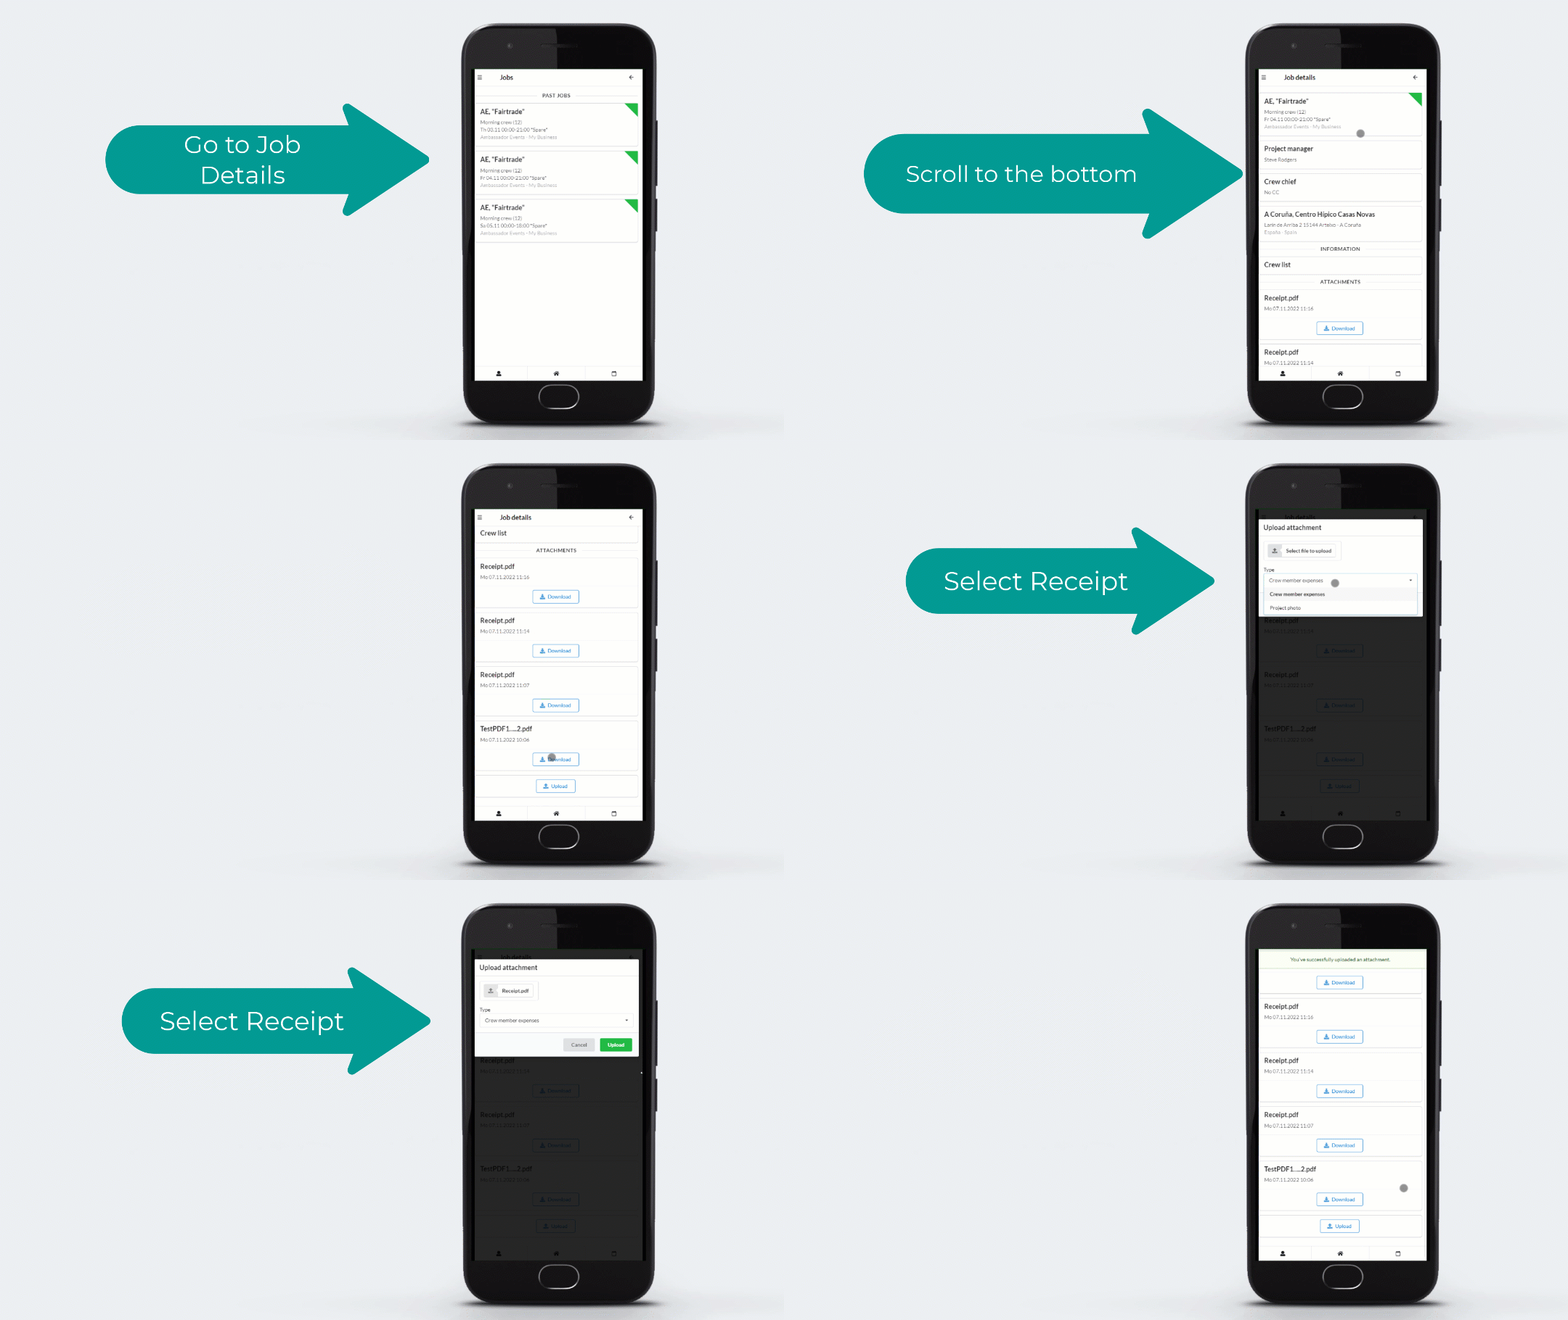
A crew member can upload the expenses directly in the mobile app where they can be then viewed and processed by the office crew.
In order to upload the expenses the crew member must log in to the mobile app and access the jobs page, select a particular booked job and scroll to the bottom of the page.
The type to be selected is ” Crew member expenses”.
Contact details – DHL Label Creation
In order to be able to see the option for DHL shipping under Contact Details the company settings need to be set up accordingly.
Create New DHL Shipping
Recipient Address – populate with the according name and address by filling in the below fields ( if they haven’t already automatically been filled in).
*name
*name add
*Street address
*house number
*address add 1
*postcode
*city
*state
*country
Parcel information – populate with the according details pertaining to the sender in the below fields
*Sender company
*Sender address
*Shipping dimensions
*Length (cm)
*Width (cm)
*Height (cm)
*Weight (kg)
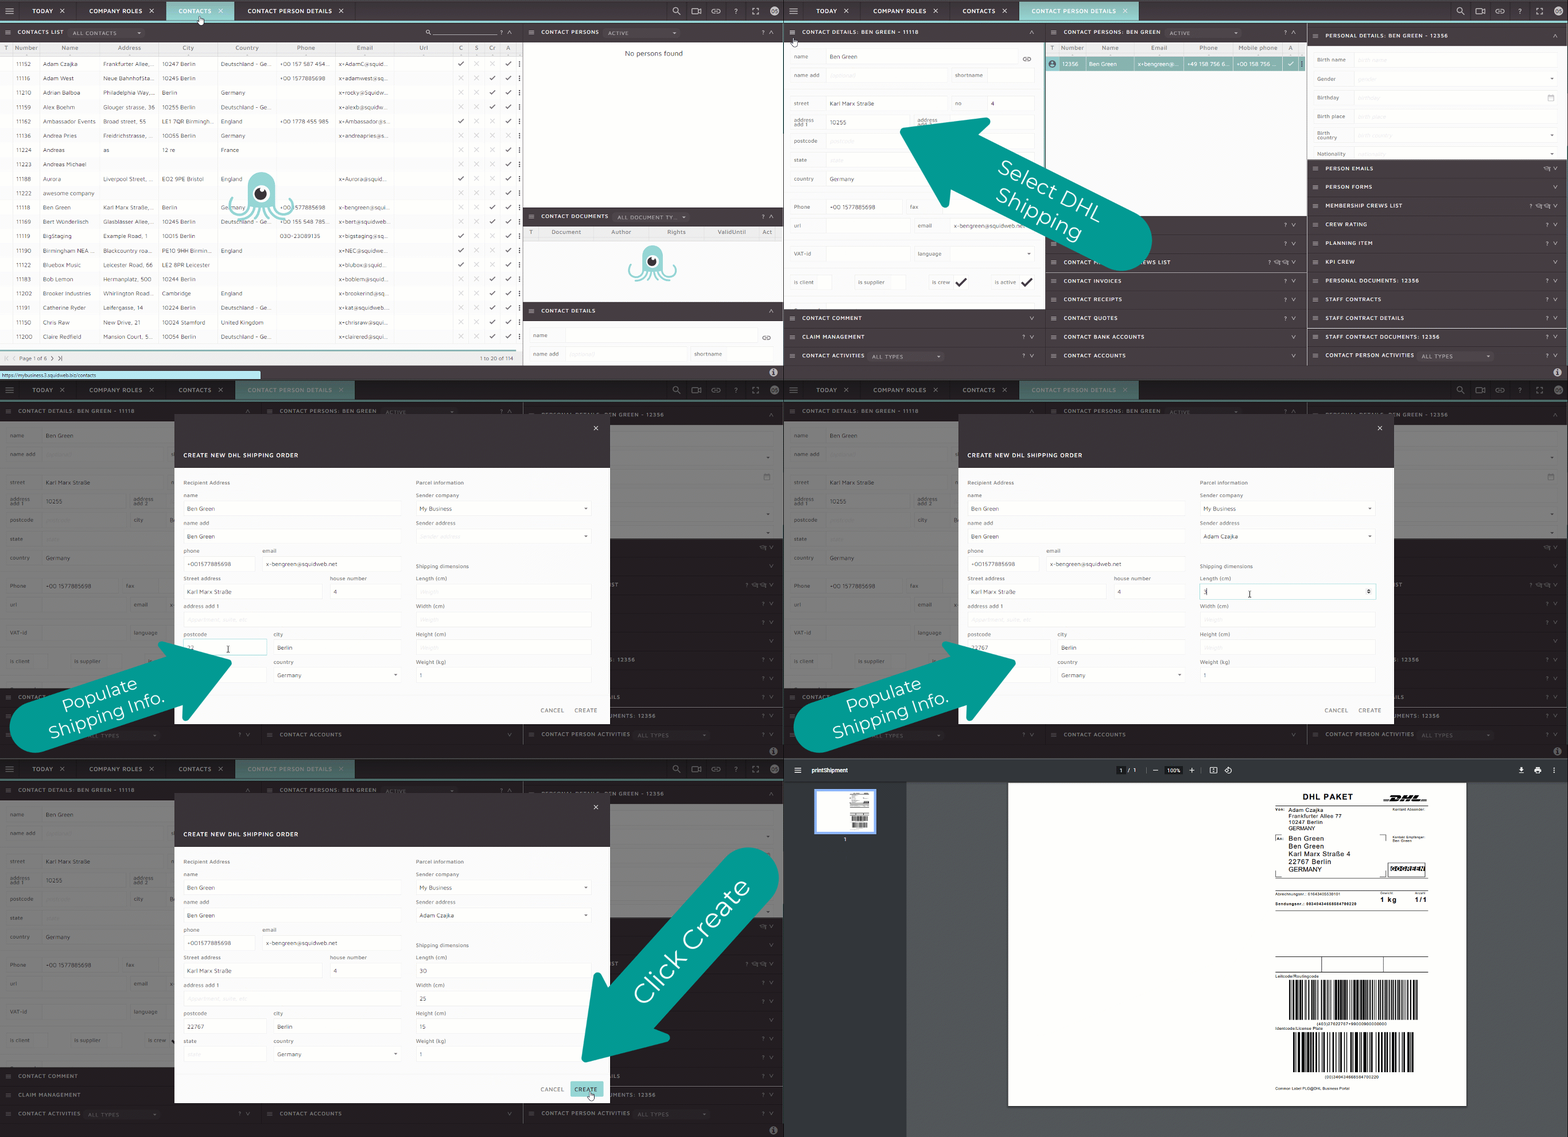
Once all the above fields are populated click on CREATE and a new tab will open with the DHL Paket label shown.

The shipping / tracking number can also be found under the Contact Activities container.

For a faster execution of actions enable the row selection so that project crew items can be selected. Once the row selection is enabled select as many or all group items with crew members.

When the selection is done now the bulk actions can be selected.
Bulk action: set status
When selecting bulk action: set status the dialog “Set status for x of x items” opens and within the dropdown selection user can select the following statuses:
* Has been cancelled
* SparetoFix
* Has changed
* Confirmed
* Requested
Upon selection one of the options from above an email dialog for sending new emails opens with the prefilled email template. Keep in mind if there is no email template created for the different statuses a toaster error will appear with the following message: “No templates for MSGJobHasBeenCancelled defined. Please contact with templates administrator to set it up.” Once the email is sent the selected status will be shown in the project crew item list under Status.

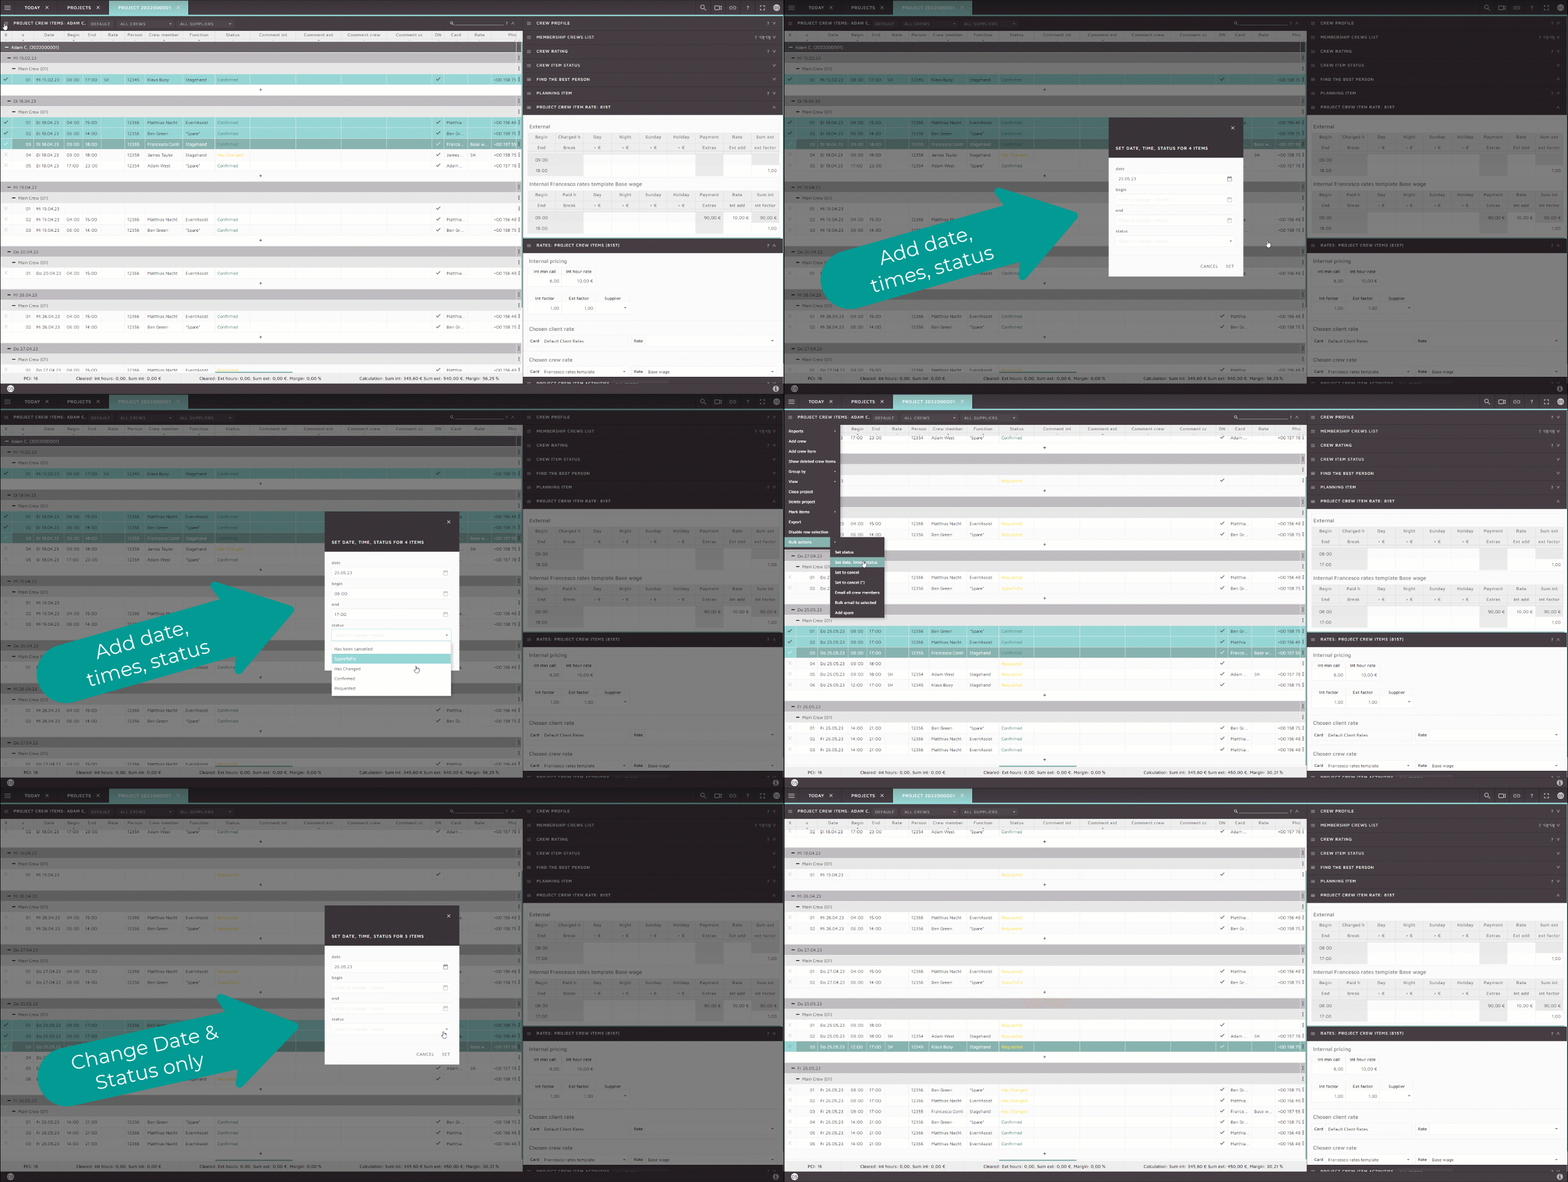
Bulk Action: set date, times and status
A user can perform a quick bulk action by selecting this option and either changing the date, times (start and end time or both) and the status. These actions can be performed altogether or just one out of the three, being independent of each other.
Bulk action: set to cancel & set to cancel (*)
The dialog “Set X items to cancellation” opens and within the dropdown a log note can be added to reason why the cancellation was selected. Once cancellation has been set it will be shown under the “Functions” column. When selecting the set to cancel (*) the cancellation will not be shown everywhere. Simply stated the cancellation will be more internal and will not appear under quotes, calculations etc. The exact mapping of appearance can be found here: Page: Projects#Based_on_functions_and_functions_types

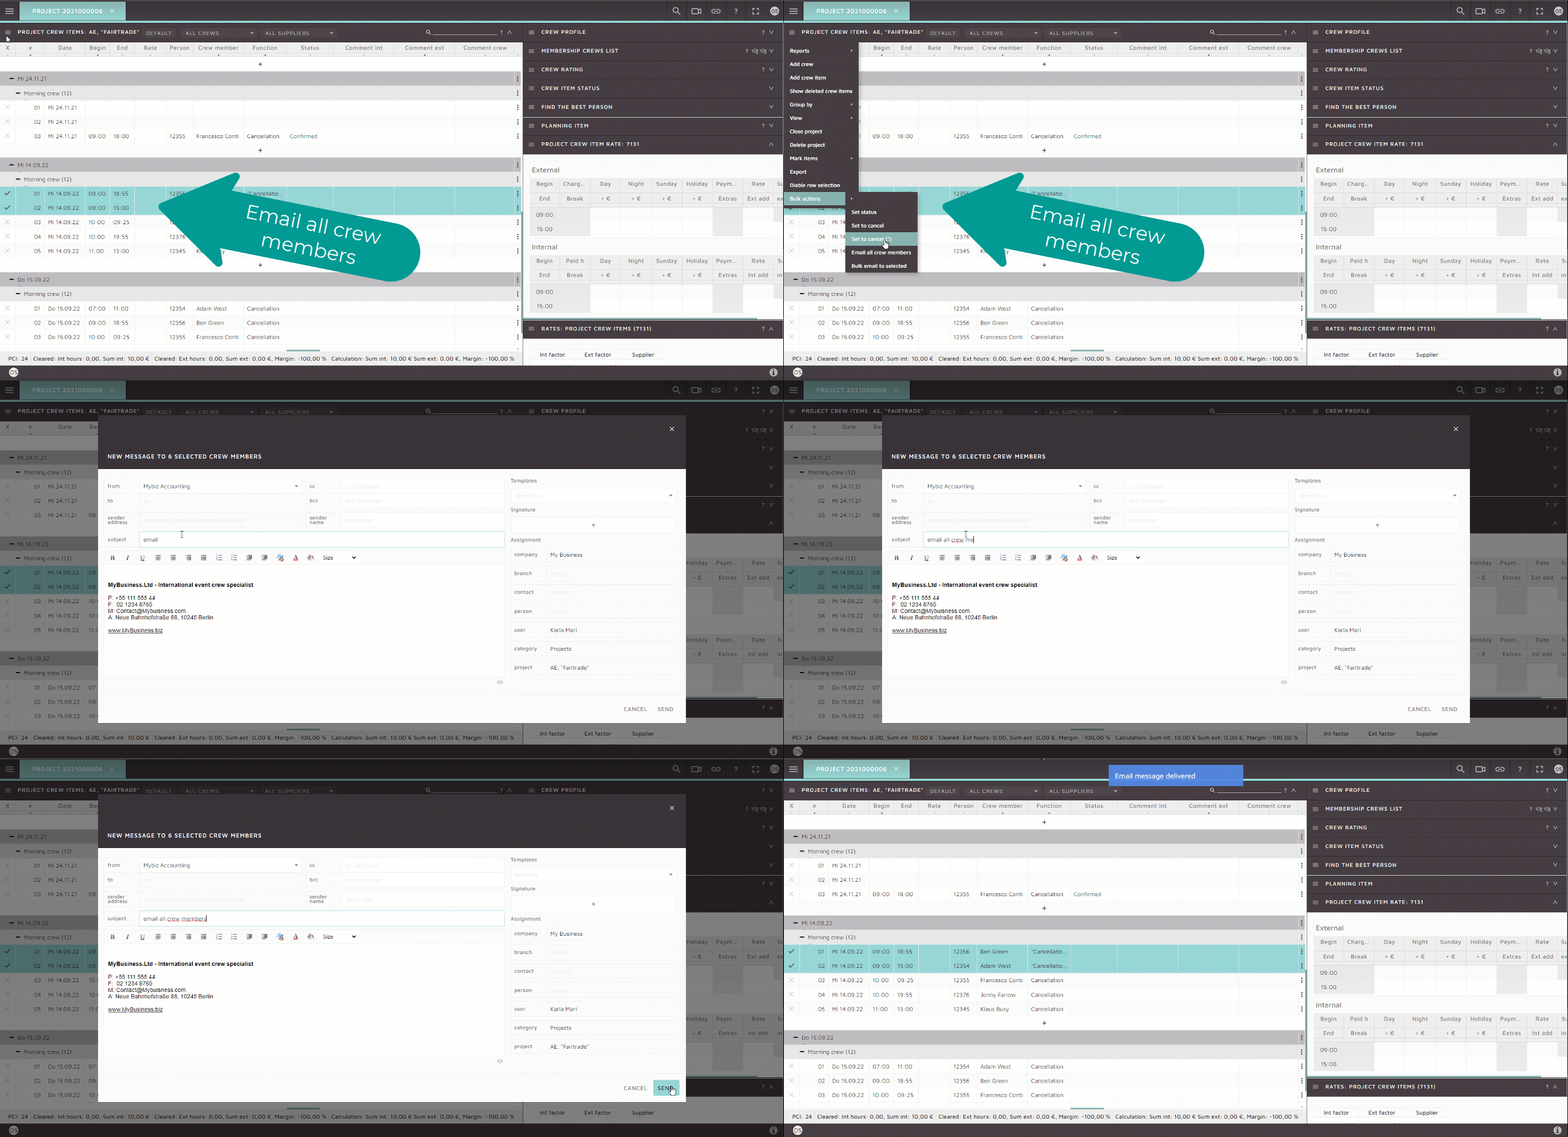
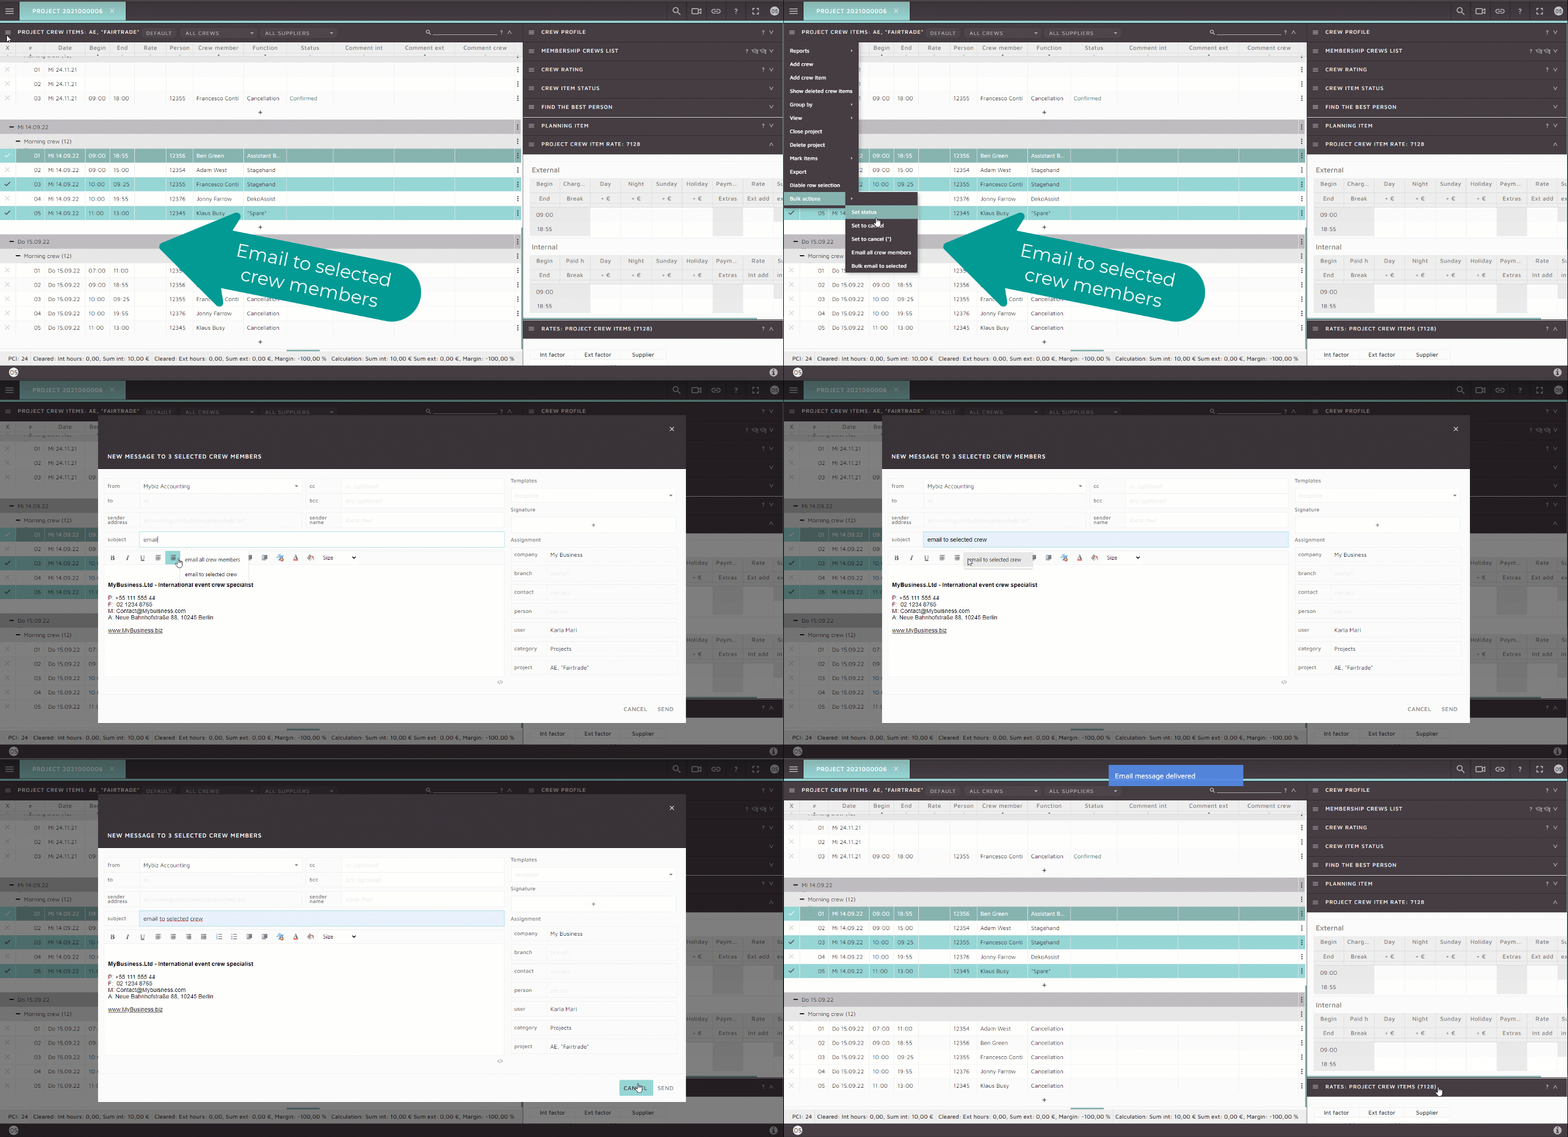
Bulk Action: email all crew members
The dialog opens with the email “New message to X selected crew members”. All crew members can be emailed given that they have an email set up within their profile. Once the email is ready to send, click send and the email will be automatically send to all crew members.
Bulk Action: bulk email to selected
Once the row selection has been enabled and crew items have been selected the user can select Bulk email to selected and the dialog will open with the email “New message to X selected crew members”. Only selected crew members will be emailed.
Bulk Action: add spare
A quick Add spare action can be performed to insert a new position.

Automate the process by adding a robot to add spare.

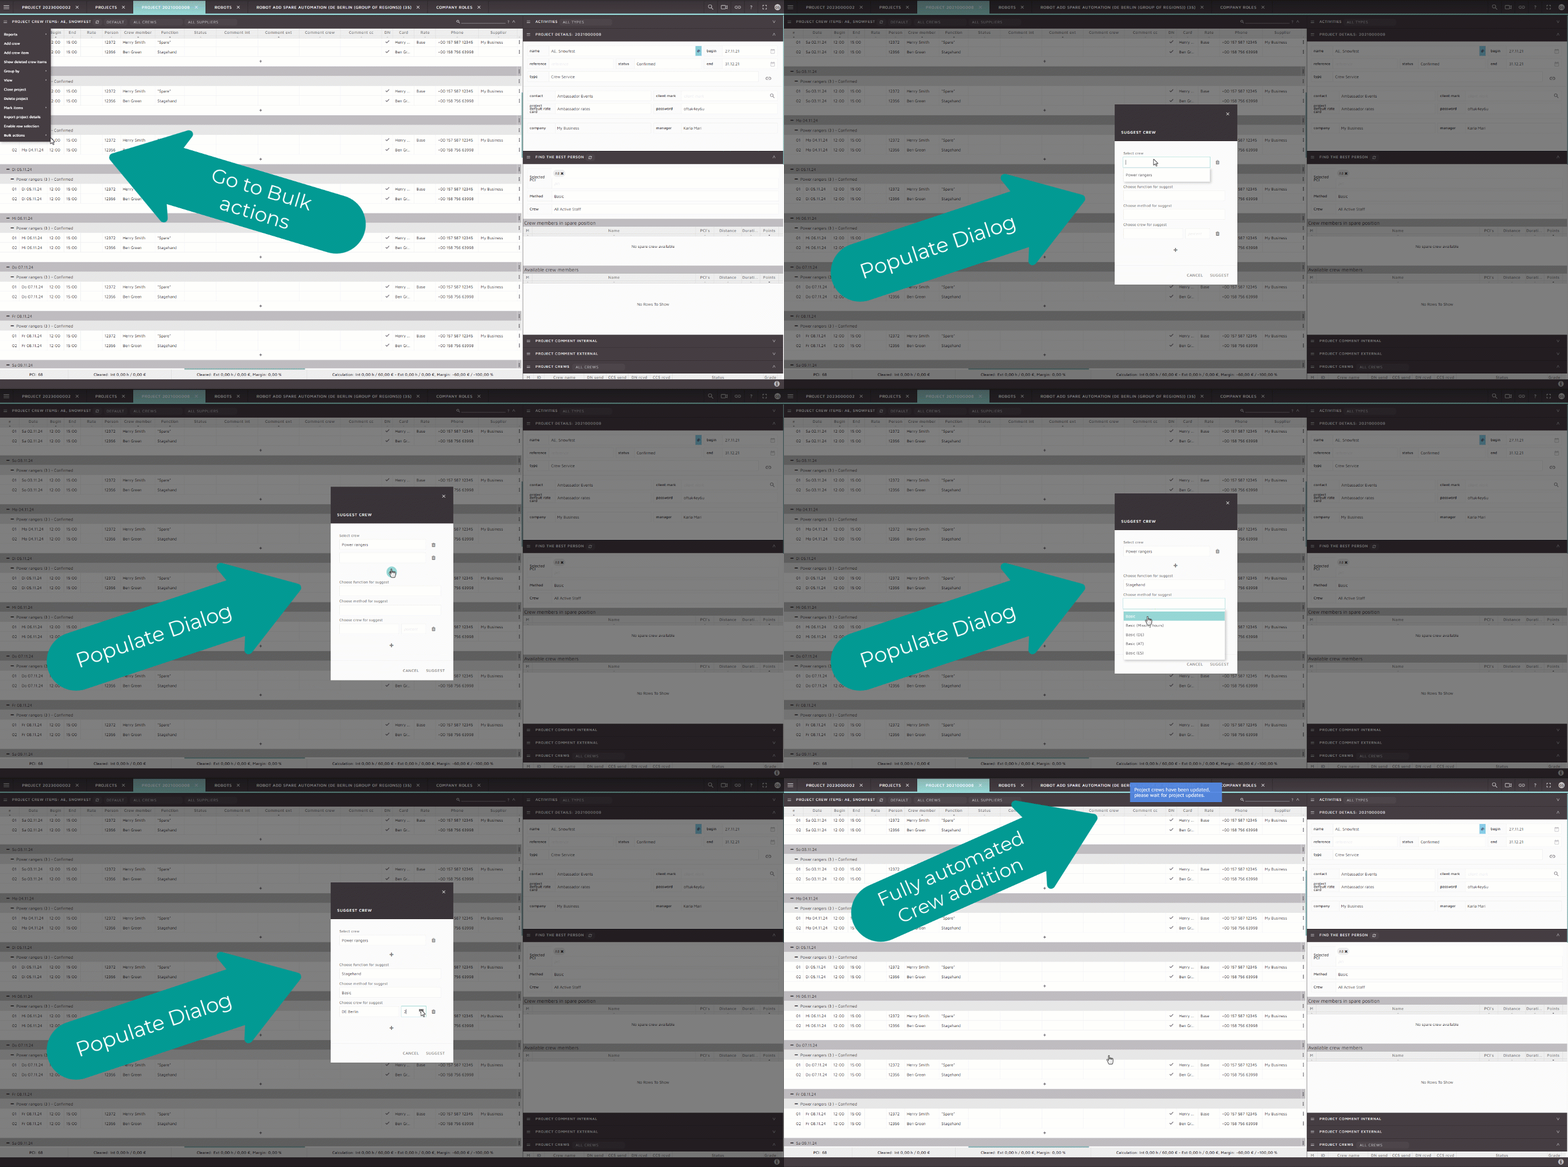
Suggest crew
A user can perform a bulk action on suggesting a crew members based on the input data. Unlike the Find the best person feature this option is a fully automated option meaning the Project crew items will be automatically changed based on the suggested crew.
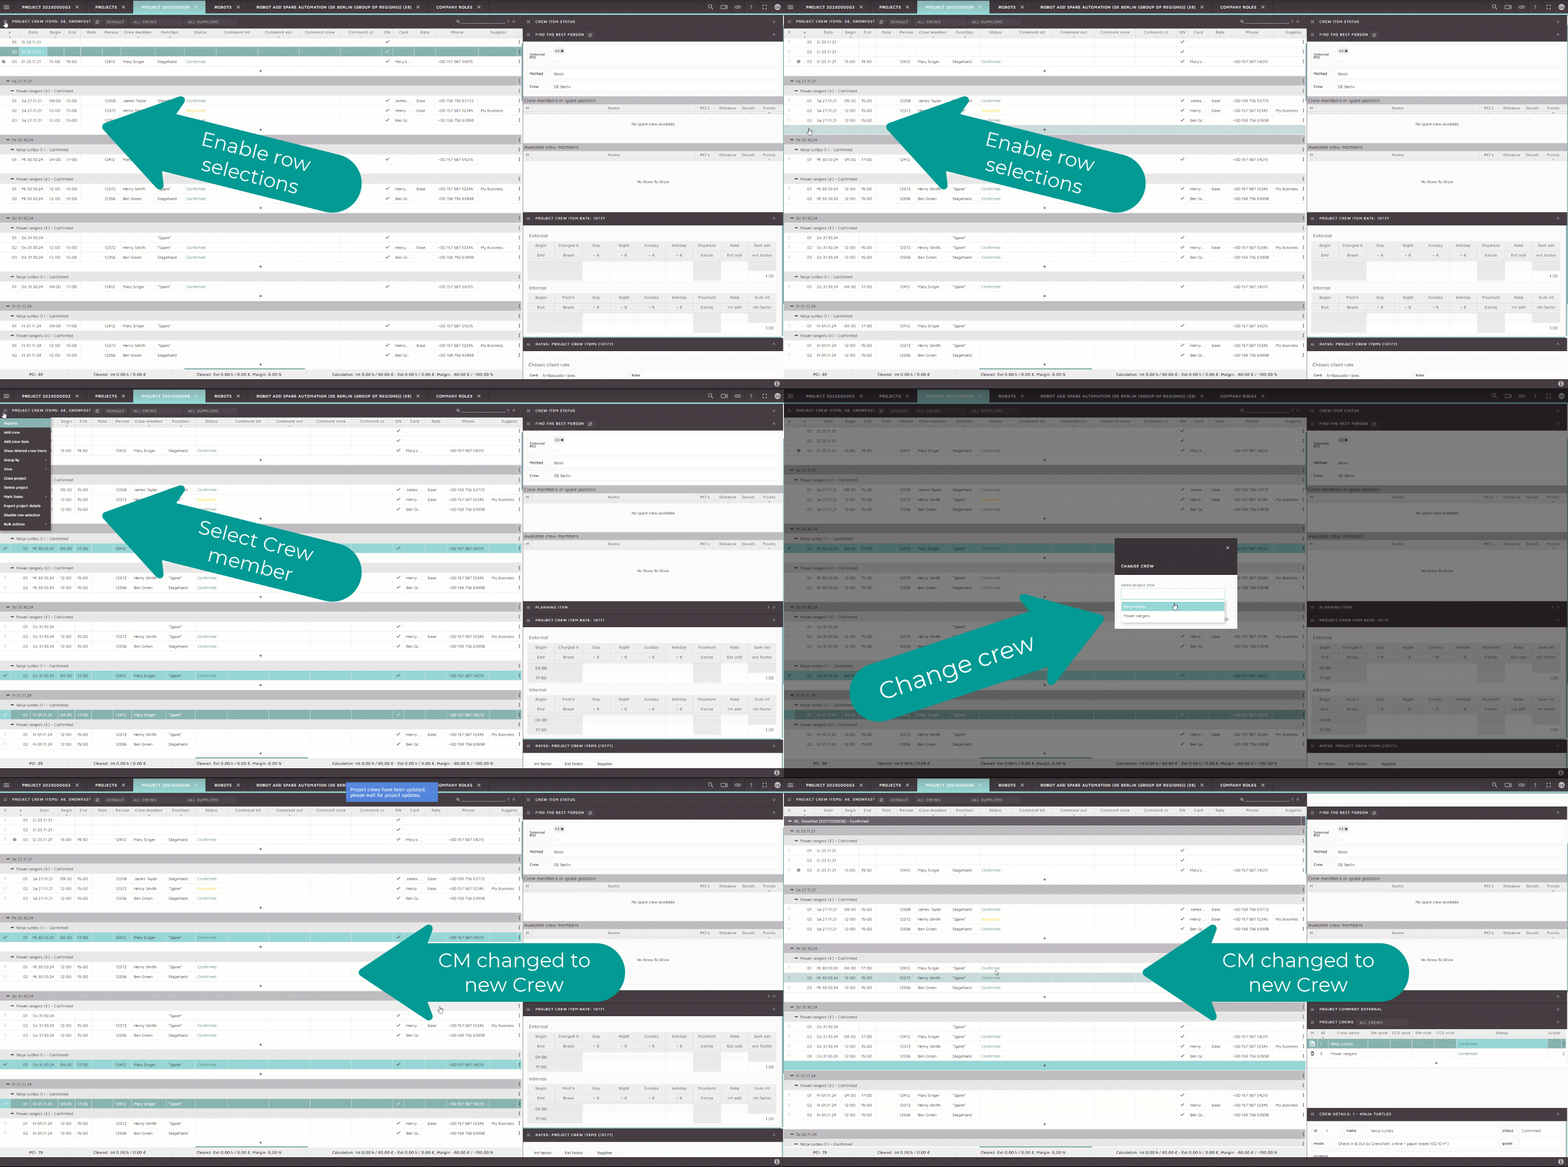
Change crew
When crew members need to be changed from one project crew to another, the bulk action can enable a quick and easy chanbe by selecting the crew members and applying Bulk Action Change Crew.
SquidWeb Messenger is a self-hosted online chat service with file sharing, search, and video conference capabilities. It is designed as an internal chat for teams and companies. A company server be organized into public and private channels with select team members, as well as direct message to one another. The service also offers video conferencing for meeting hosted on Jitsi for team, or individual, calls.
SquidWeb messenger also send daily announcements to users. These announcements can be customized, through the use of SquidWeb Robots, to your company’s needs to give whatever information you find most necessary for the team, such as when a notification when a project is closed s well as it’s turn over and which crew members were absent, daily updates on crew metrics, if a key account needs to be contacted or any other information from SquidWeb that can be useful to your planners.
This allows users to receive important and useful information automatically and regularly without any moderation required.
To set up your SquidWeb Messenger account navigate to user settings in the top right corner of the dashboard and set your username: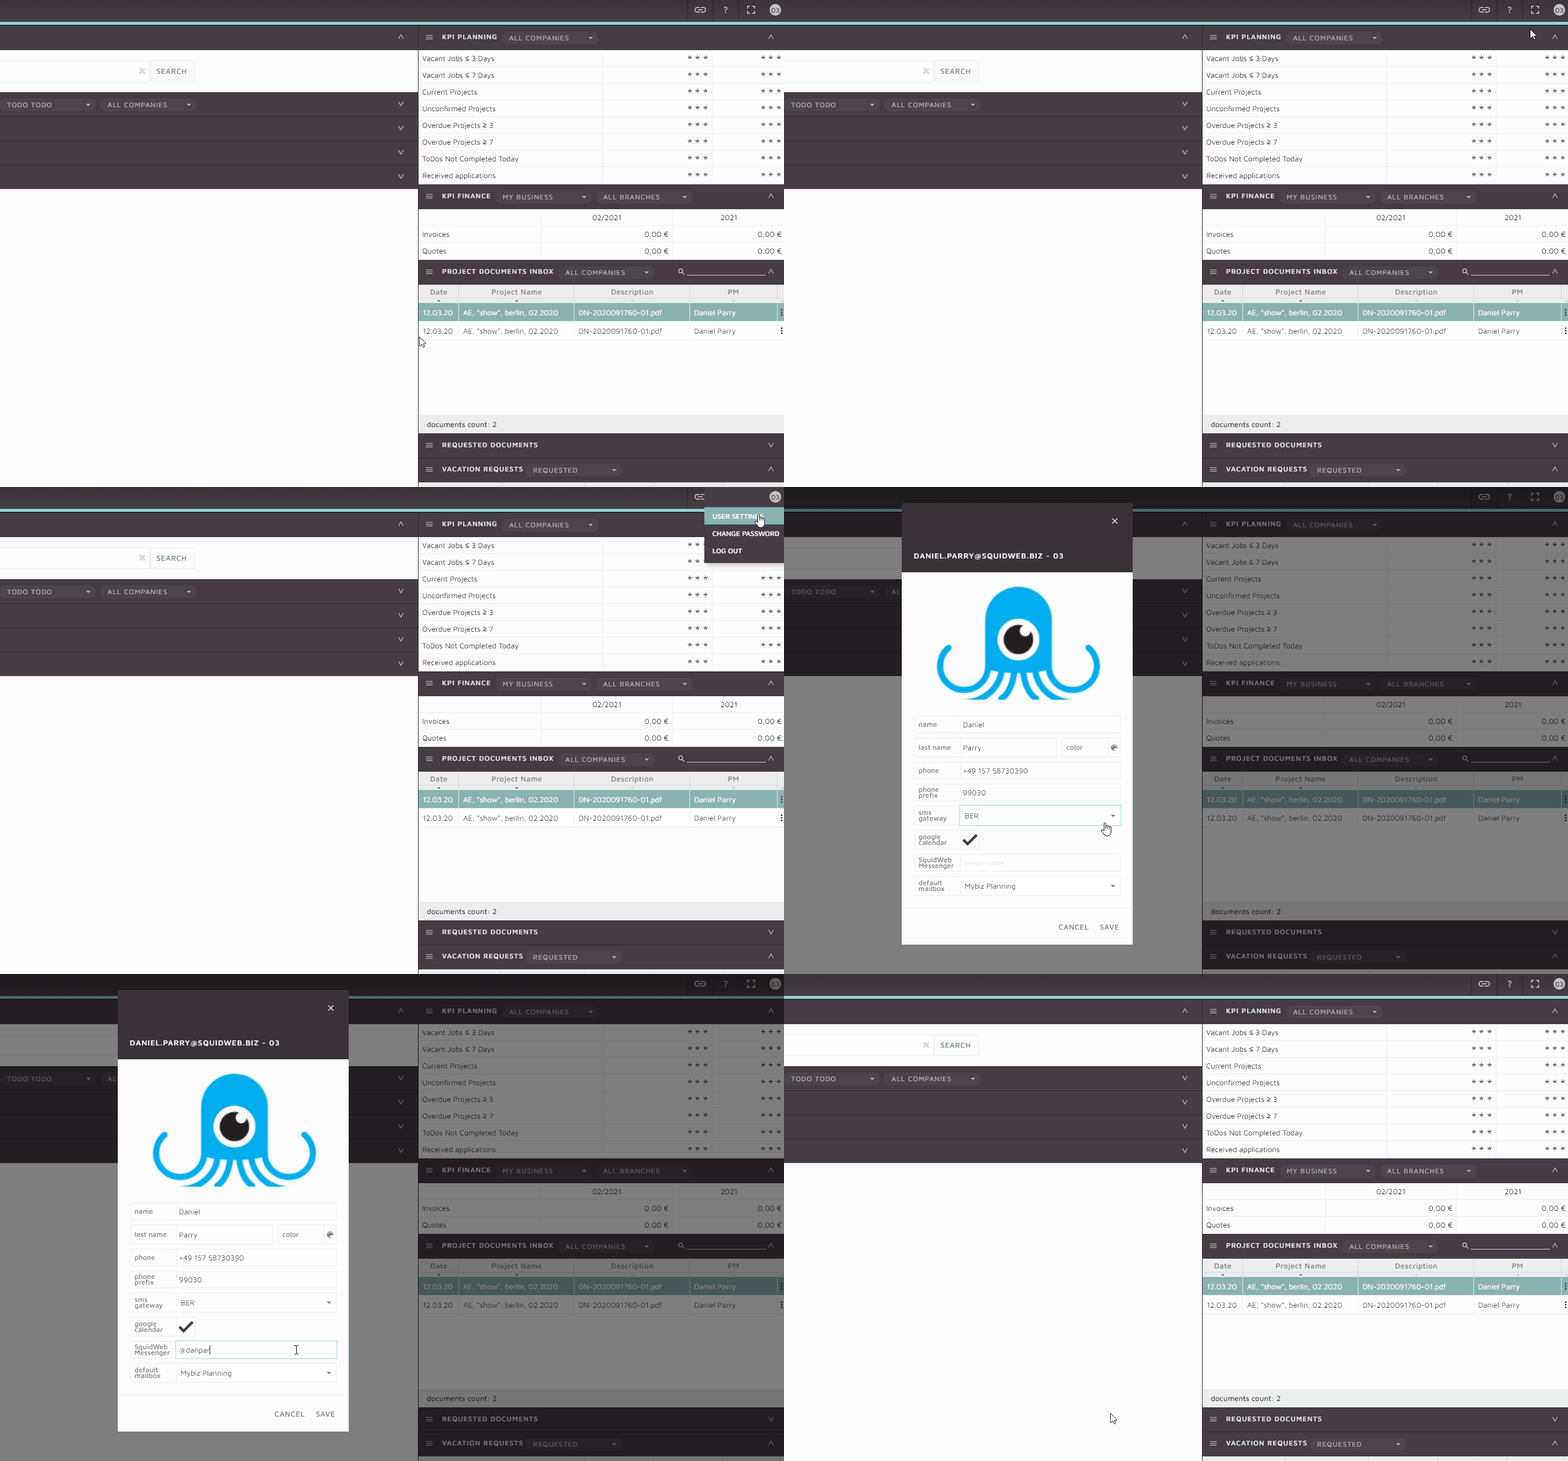
Your company will have a unique URL to access the messenger: https://messenger.squidweb.biz/[COMPANY_NAME] – we recommend saving this to a bookmark in your browser to access it at the start of each work day.
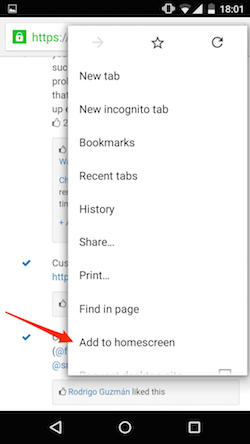
A mobile version of the messenger is also available, it is saved to the mobile in the same way the SquidWeb companion app is saved; simply access the URL on your mobile browser and select “add to homescreen” from the page menu.
