Signatories can be added to a document in SquidWeb, this will allow the document to be signed digitally via the app and returned to the desktop version for storage.
This feature can be used when a new employee is hired in a separate branch to the CEO for example.
In the case of an employee contract, the contract can be generated with SquidWeb’s document template feature. The signatories are then added to it and it can be signed by a CEO in Düsseldorf and the new employee in Berlin without any need for printing or scanning.

This article will explain how to complete this process.

Workflow:
Add variables to document template
Add signatories to the document (Example doc here)
Select signature order
Allocate the signatories
Drag & drop signature container onto the document
Invite signatories to sign
Sign document

Add variables to document template

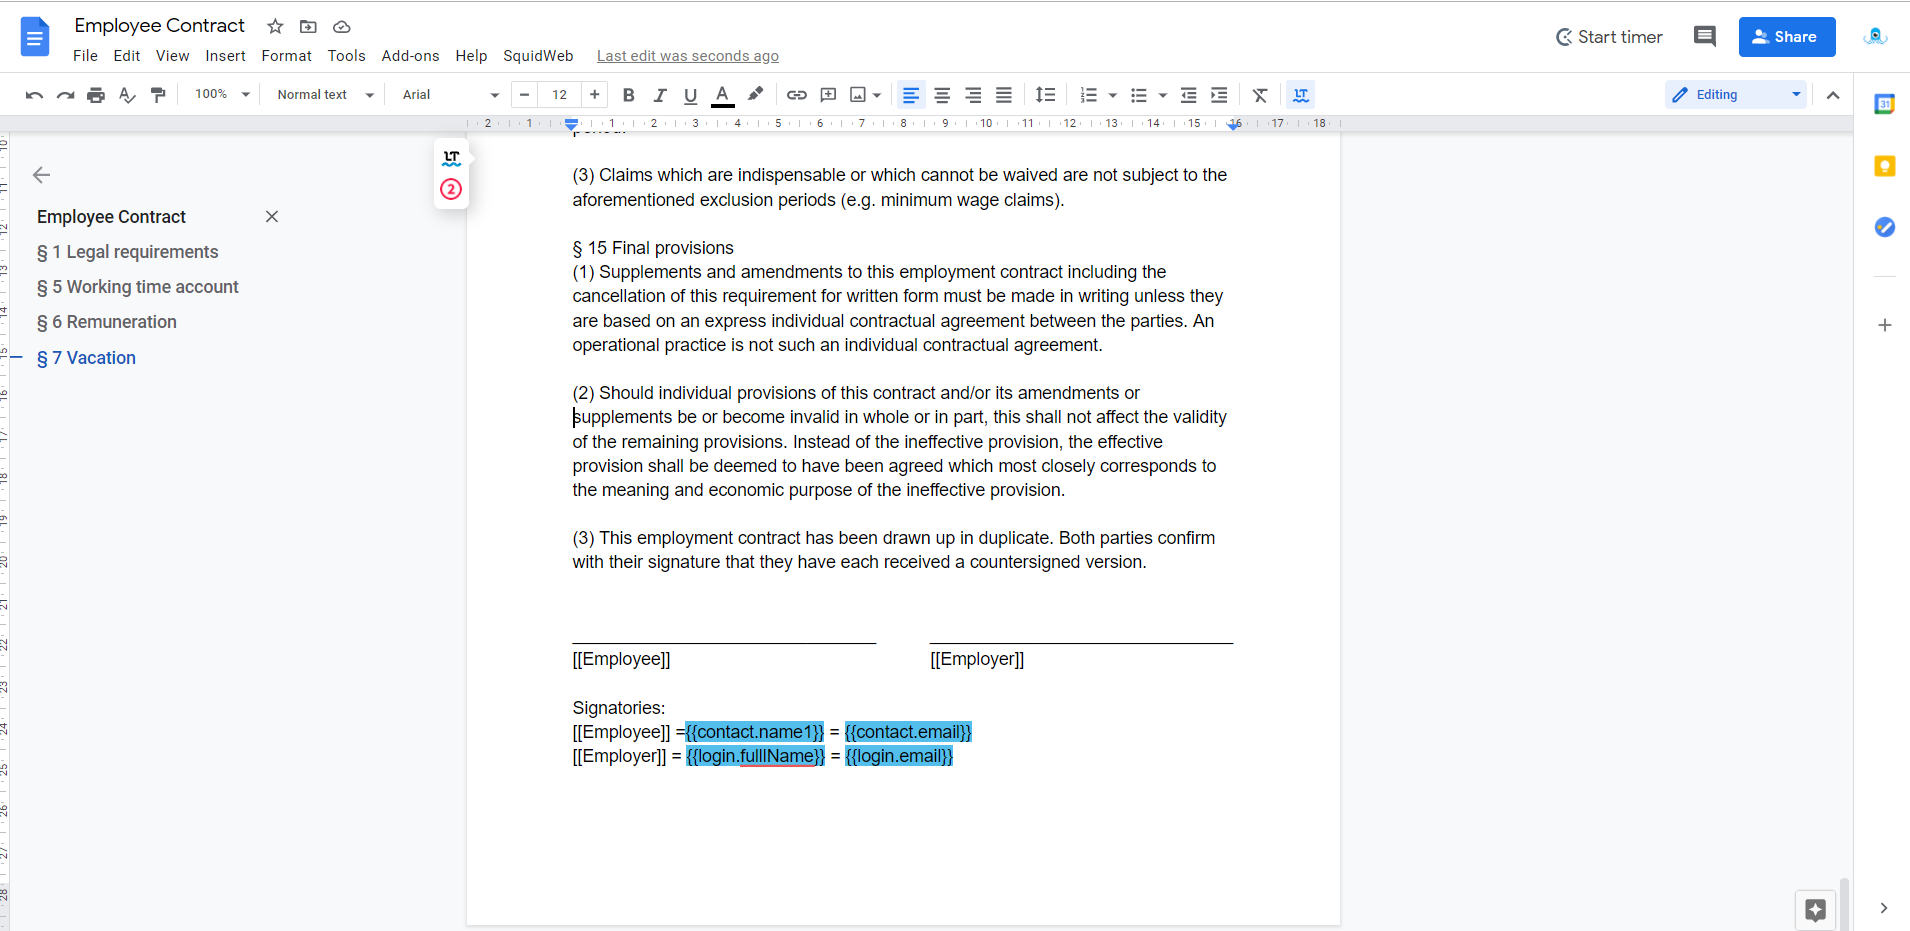
Before this feature is used to add digital signatures to a contract, the document template must be updated to correctly label the participants. To do this, add variables for the employee and employer to the bottom of your contract template like so:

[NOTE: The variables are only highlighted blue for your information]

These variables will be replaced with the correct information when the document is uploaded to SquidWeb.
A copy of the example template document can be found here – EXAMPLE TEMPLATE DOCUMENT

How to add signatories to a document

To add signatories to a document, first, open the document in SquidWeb so it can be viewed on the document preview page.
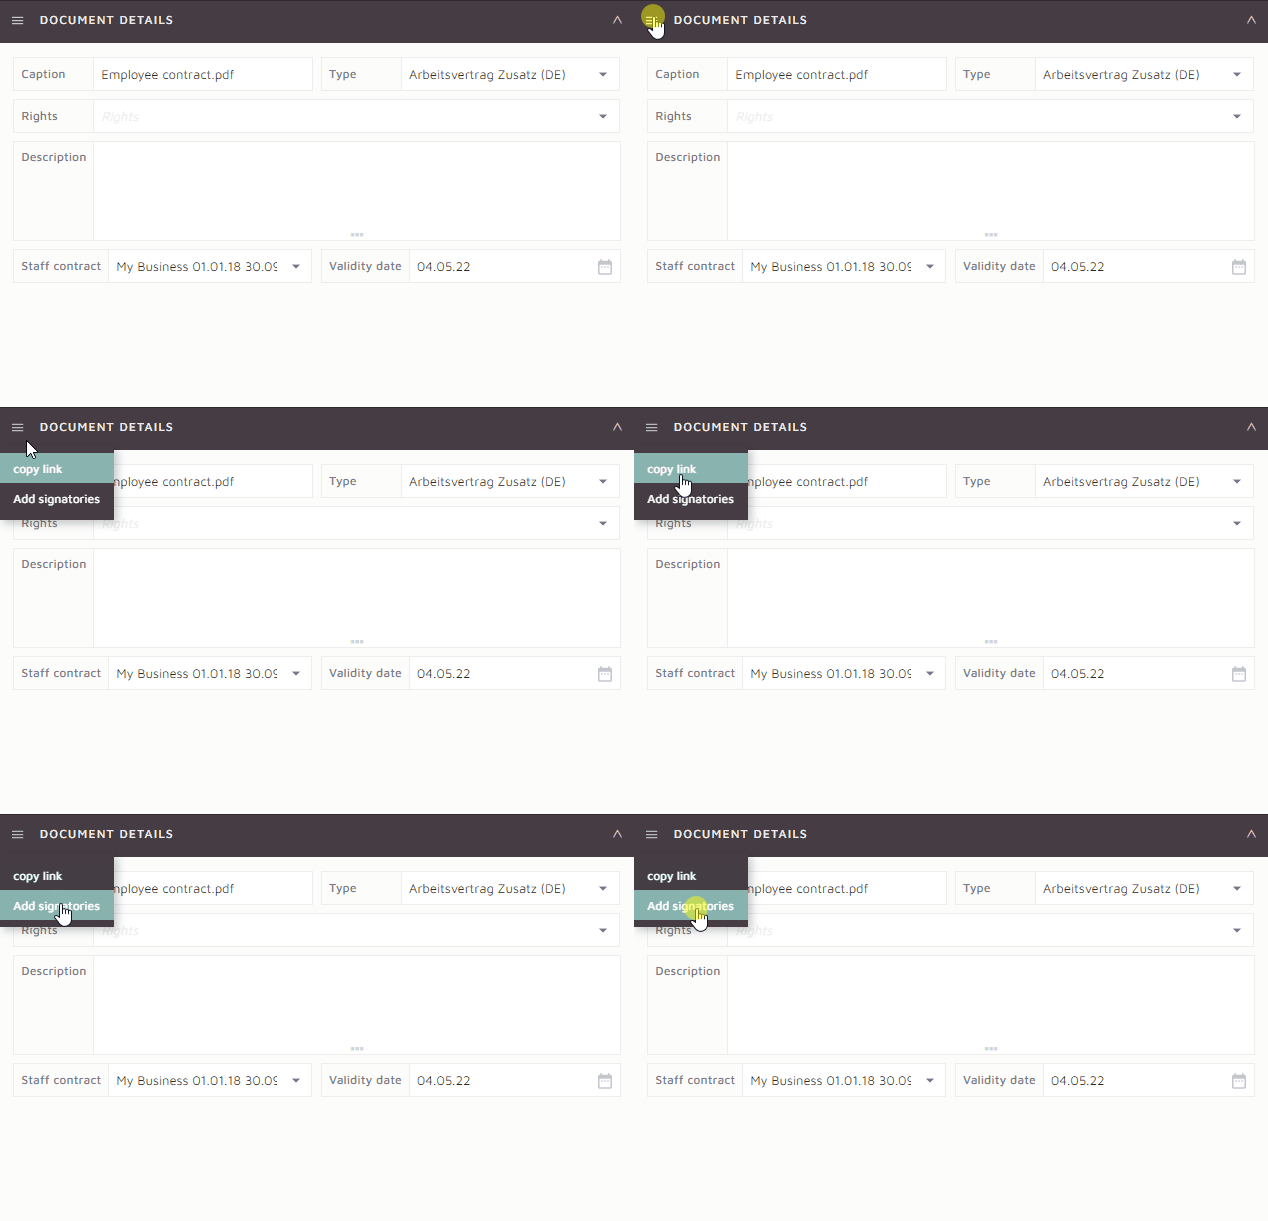
In the container menu select “Add signatories

This will add the document signatories container to the document preview page, it will appear below the document details container in the SidePanel.
The document signatories container will allow you to choose who will sign the document, what order they will sign it in and send an invitation to the signatories to inform them they have a document to sign.
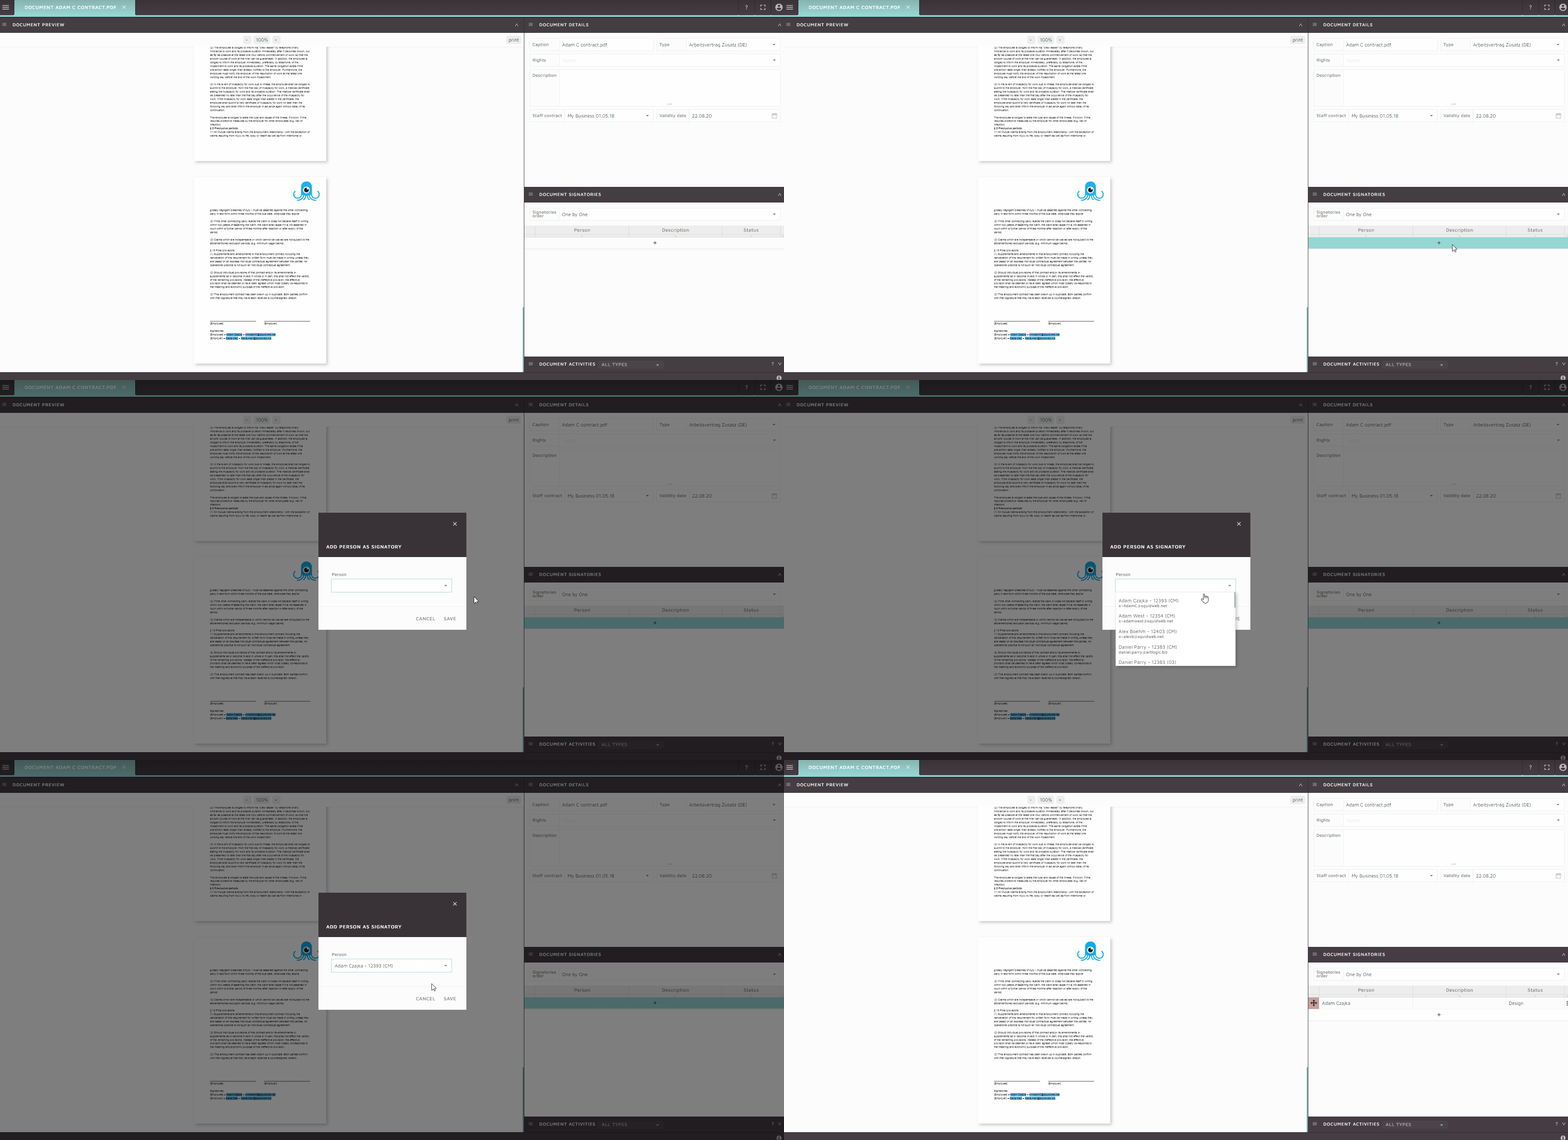
The gif below will demonstrate how to allocate a person to be a signatory on the document by selecting the ‘+‘ icon and choosing from all persons in your SquidWeb database.

There are two signatory orders to choose from:
One by One – the second signatory will only be able to sign document after the first signatory  has signed it.
Parallel – all signatories can sign in any order.

In either case the signatories will sign in the mobile on their own device.

Drag & Drop signature container onto document

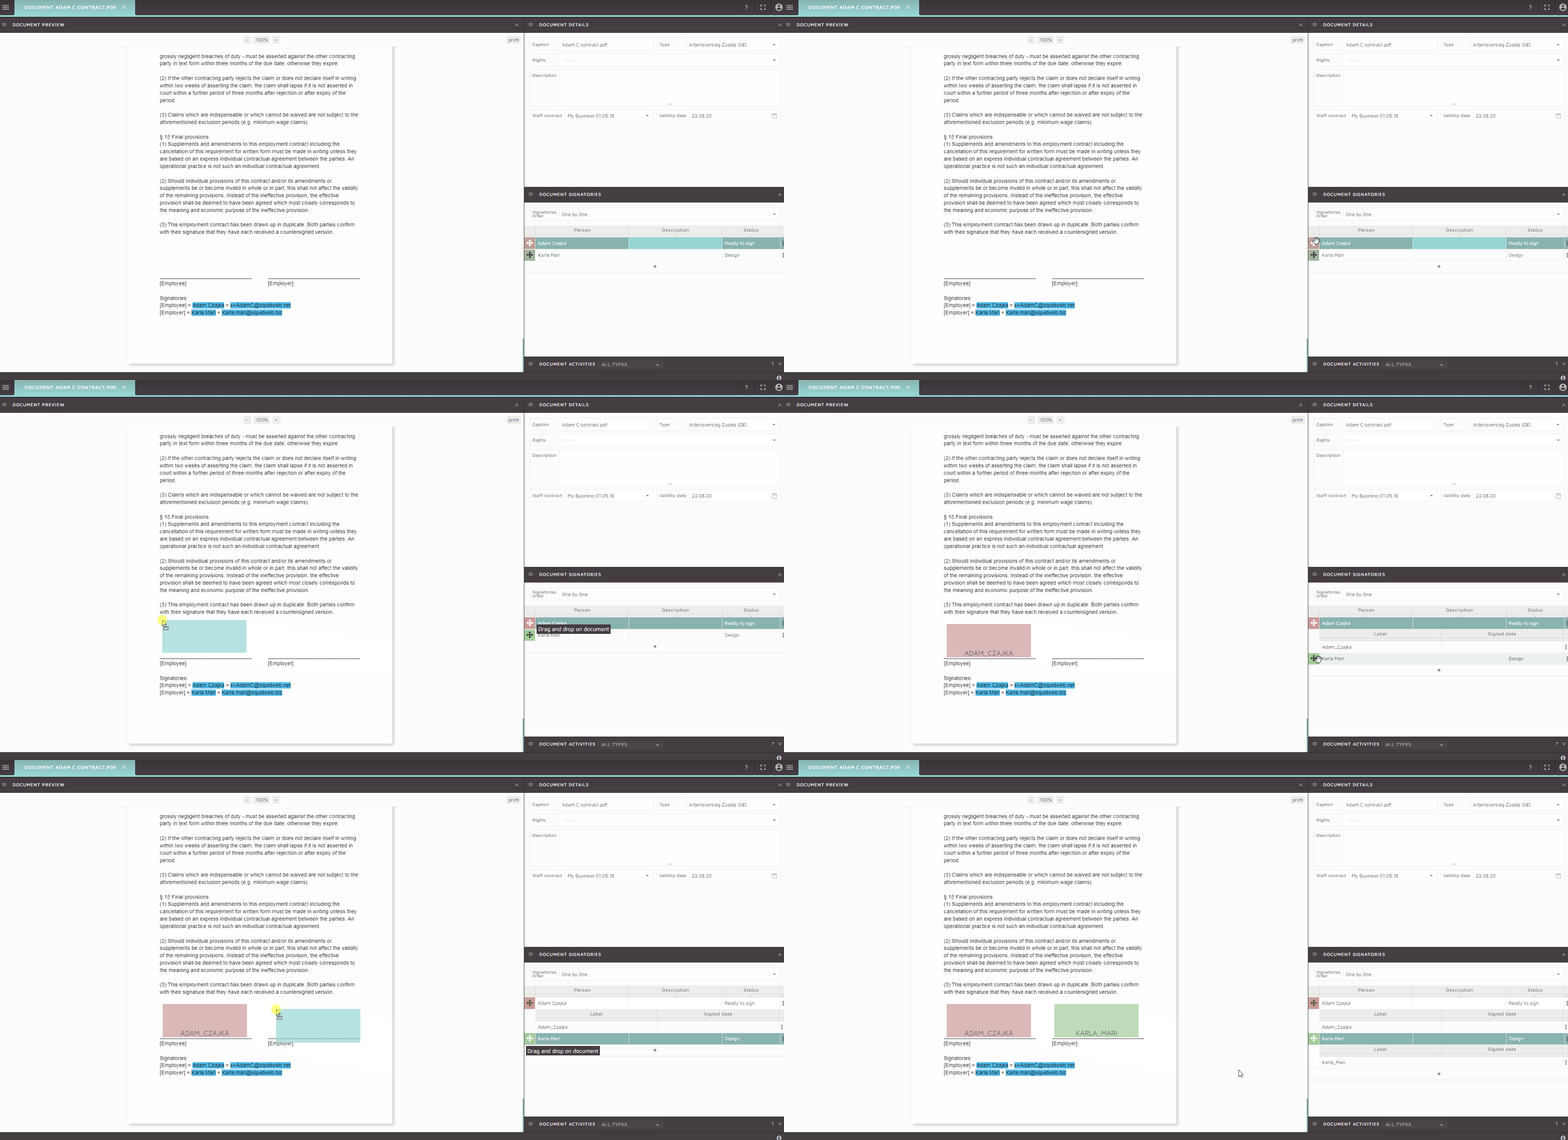
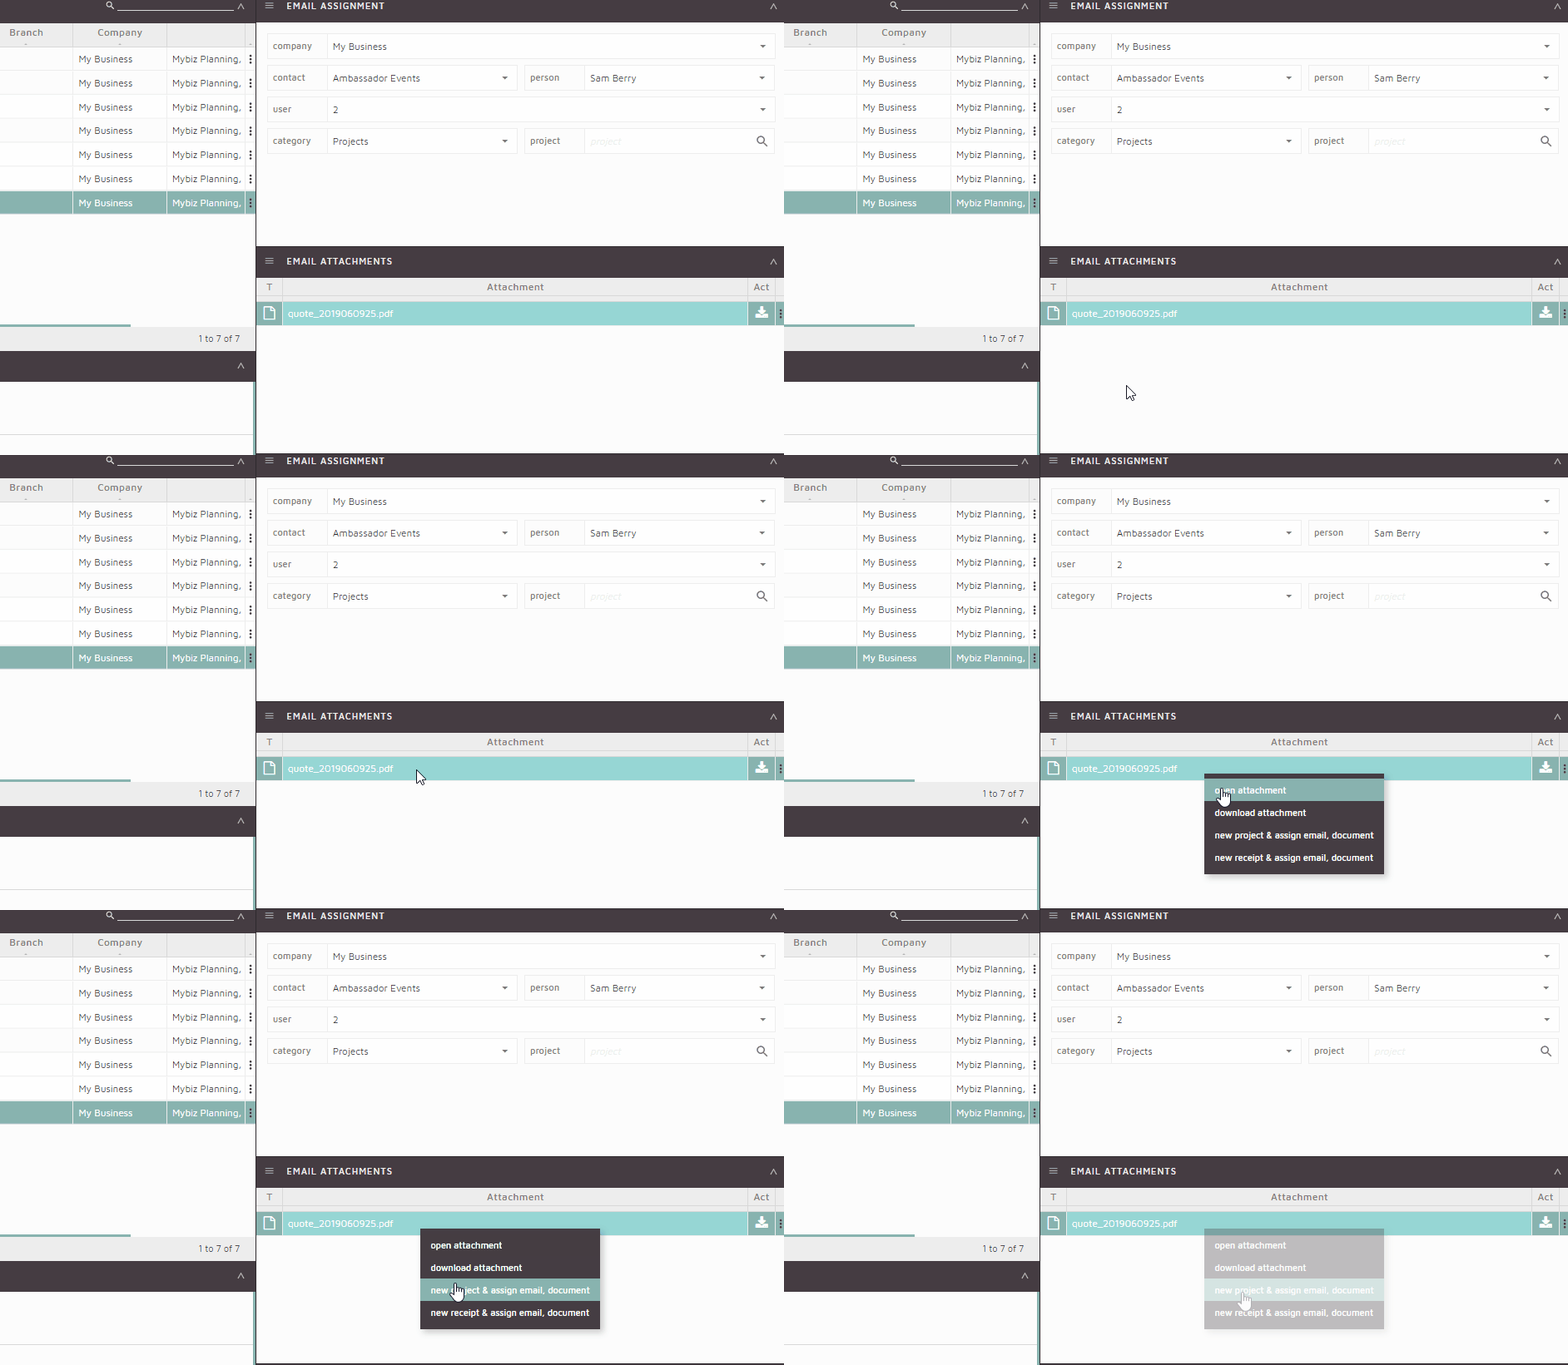
Once the signatories have been assigned to the document, the space in which they are required to sign on the document can be set. This is done by clicking on the icon next to their name and dragging the container to the correct place on the document. Here is a gif to demonstrate:


Invite signatories to sign/set status to ready

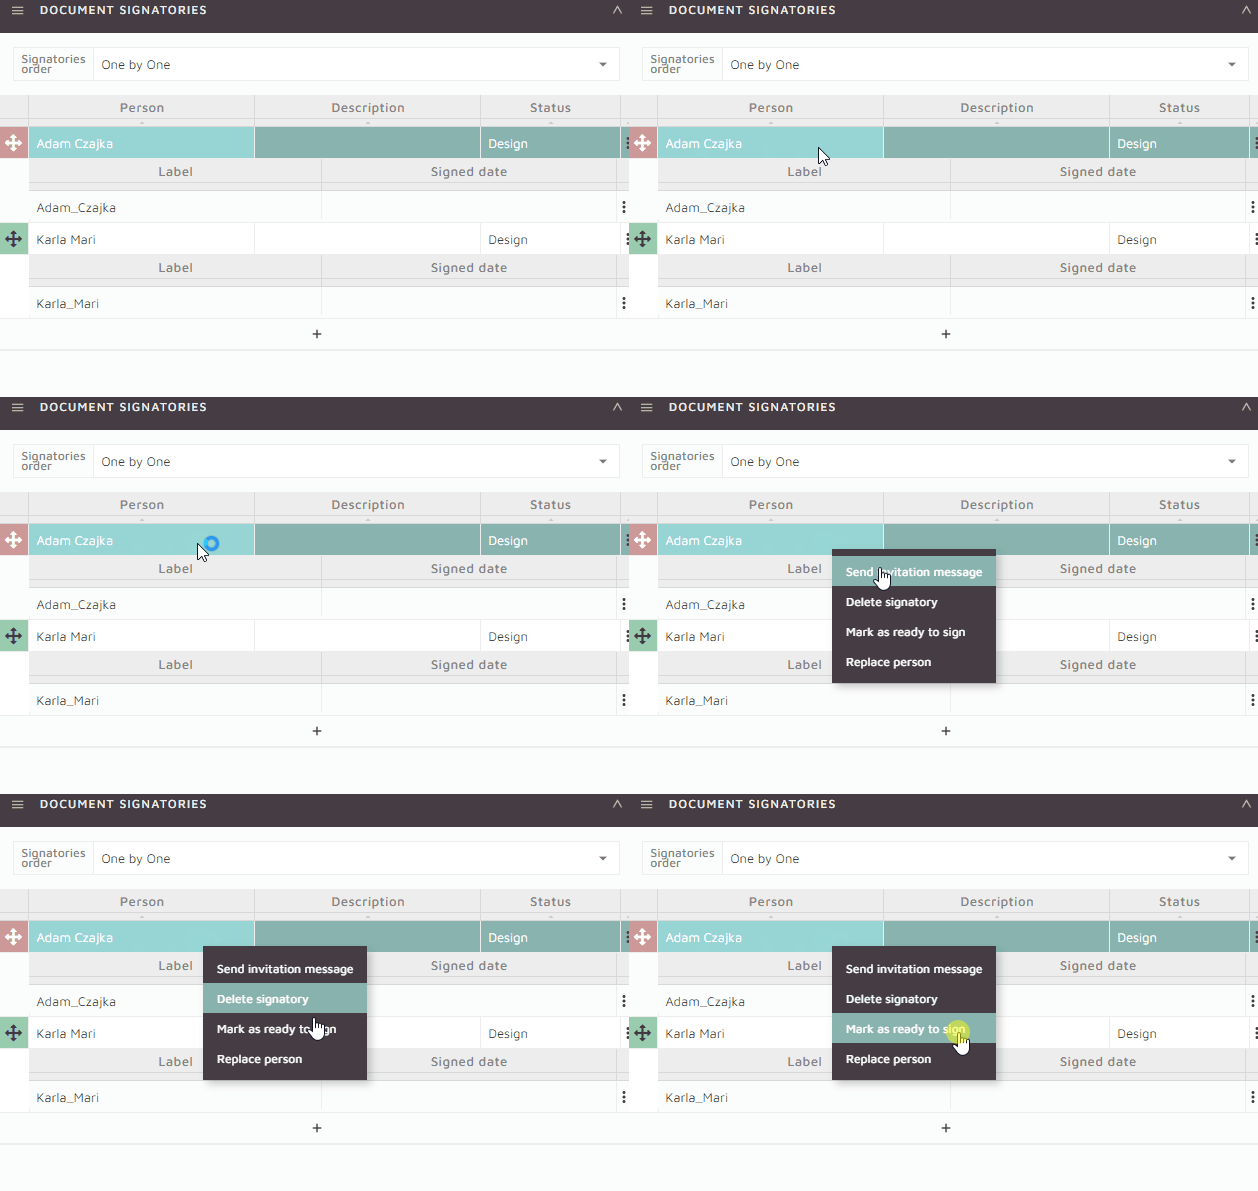
Right click on the signatories name and select “Mark as ready to sign” – once this status is set the document will appear on the home page of the app when the person next signs in.

An invitation may also be sent if the person needs to be informed to check their app. Right clicking on the signatory and selecting “Send invitation message” will trigger an email dialog with the MSGSignatoryInvite type templates included. This message will inform the user to login to the app and sign the document.

Signing the document

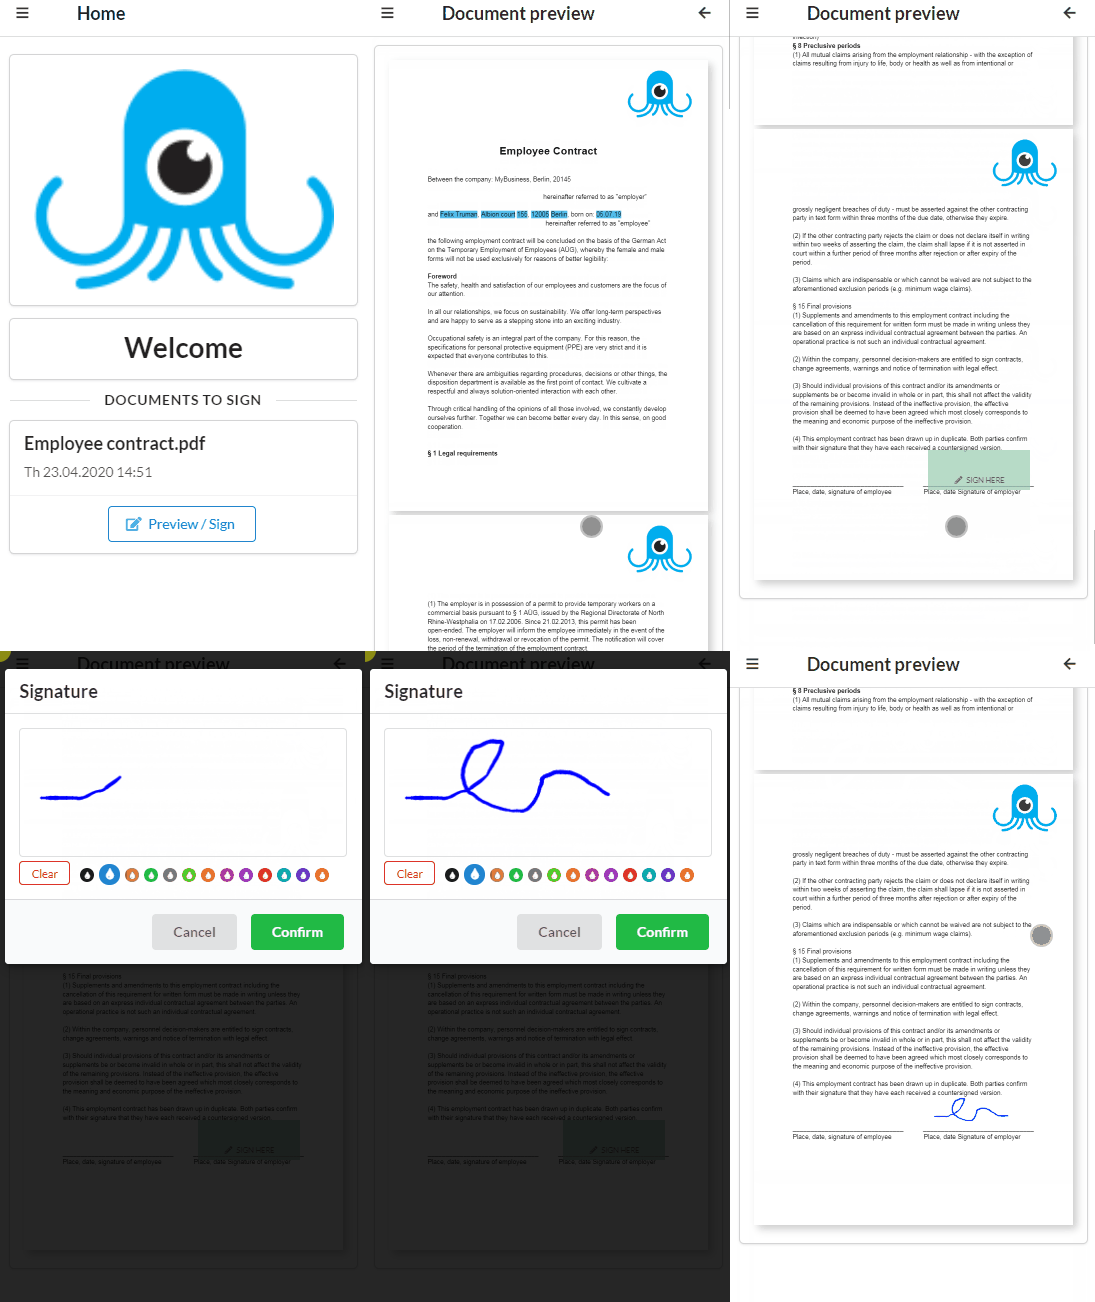
All documents assigned to a person that require a signature will appear on their app homepage under “Documents to sign“.
To complete the signature, select “preview/sign” to open the document PDF. Navigate to the designated signature area and tap it to trigger the signature dialog.

Various colors can also be selected to sign in.

Once the signature is complete the document will automatically be updated in SquidWeb.

Cancelling a Signatory Document – Contracts only

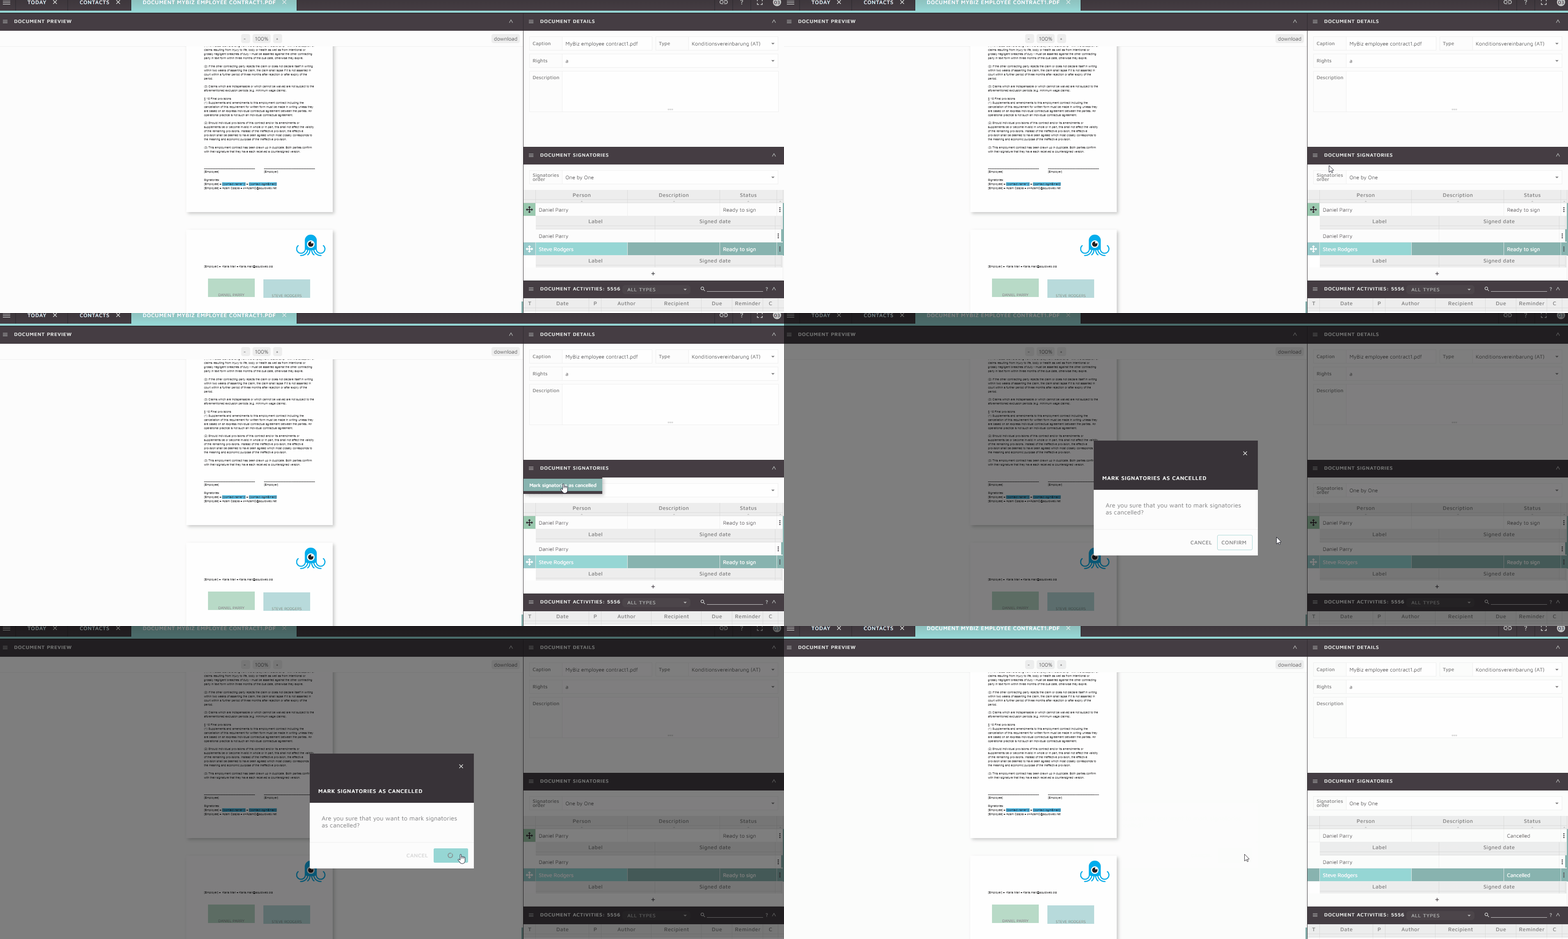
If a contract is refused, the signatories can be marked as cancelled and then removed from the document via the Document Signatories container menu.
Select the “Mark signatories as cancelled” option and confirm the action when prompted. The status of all signatories will be updated to “Cancelled” and any outstanding notification on the mobile app of the recipients will be removed.

Resources

EXAMPLE TEMPLATE DOCUMENT

SquidWeb WIKI


The membership crew feature allows users to assign a crew member to a specific crew that can then be easily filtered in the Crew Planner.
A membership crew can be assigned to a client and company. Once they are assigned to a client, they are immediately visible in the client app.
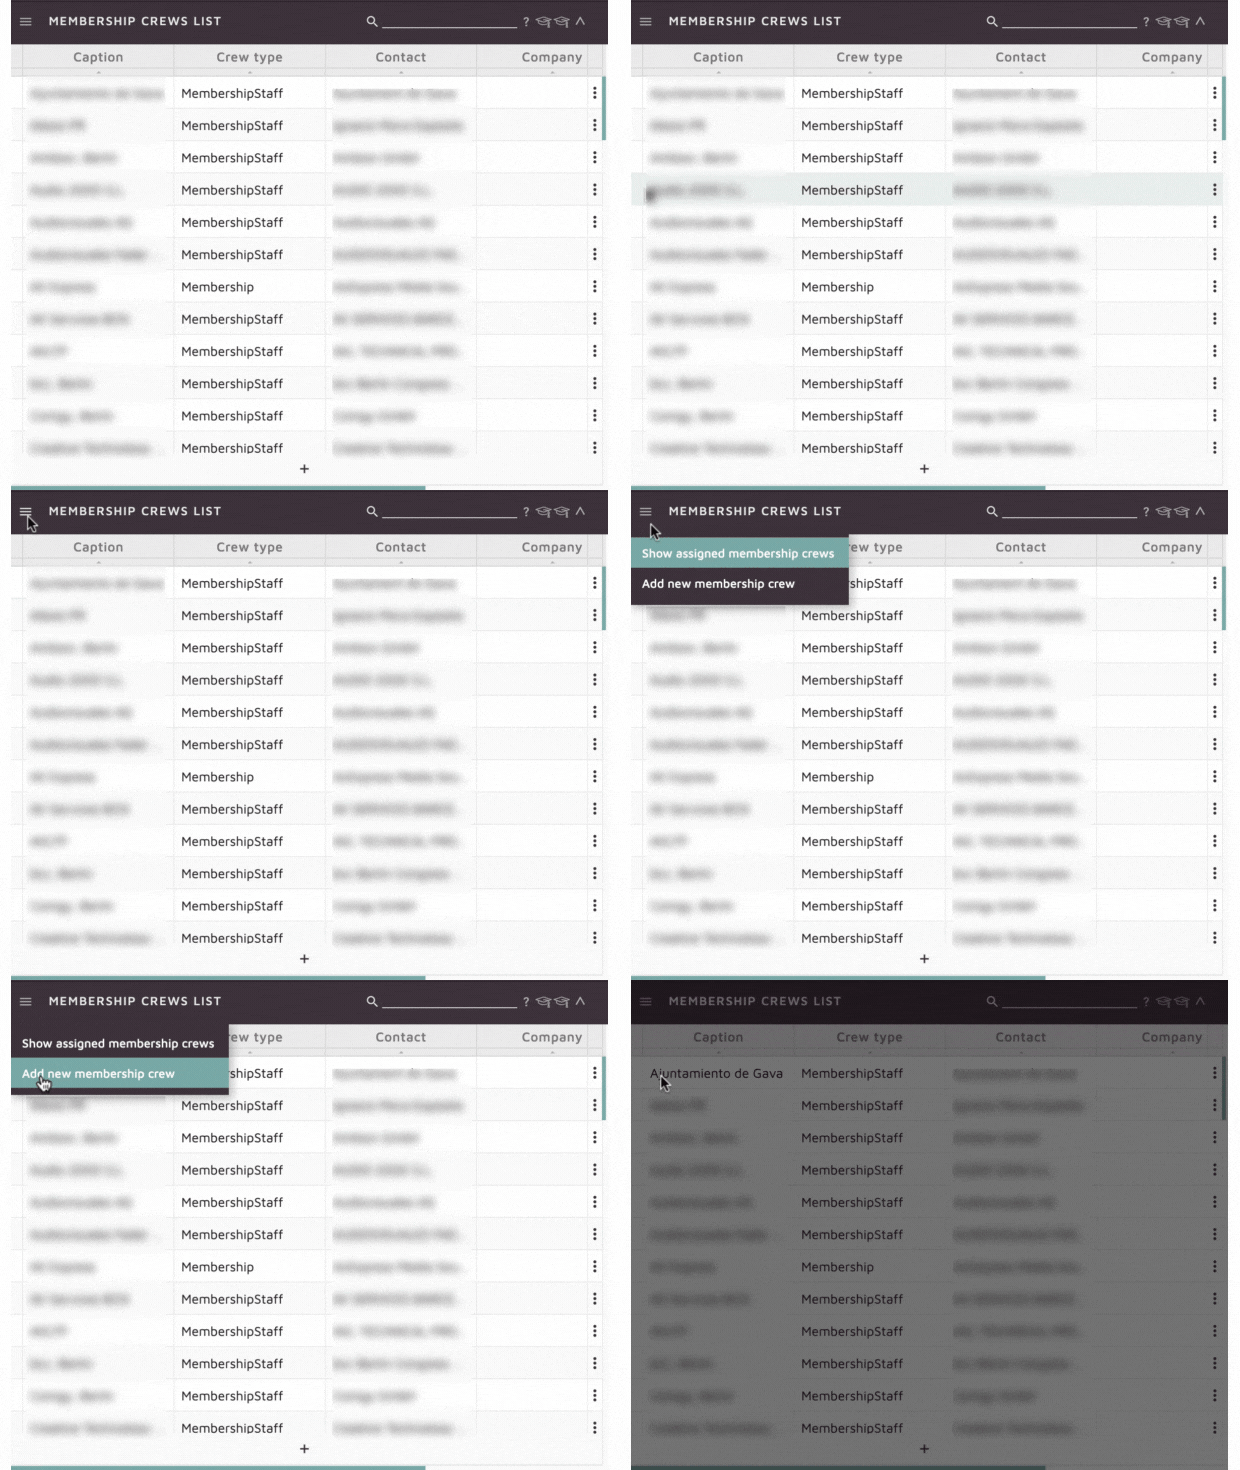
Crew members can be assigned to membership by the Membership Crews container; located under the Crew Profile container on the Crew Planner page or on the Contact Person Details page.

Membership crews can be assigned, created or edited from the membership crews container; located under the Crew Profile container on the Crew Planner page or under the Person emails container on the Contact Person Details page.

Assigning a crew member to membership crew

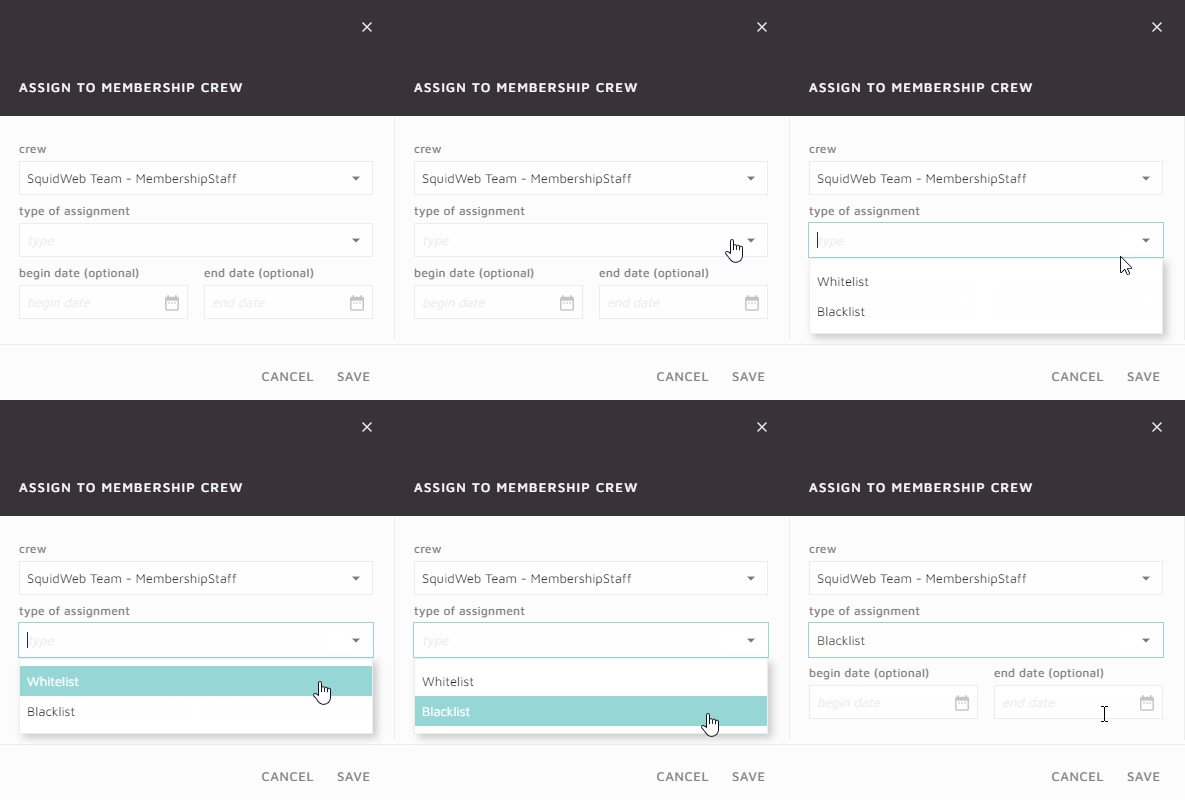
To assign a crew member to a membership crew, select the crew member (if you are on the crew planner) and select “Assign to membership crew” from the container menu.
The Assign dialog will be triggered. Select the crew you wish to assign the crew member to and choose the type of assignment, Blacklist or Whitelist. If a crew member is blacklisted for a specific membership crew they will not appear in any searches for this crew. A beginning and end date can also be added to a membership assignment, if the crew member is only working for a single project or on a seasonal arrangement, for example.


A beginning and end date can also be added to a membership assignment, if the crew member is only working for a single project or on a seasonal arrangement for example.

Add new membership crew
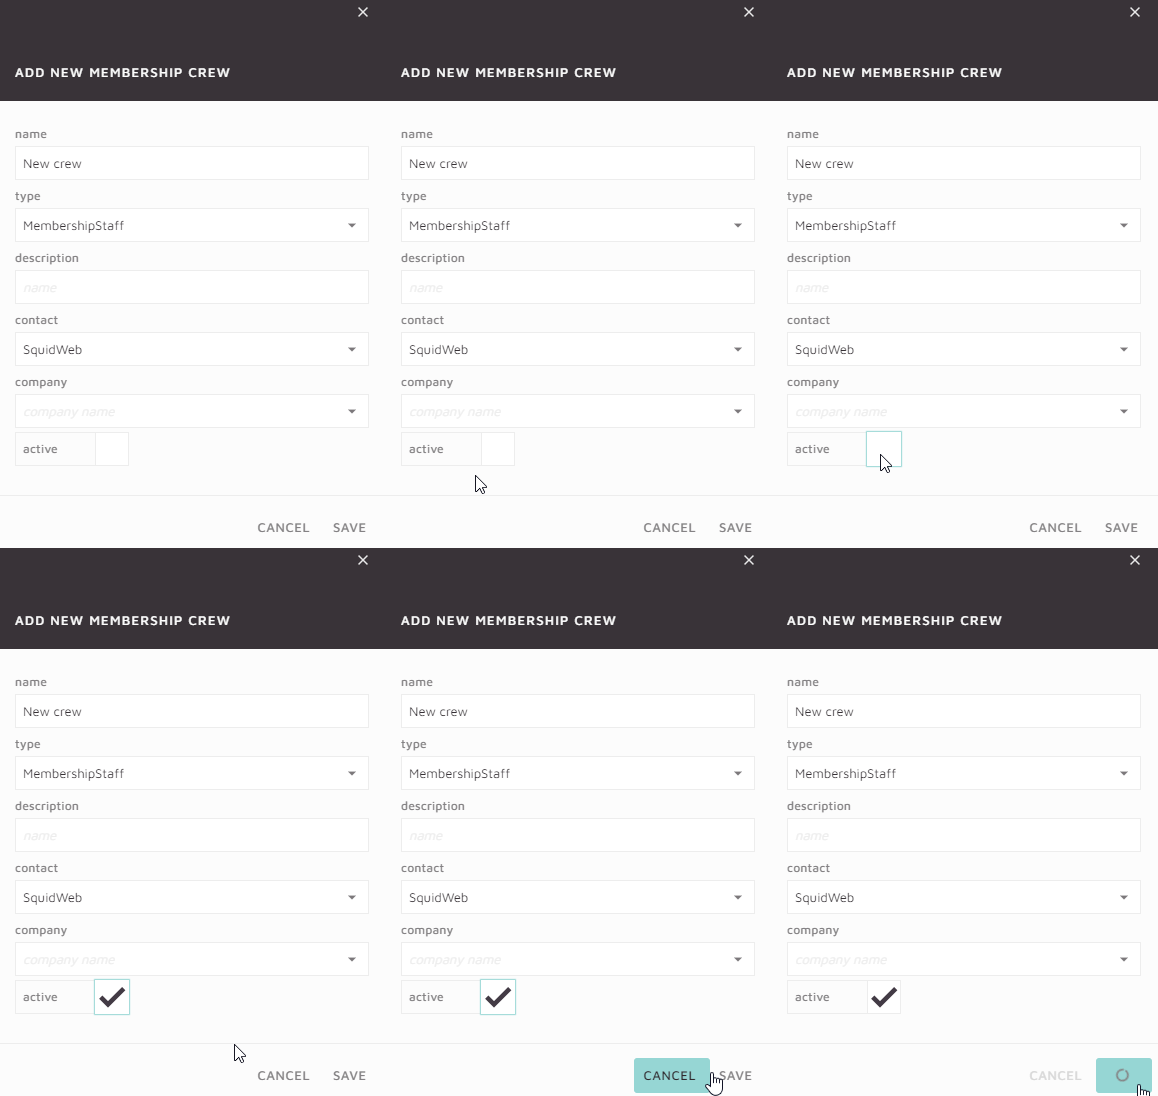
To create a new membership crew select “Add new membership crews” from the menu. The new crew dialog will be triggered.
There are 3 crew types to choose from:

  • Membership
  • MembershipStaff
  • Blacklist

The description field is optional but you must assign a contact and company to the new crew.
Set the crew to active in order for it to appear in the membership crews list.

A “crew info” documents is a document that can be made available for all crew members to access via the mobile app.

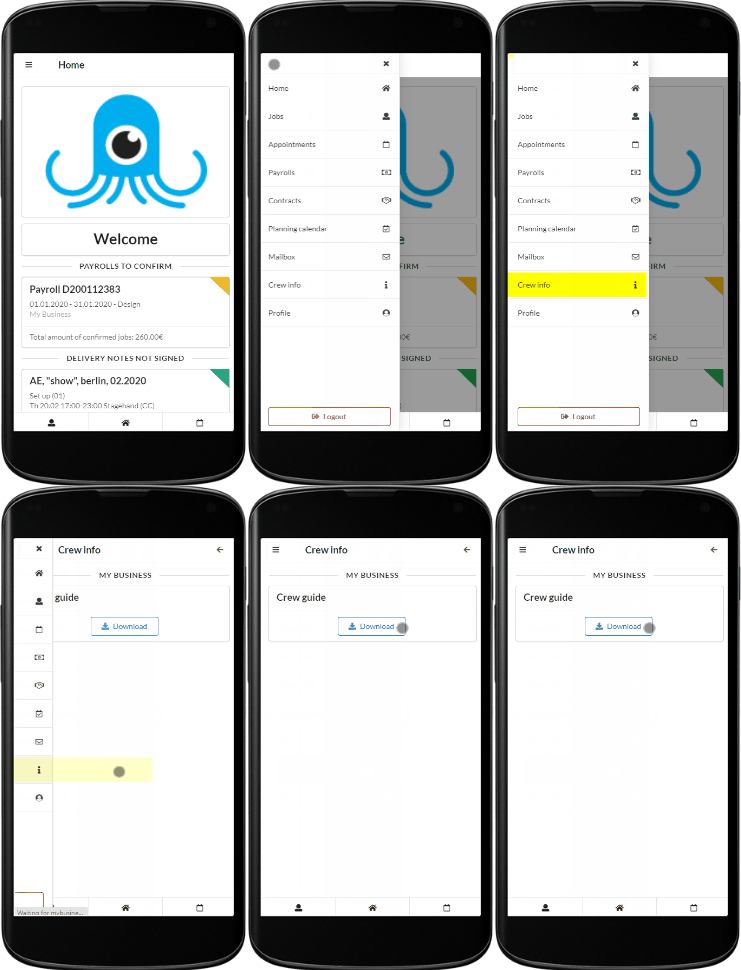
To add  crew info document, navigate to the “Crew info mobile app” section in company settings and add a new document. The document can be uploaded as a file from your device or a URL link can be added if the document is stored online.

Once the document has been added in company setting and set to active, it will be available to download for crew members in their app under the Crew Info section:


This feature can be used for any document that needs to be viewed by all crew members in your team. A good example of this would be a crew guide, a document that is the same for all crew members and may need to be accessed at any time during their employment. This guide can be downloaded as a PDF at anytime if uploaded in the method descried above.

Once a project has finished and the planner has cleared the position it is ready to be added to an employee’s payroll.

Payrolls are generated for all active employees for a chosen period and then all cleared items within that period can be added to their individual payrolls in a single click. The accountant can then check each payroll and make any adjustments needed. Once all payrolls have been completed a notification can be sent to all employees simultaneously, the payroll details pdf can be generated and once the rights are set to ‘a’ it will become available for the employee to  download via the app.

Depending on the user’s preferred workflow the payroll documents can be automatically generated and the rights set to a when the notification is sent, this is determined by the email template type used, see here for full details
https://wiki.squidweb.info/index.php?title=Templates#Payrolls


SquidWeb’s mailbox is an integrated email system that allows for the creation and processing of mail for public or private mailboxes – an address can be created for individual team members or company departments.

As well as being a fully functional email client- allowing users to read, filter, reply, forward and create emails – Mailbox allows users to assign an email to other destination within in SquidWeb:
An email can be assigned to a specific category such as ‘Projects’, ‘Invoices’ or ‘Receipts’. Once a mail is assigned to ‘Projects’ for example, it may then be attached to an existing project or a new project can be created directly from the mailbox page:

To create a project directly from the mailbox page, right click the email in the email list or its attachment, the email must have the status ‘assigned’ or ‘received’.

Emails and their attachments will be accessible from their assigned destination.

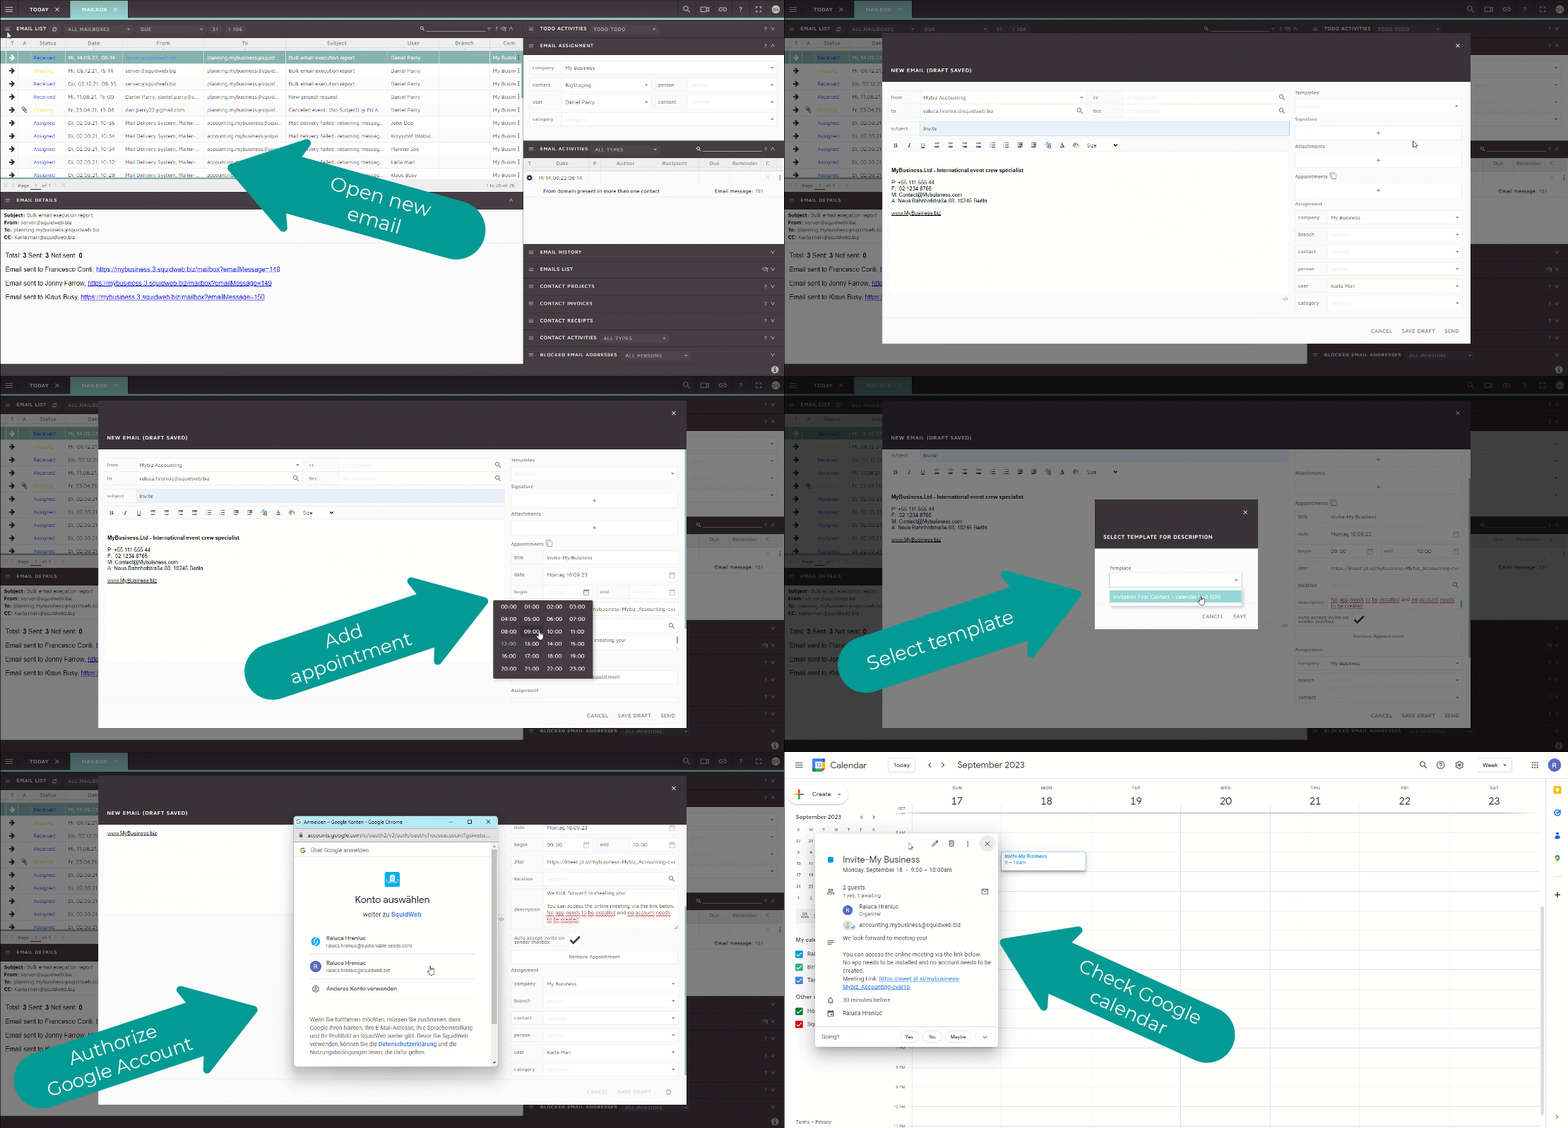
Mail- Appointments enable to send a new email or replying to an existing email chain, with the option of adding a Jitsi meeting appointment which will be automatically added to the calendar authorized via Squid, which is in most cases Google Calendar.

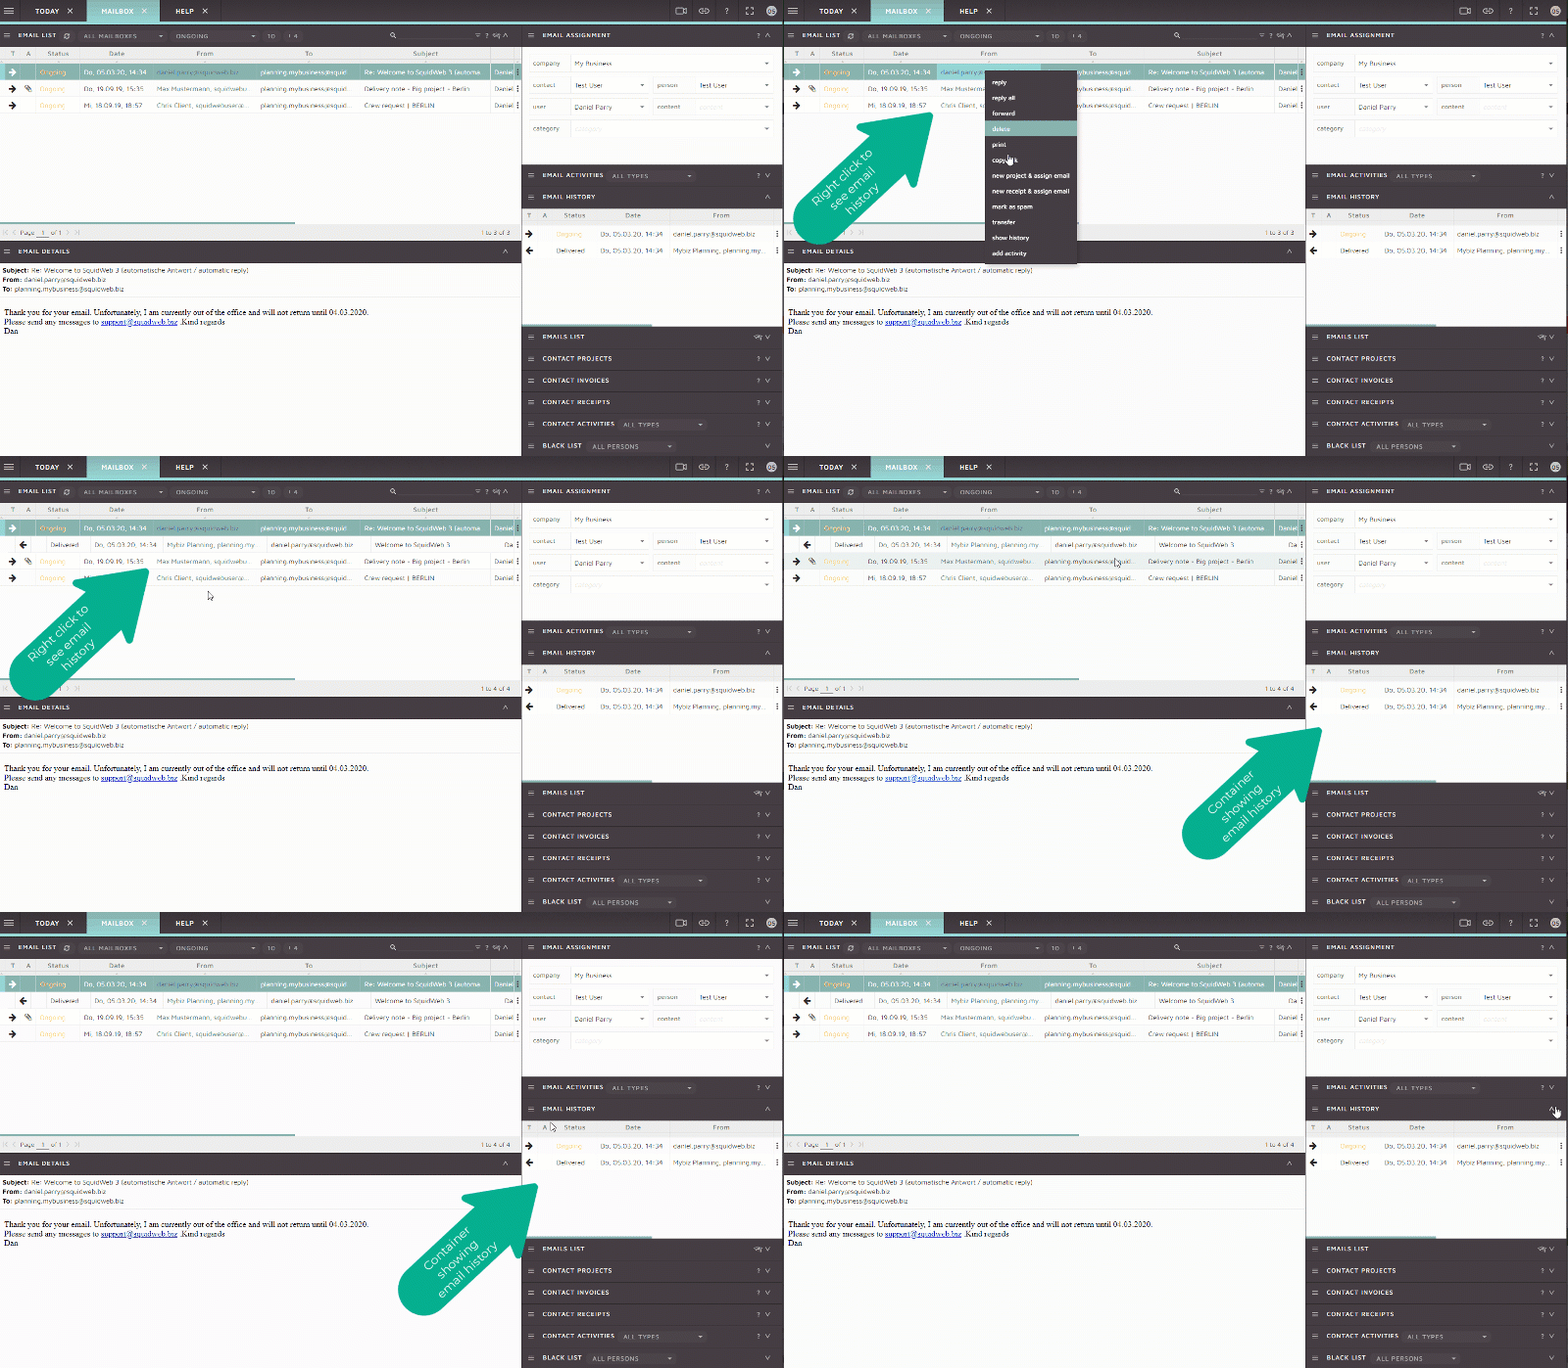
Show email history can be used to quickly identify the history and all statuses connected to an email chain. It can be seen under the specific email and on the right hand side Email history container:

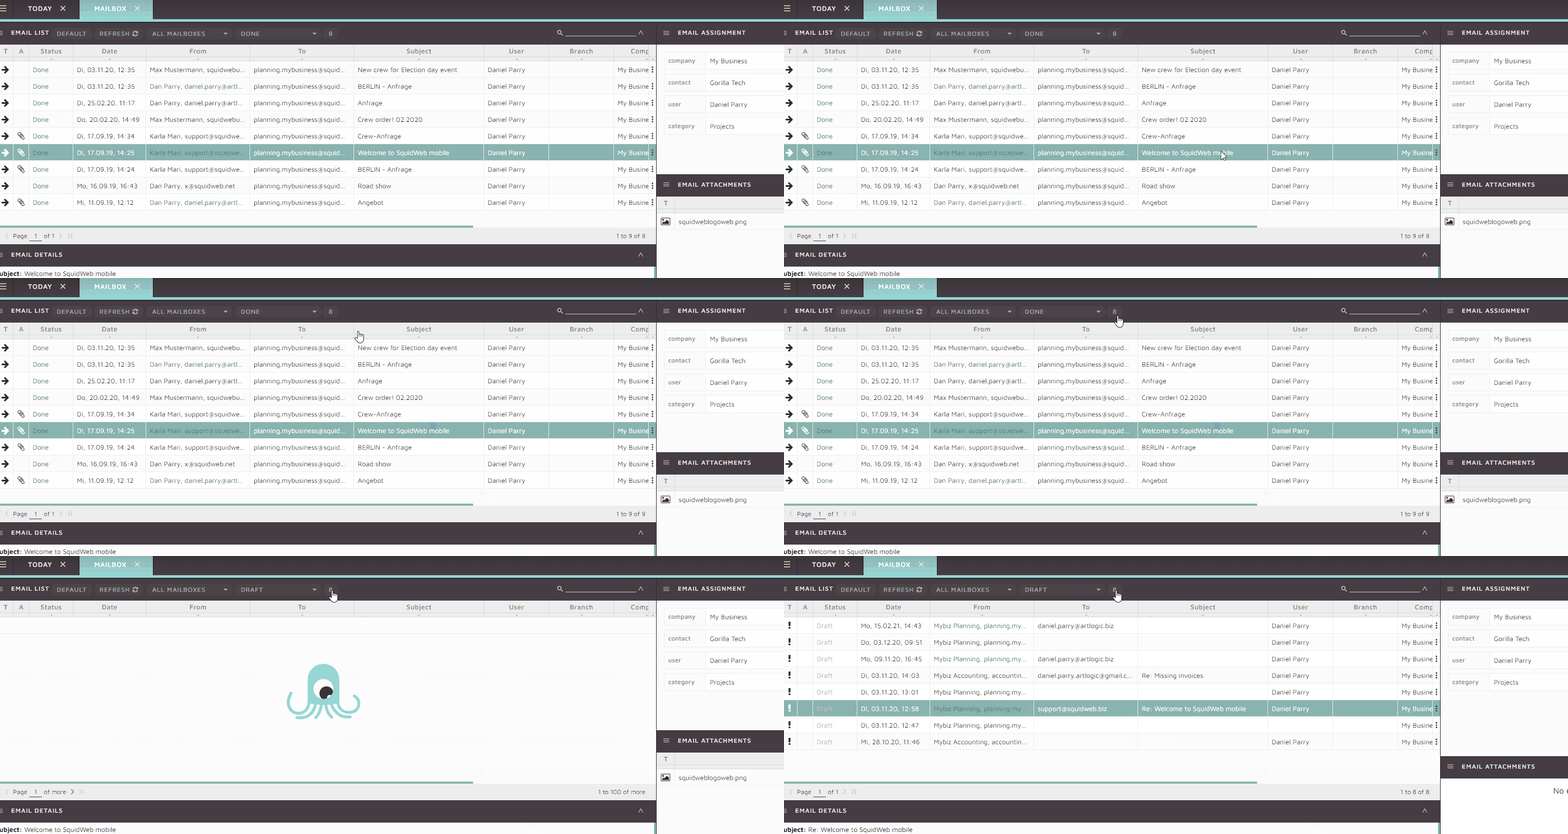
Draft emails can also be created to prevent email lose. If SquidWeb is accidentally closed, or refreshed, for any reason while an email is being written, a draft email will be created to store the email. Saving the content of the mail to be sent later. Once created draft emails can be accessed by selecting the number in the email list container header. Clicking on this button will filter the email list to show only mail with the status “Draft”:

Draft emails can also be filtered by selecting “Draft” from the status filter in the email list header. For details on how to display and interact with the status filter, as well as full details on all other Mailbox features, layout and functionality, watch our tutorial video here:


Supplier receipts differ from normal receipts as the project crew items need to be assigned to the receipt during its creation.

When suppliers send an invoice for a crew service a supplier receipt is created to pay the outstanding amount. As the PCI’s from the project are added to the receipt the sum total will be automatically calculated and updated, this allows you to check the suppliers invoice against your project data and be sure there are no mistakes.

A bank transfer can be added directly to a receipt to pay the supplier and send notification at the same time.

You can create an account for clients to login to Squidweb and check their projects, documents and invoices.

Here is a short guide of how to create the account for the client and send them their welcome link.

Bank transfers can be sent alongside the creation of receipts in SquidWeb to pay incoming invoices quickly and easily.

All bank transfers made from SquidWeb are stored and accessible from the bank transfers page. Transaction reports can also be taken directly from SquidWeb and turned into a compressed file to be processed in accounting software.

SquidWeb wiki Bank transfers

Mobile users can find a copy of their contract, view their monthly working hour values and download all of their personal documents via the app, this short guide will show you where these features can be found.

8
1

After the project is finished and all project documents have been returned, the hours must be checked and added to the PCI’s so the invoice can be created and the crew can be paid correctly.

SquidWeb wiki Projects