SquidWeb Messenger is a self-hosted online chat service with file sharing, search, and video conference capabilities. It is designed as an internal chat for teams and companies. A company server be organized into public and private channels with select team members, as well as direct message to one another. The service also offers video conferencing for meeting hosted on Jitsi for team, or individual, calls.
SquidWeb messenger also send daily announcements to users. These announcements can be customized, through the use of SquidWeb Robots, to your company’s needs to give whatever information you find most necessary for the team, such as when a notification when a project is closed s well as it’s turn over and which crew members were absent, daily updates on crew metrics, if a key account needs to be contacted or any other information from SquidWeb that can be useful to your planners.
This allows users to receive important and useful information automatically and regularly without any moderation required.
To set up your SquidWeb Messenger account navigate to user settings in the top right corner of the dashboard and set your username:
Your company will have a unique URL to access the messenger: https://messenger.squidweb.biz/[COMPANY_NAME] – we recommend saving this to a bookmark in your browser to access it at the start of each work day.
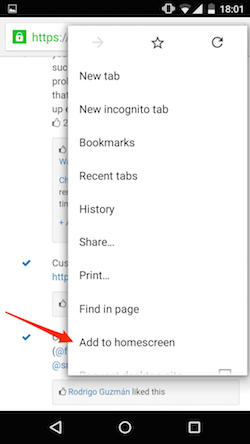
A mobile version of the messenger is also available, it is saved to the mobile in the same way the SquidWeb companion app is saved; simply access the URL on your mobile browser and select “add to homescreen” from the page menu.