New features and updates:

  • Project calculations: Sort by crew option added.
  • Template documents: categories updated
    – Person details to Personal documents.
    – Contact details to Contact documents.
  • Digital Signatories: signature area can be moved.
    (https://squidweb.info/digital-signatories/)
  • Digital Signatories: Invite templates created.
  • Accounting: Periods filter is updated from date selection to financial period.
  • Accounting: Dates filter added.
  • Receipts: minus VAT options added for credit notes.

Fixes:

  • Items: group selection now works.
  • Mailbox: not able to assign receipts bug fixed
  • Receipts: VAT rounding issue fixed.
  • Mobile app: issue that made check in/out not possible has been fixed.
  • Templates: changing the company of templates no longer create error.
  • Templates: HTML editor toolbar options fixed.

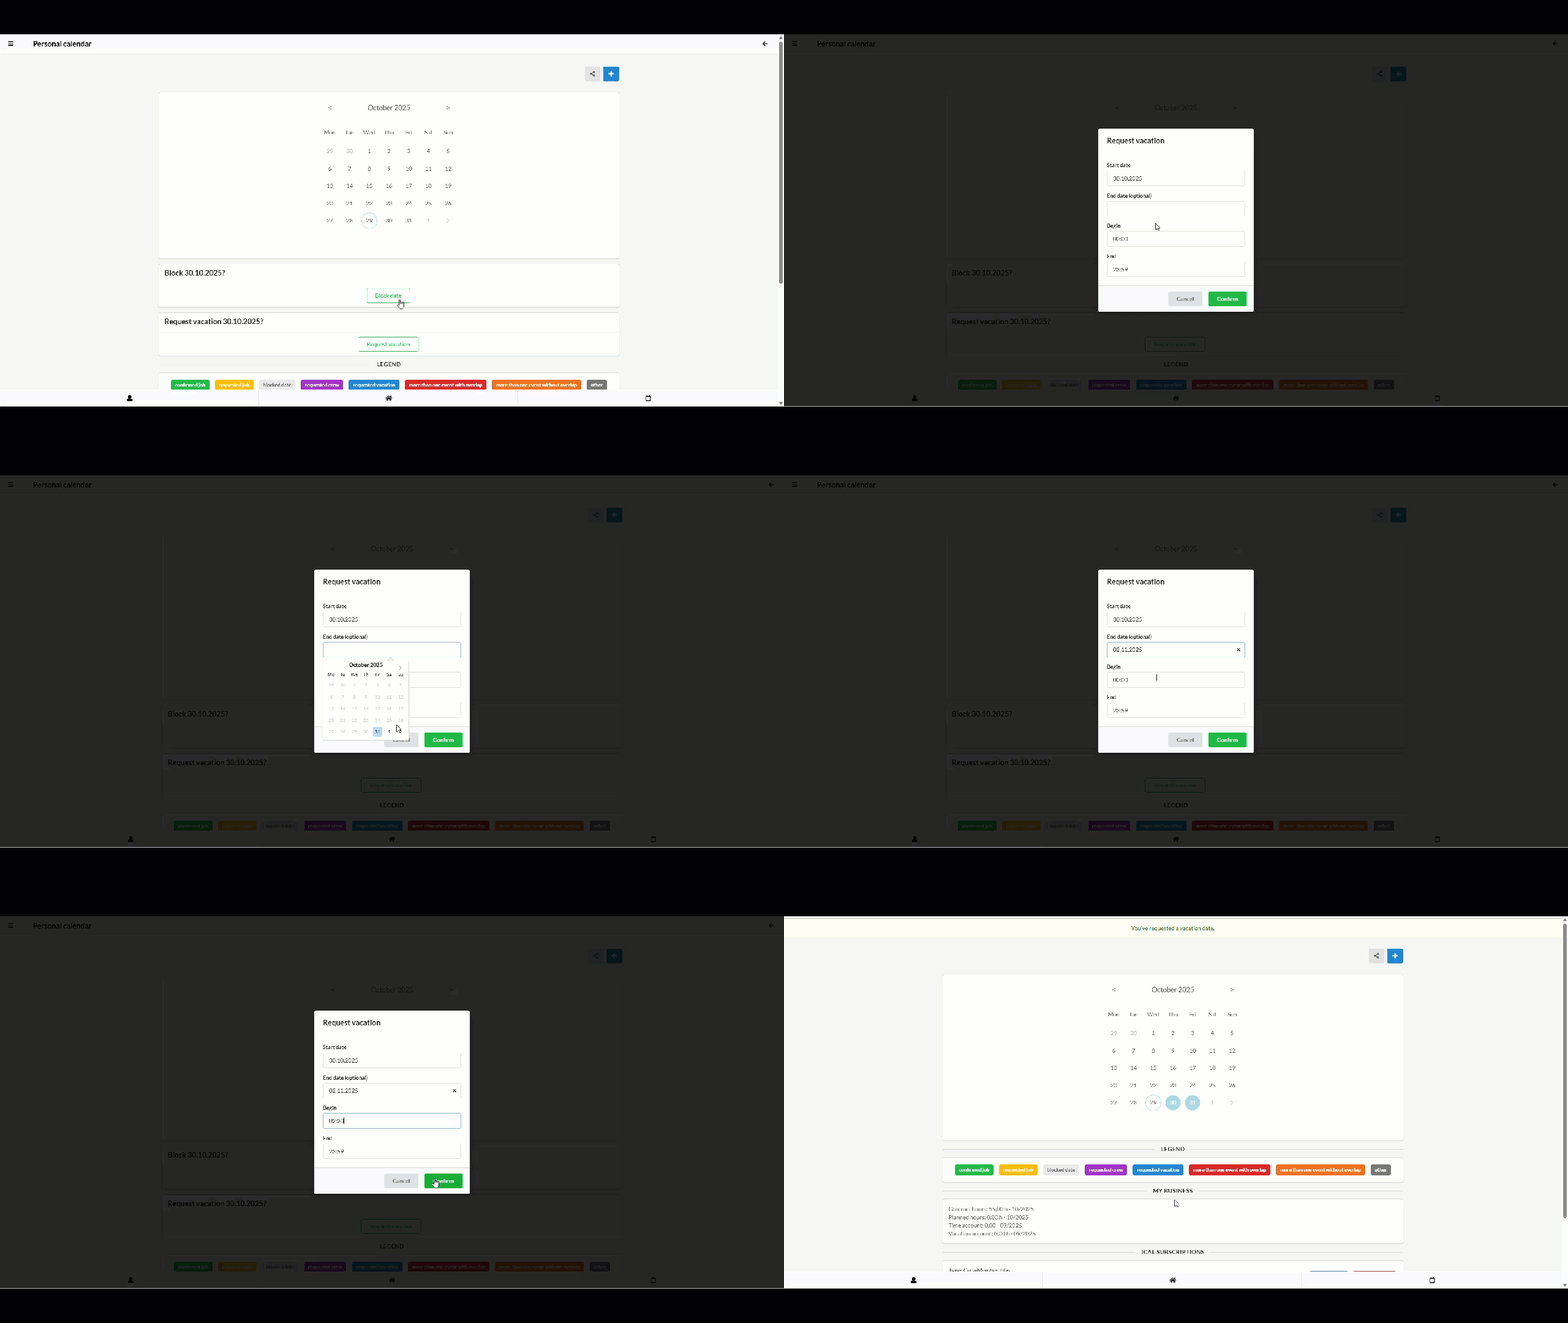
Crew members can make a vacation request from the appointments page of the SquidWeb mobile app. Once the day is selected in the appointments calendar an option will appear at the bottom of the page to submit a vacation request.
Selecting “Request Vacation” will trigger the request dialog. The user can choose a period and which time of the day they want to request vacation time for. By default, the whole day (00:00-23:59) will be included in the request unless the crew member sets a specific time.

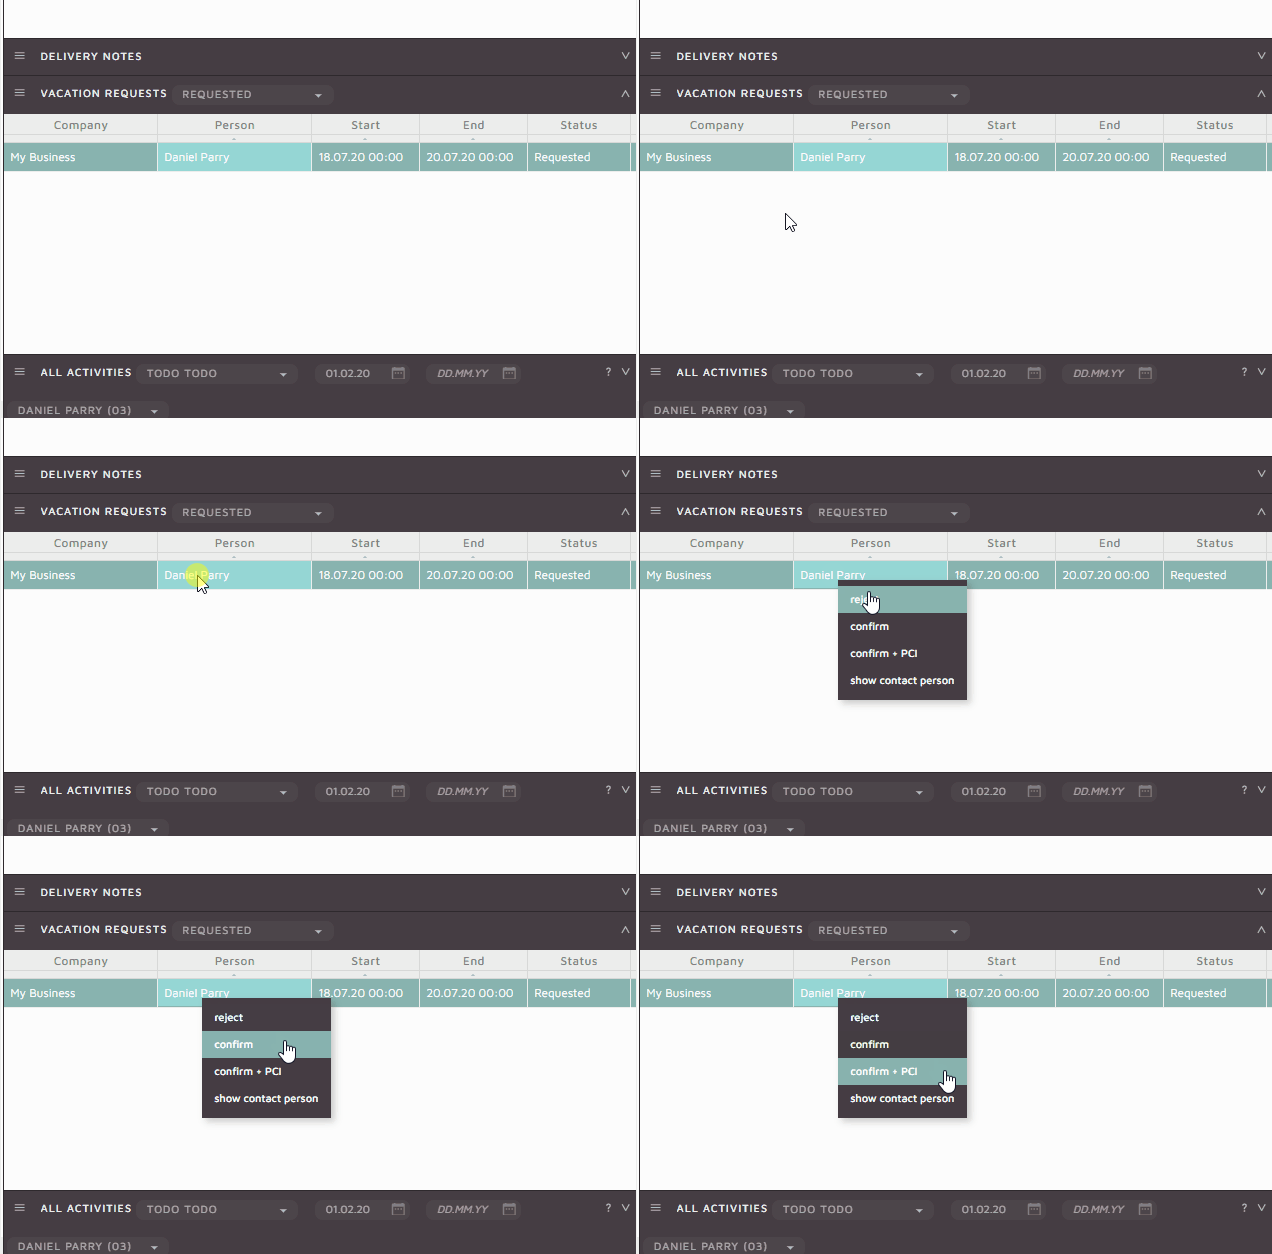
Once the request has been sent, it will be available in the “Vacation Request Container” on the SquidWeb desktop version Today page.
Right clicking on a request in this container will offer response options, selecting one of these options will trigger an email template, that should be set up in your templates page:

  • Reject – MSGVacationRequestReject template will be triggered, refusing the vacation – this template should include a reason.
  • Confirm – MSGVacationRequestConfirm template will be triggered, confirming the vacation has been granted
  • Confirm+PCI – MSGVacationRequestConfirmPCI template will be triggered, again confirming the request and also create a PCI in the vacation project.
  • Show Contact Person – Open the contact details page of the employee requesting the vacation.

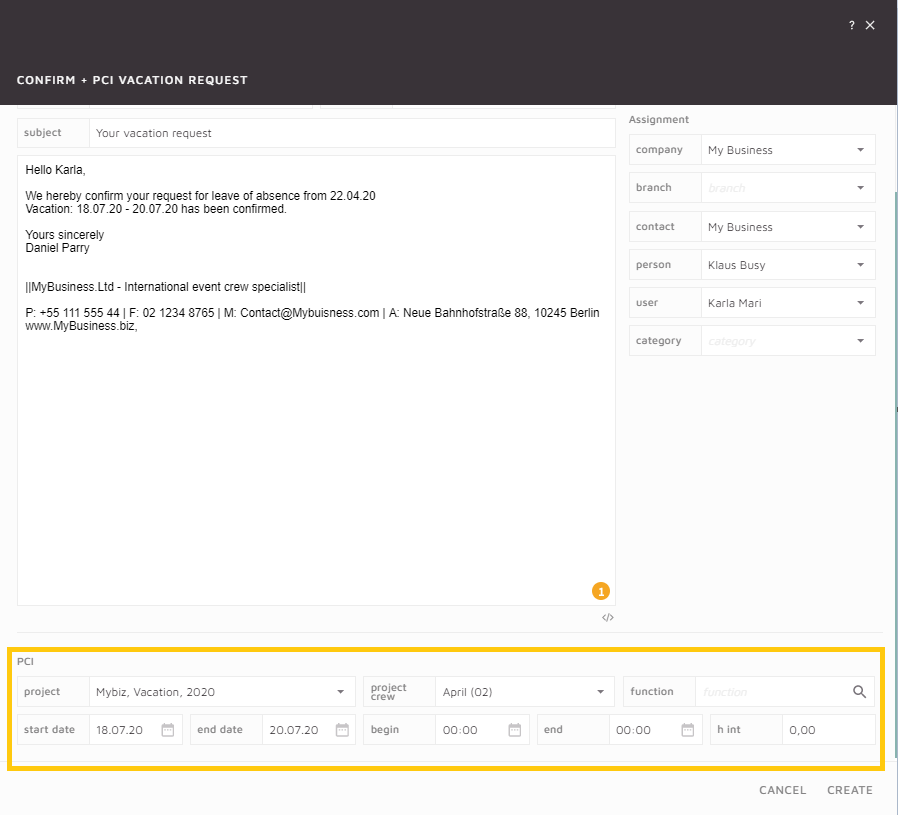
Selecting the Confirm+PCI option will trigger an email dialog with additional options at the bottom to select the vacation project and confirm the PCI details.
The PCI section of the email dialog will be auto filled with the date and times requested by the employee but may be edited it needed.
The designated vacation project must be selected from the project field.

Signatories can be added to a document in SquidWeb, this will allow the document to be signed digitally via the app and returned to the desktop version for storage.
This feature can be used when a new employee is hired in a separate branch to the CEO for example.
In the case of an employee contract, the contract can be generated with SquidWeb’s document template feature. The signatories are then added to it and it can be signed by a CEO in Düsseldorf and the new employee in Berlin without any need for printing or scanning.

This article will explain how to complete this process.

Workflow:
Add variables to document template
Add signatories to the document (Example doc here)
Select signature order
Allocate the signatories
Drag & drop signature container onto the document
Invite signatories to sign
Sign document

Add variables to document template

Before this feature is used to add digital signatures to a contract, the document template must be updated to correctly label the participants. To do this, add variables for the employee and employer to the bottom of your contract template like so:
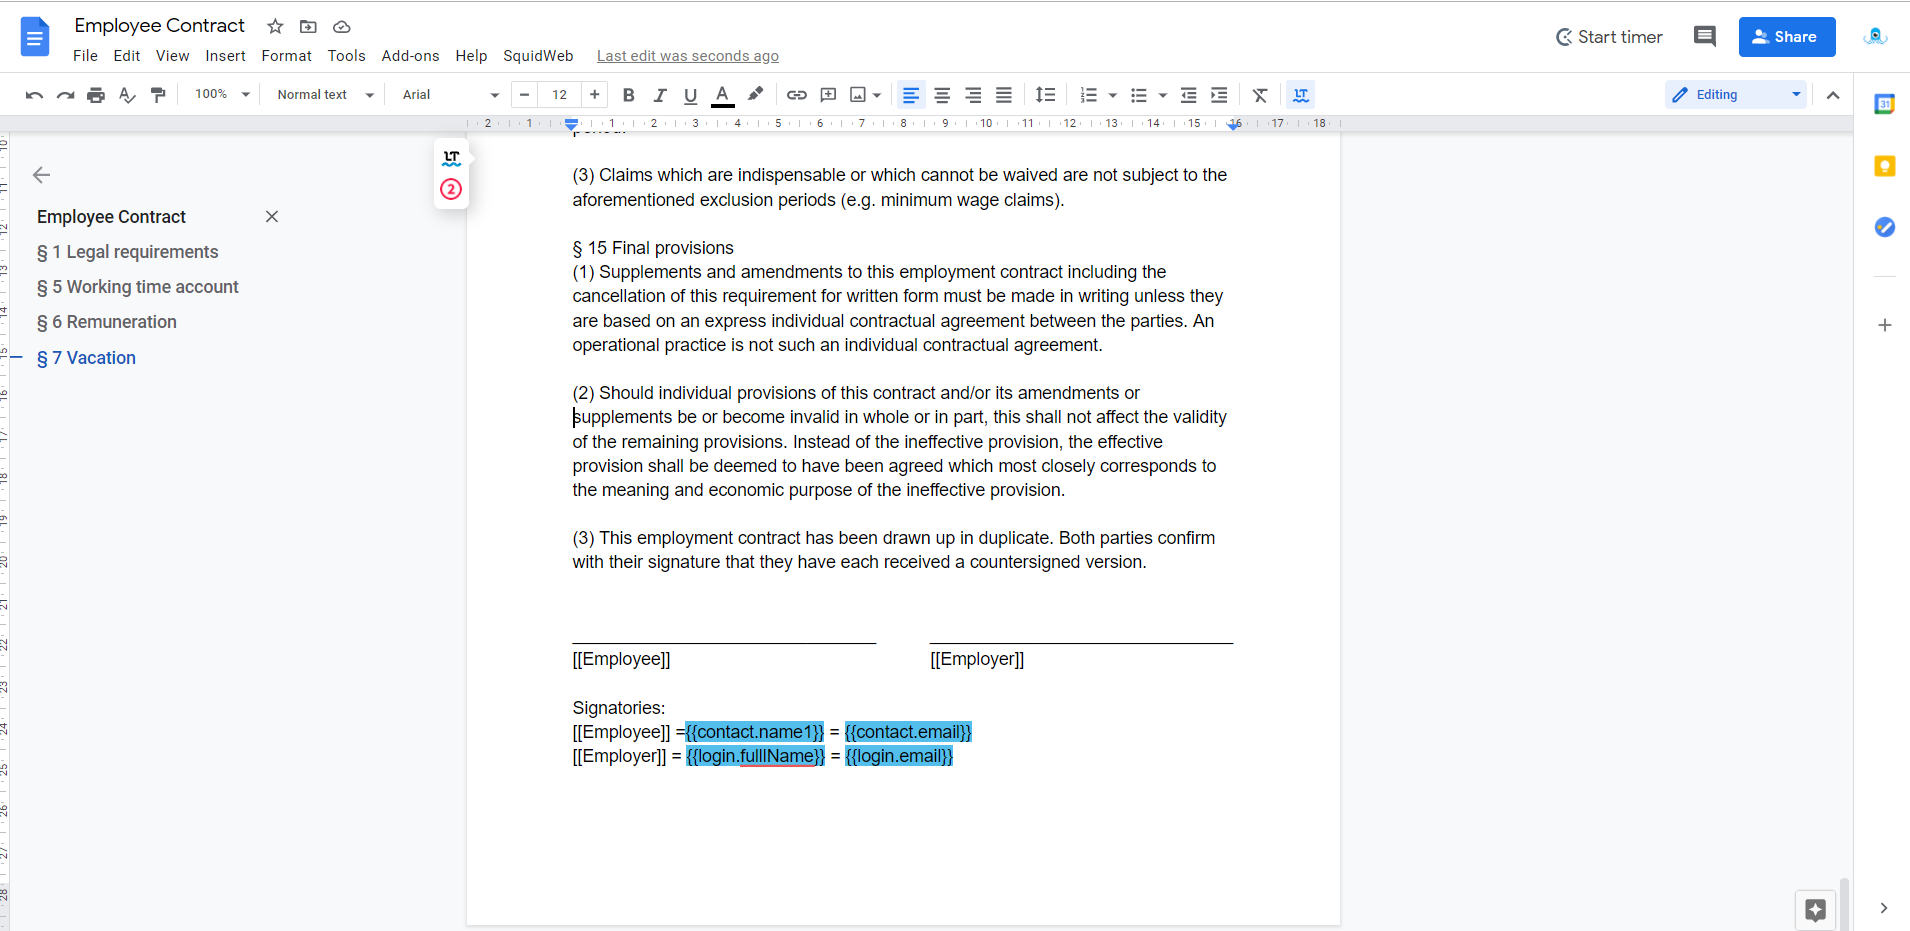
[NOTE: The variables are only highlighted blue for your information]

These variables will be replaced with the correct information when the document is uploaded to SquidWeb.
A copy of the example template document can be found here – EXAMPLE TEMPLATE DOCUMENT

How to add signatories to a document

To add signatories to a document, first, open the document in SquidWeb so it can be viewed on the document preview page.
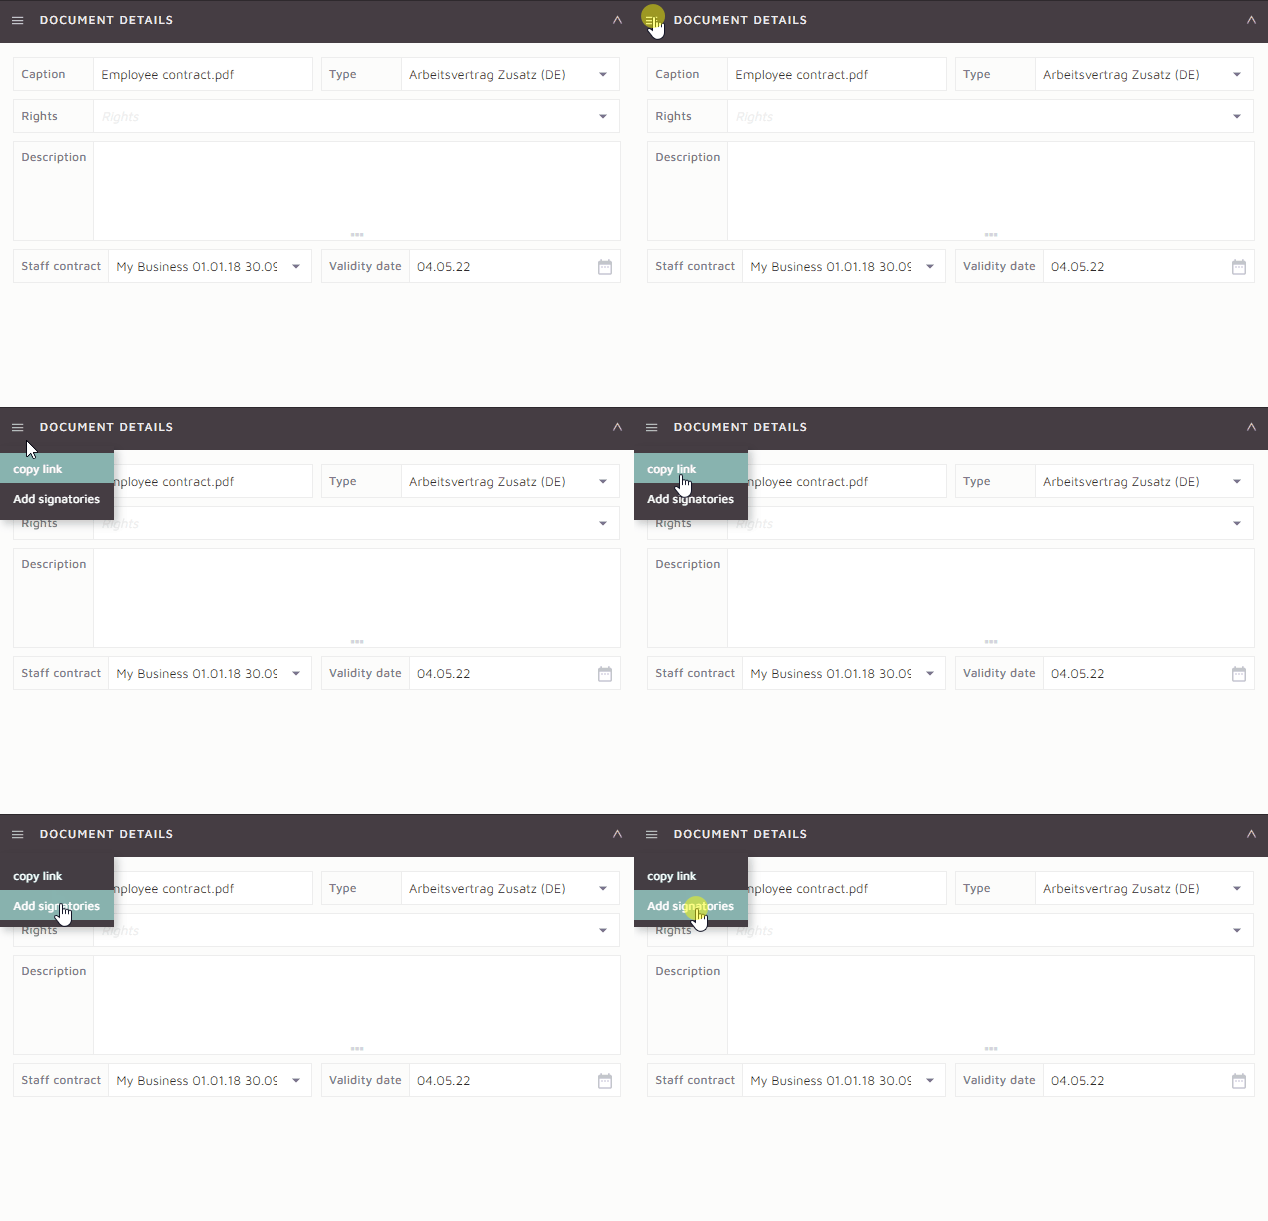
In the container menu select “Add signatories

This will add the document signatories container to the document preview page, it will appear below the document details container in the SidePanel.
The document signatories container will allow you to choose who will sign the document, what order they will sign it in and send an invitation to the signatories to inform them they have a document to sign.
The gif below will demonstrate how to allocate a person to be a signatory on the document by selecting the ‘+‘ icon and choosing from all persons in your SquidWeb database.
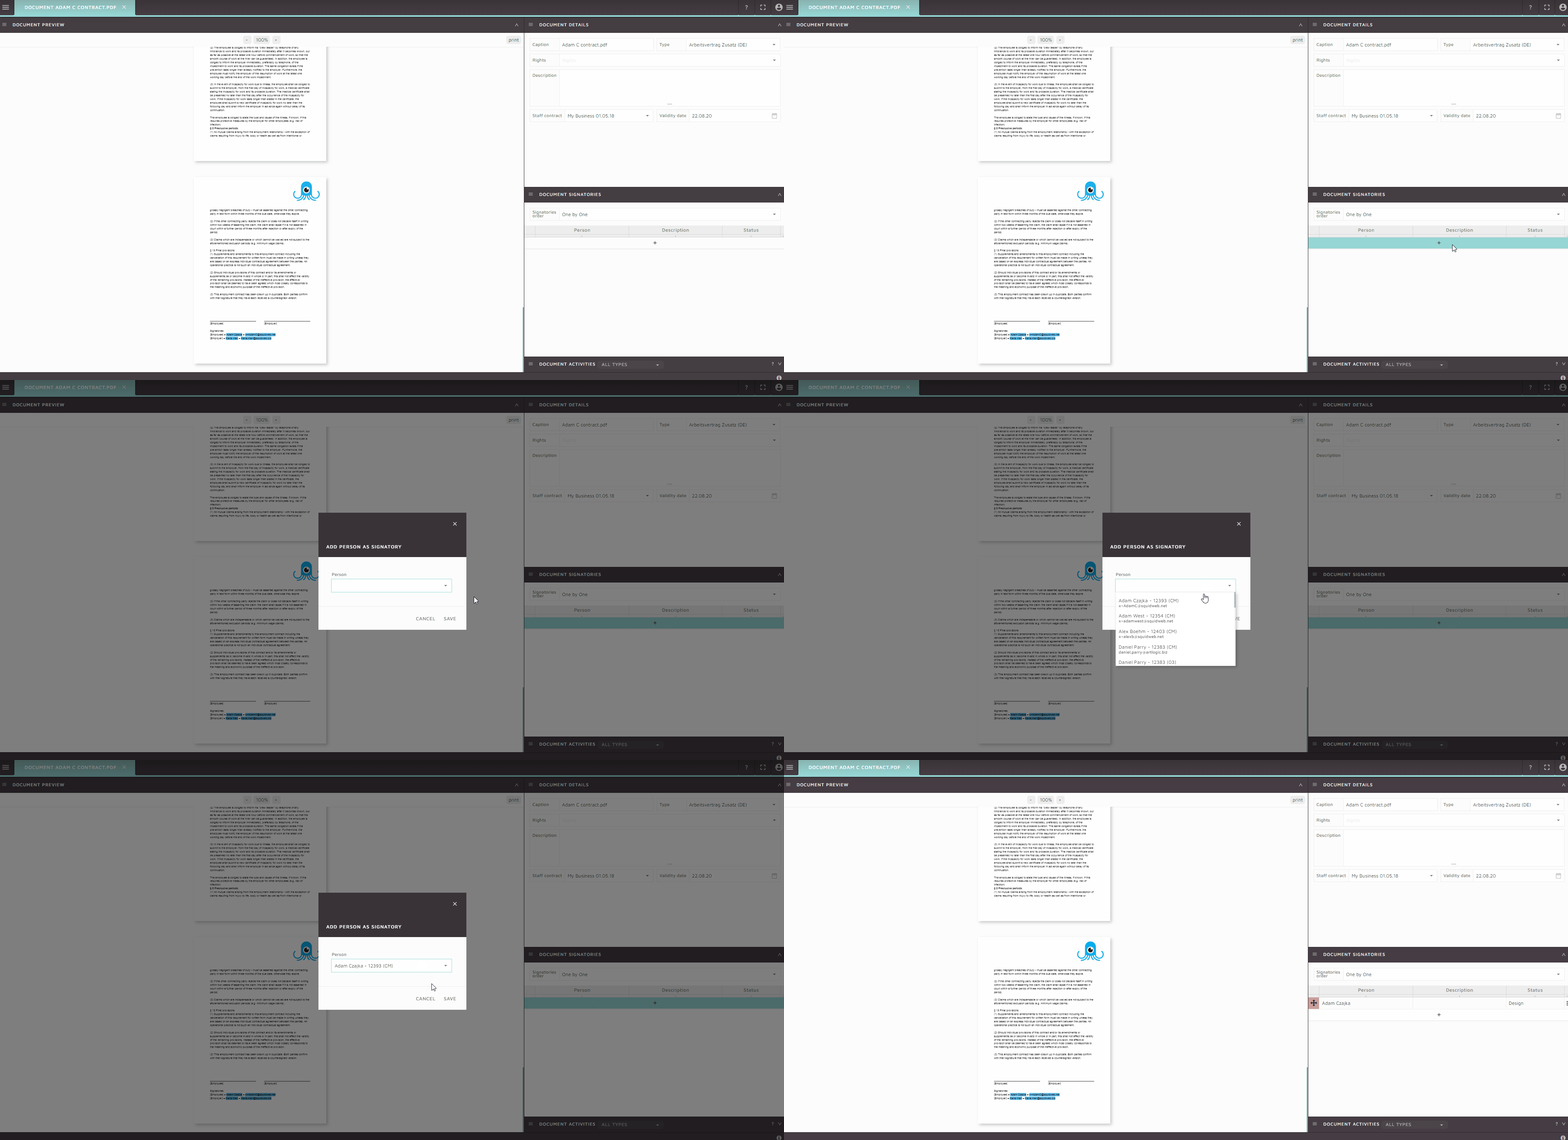
There are two signatory orders to choose from:
One by One – the second signatory will only be able to sign document after the first signatory  has signed it.
Parallel – all signatories can sign in any order.

In either case the signatories will sign in the mobile on their own device.

Drag & Drop signature container onto document

Once the signatories have been assigned to the document, the space in which they are required to sign on the document can be set. This is done by clicking on the icon next to their name and dragging the container to the correct place on the document. Here is a gif to demonstrate:
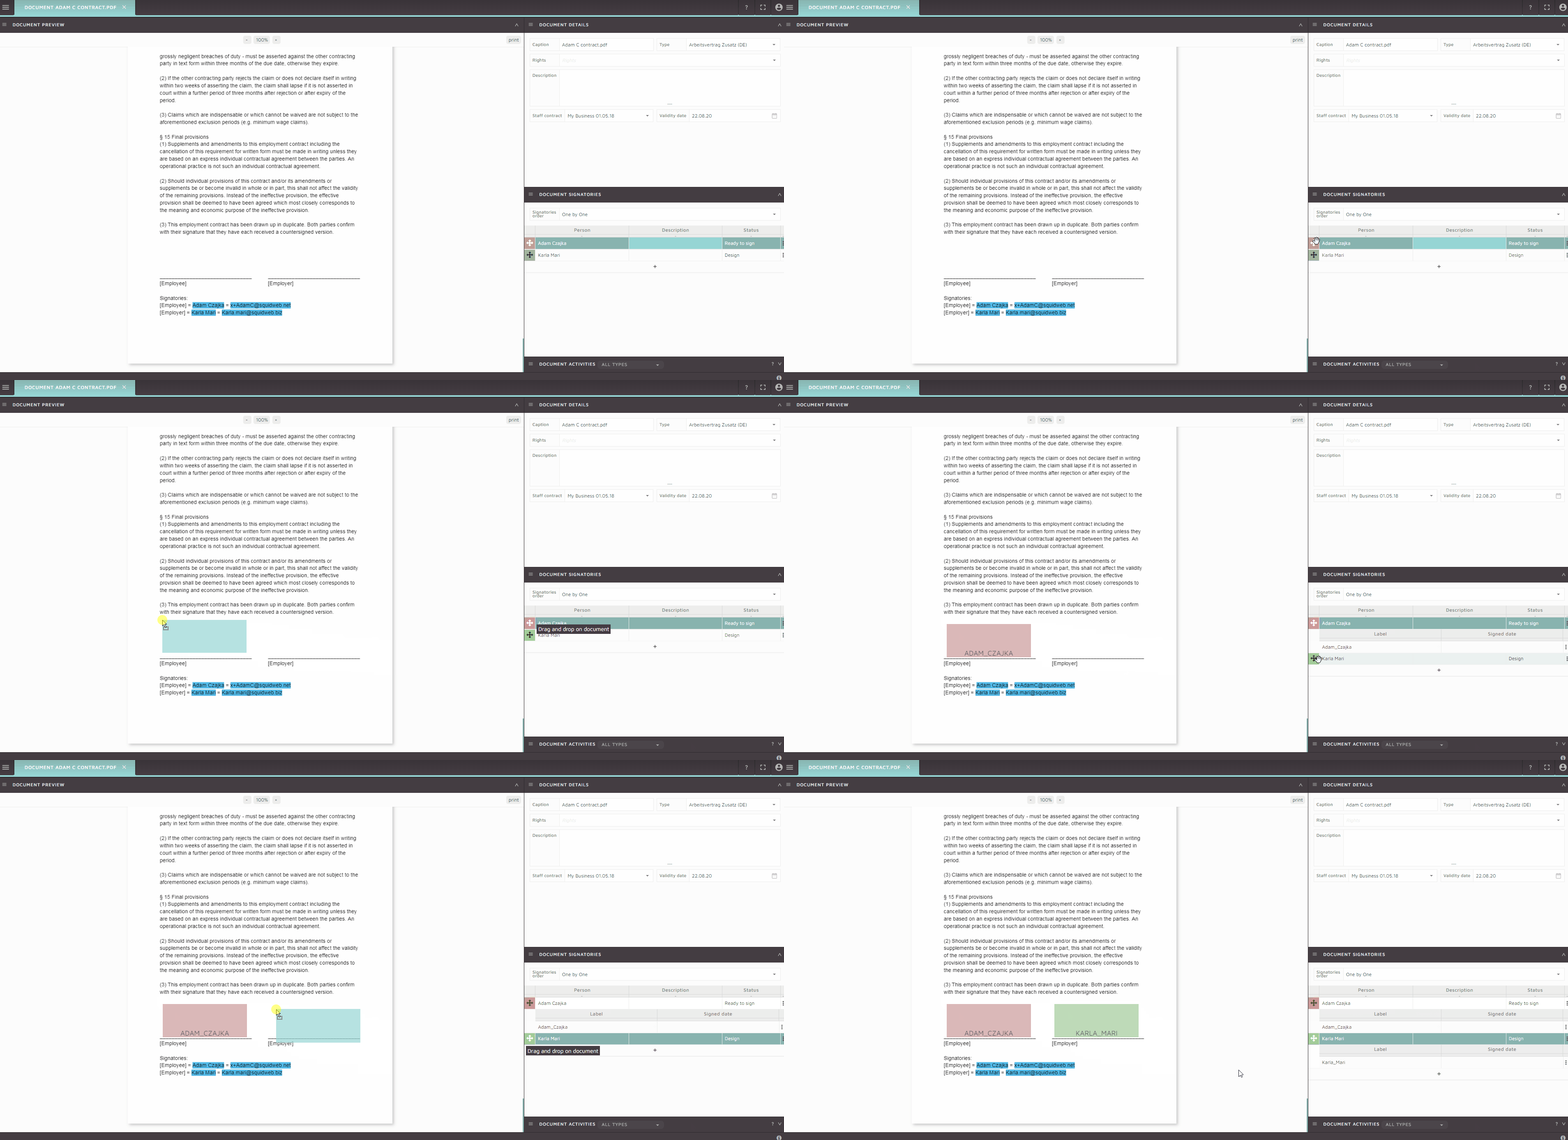
 

Invite signatories to sign/set status to ready

Right click on the signatories name and select “Mark as ready to sign” – once this status is set the document will appear on the home page of the app when the person next signs in.
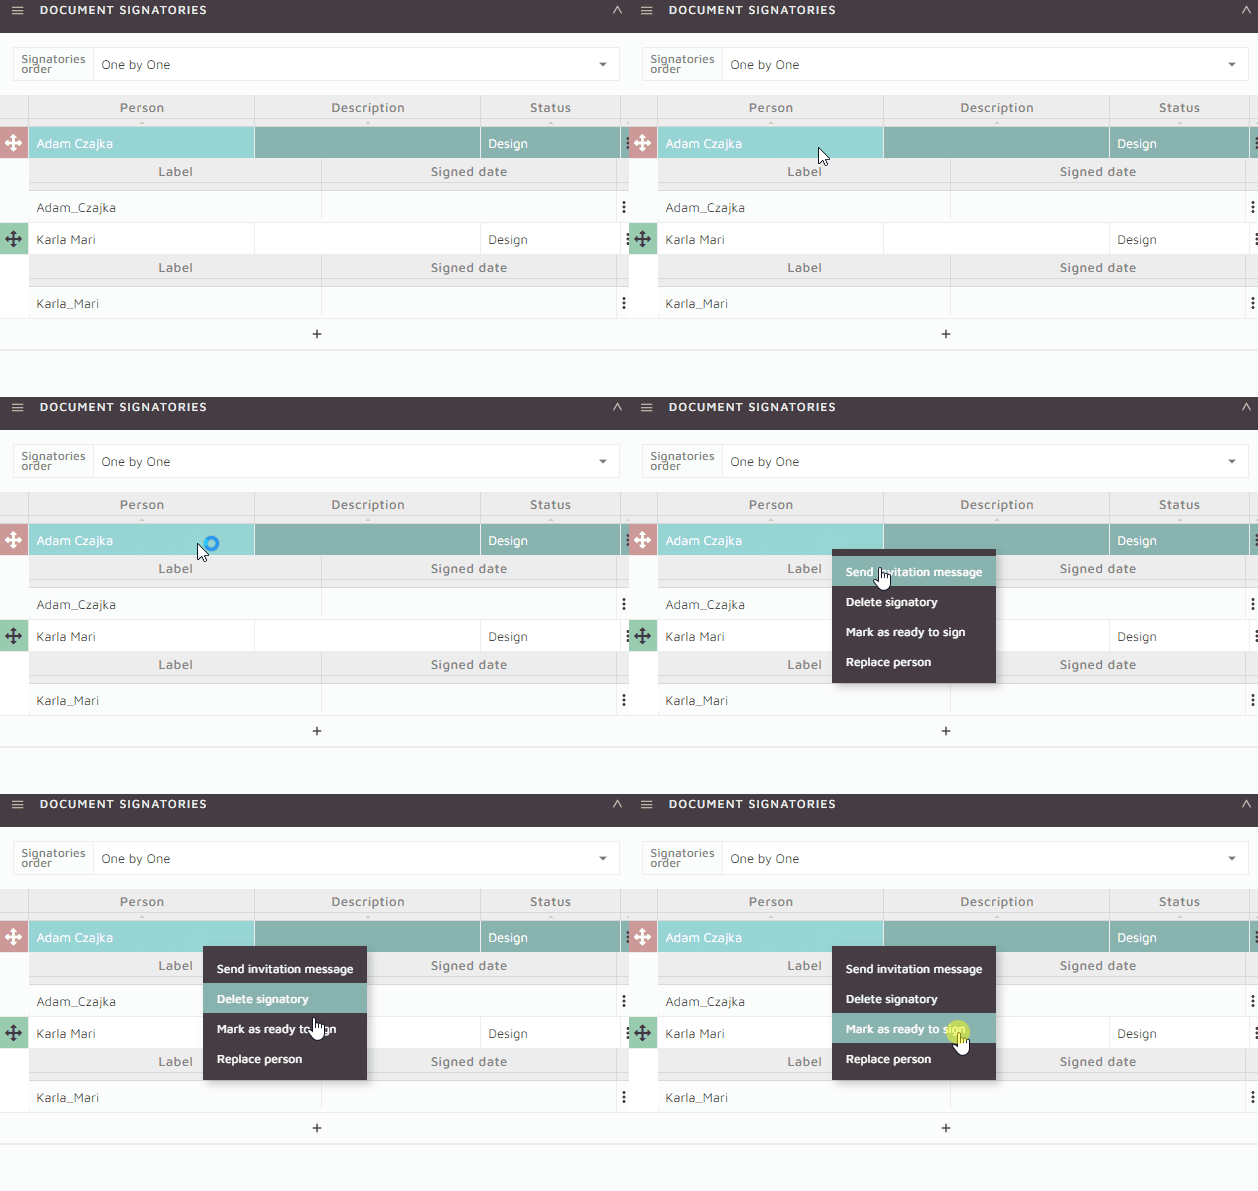
An invitation may also be sent if the person needs to be informed to check their app. Right clicking on the signatory and selecting “Send invitation message” will trigger an email dialog with the MSGSignatoryInvite type templates included. This message will inform the user to login to the app and sign the document.

Signing the document

All documents assigned to a person that require a signature will appear on their app homepage under “Documents to sign“.
To complete the signature, select “preview/sign” to open the document PDF. Navigate to the designated signature area and tap it to trigger the signature dialog.
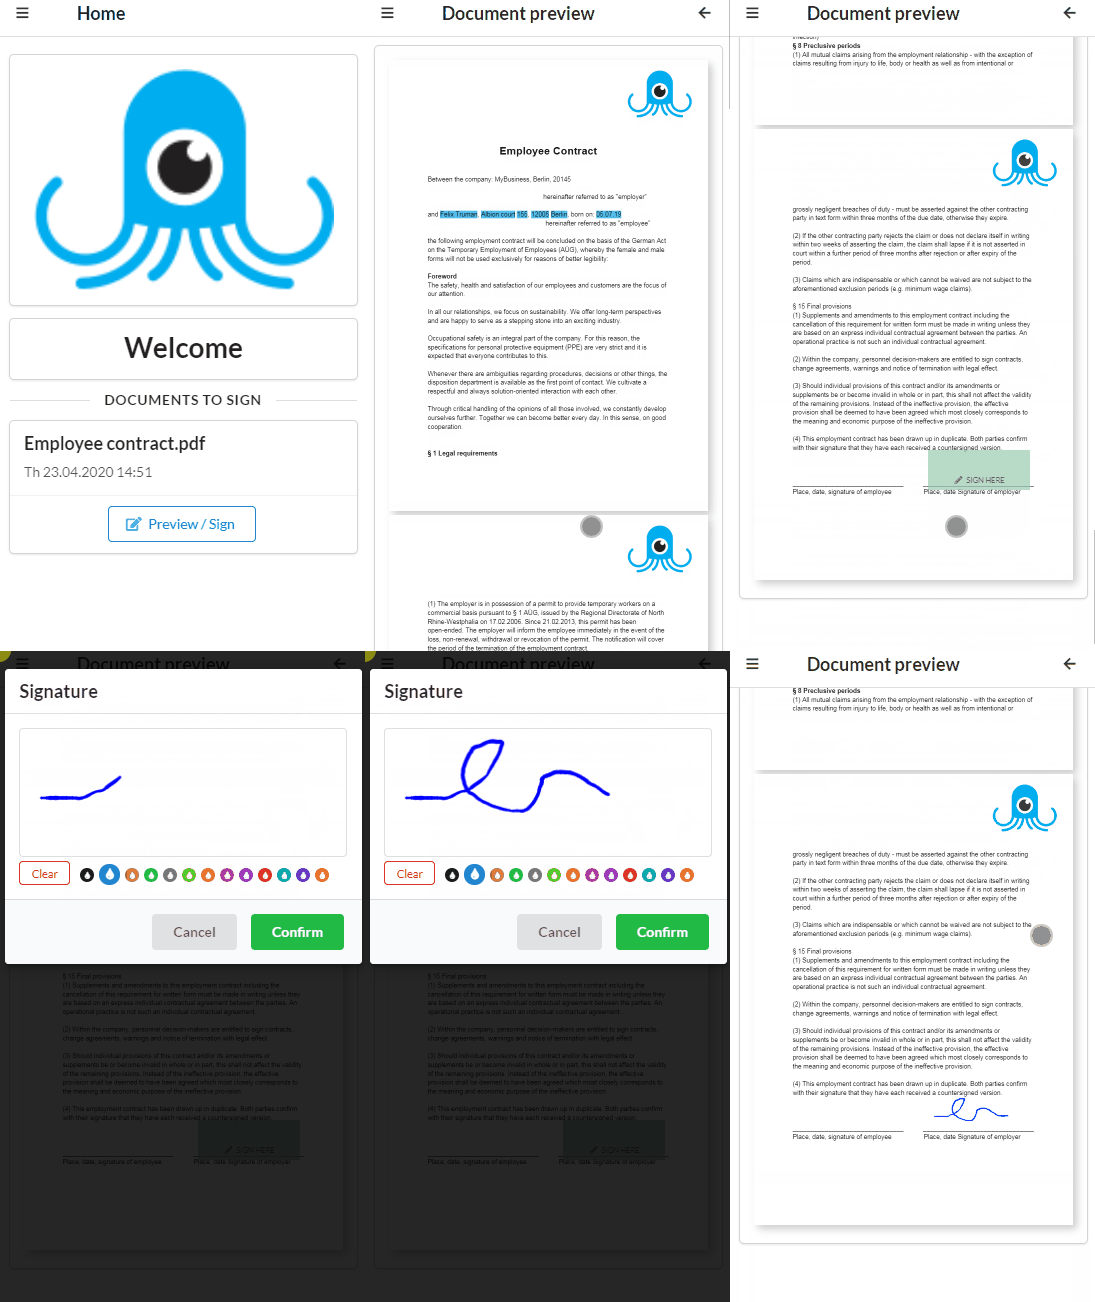
Various colors can also be selected to sign in.

Once the signature is complete the document will automatically be updated in SquidWeb.

Cancelling a Signatory Document – Contracts only

If a contract is refused, the signatories can be marked as cancelled and then removed from the document via the Document Signatories container menu.
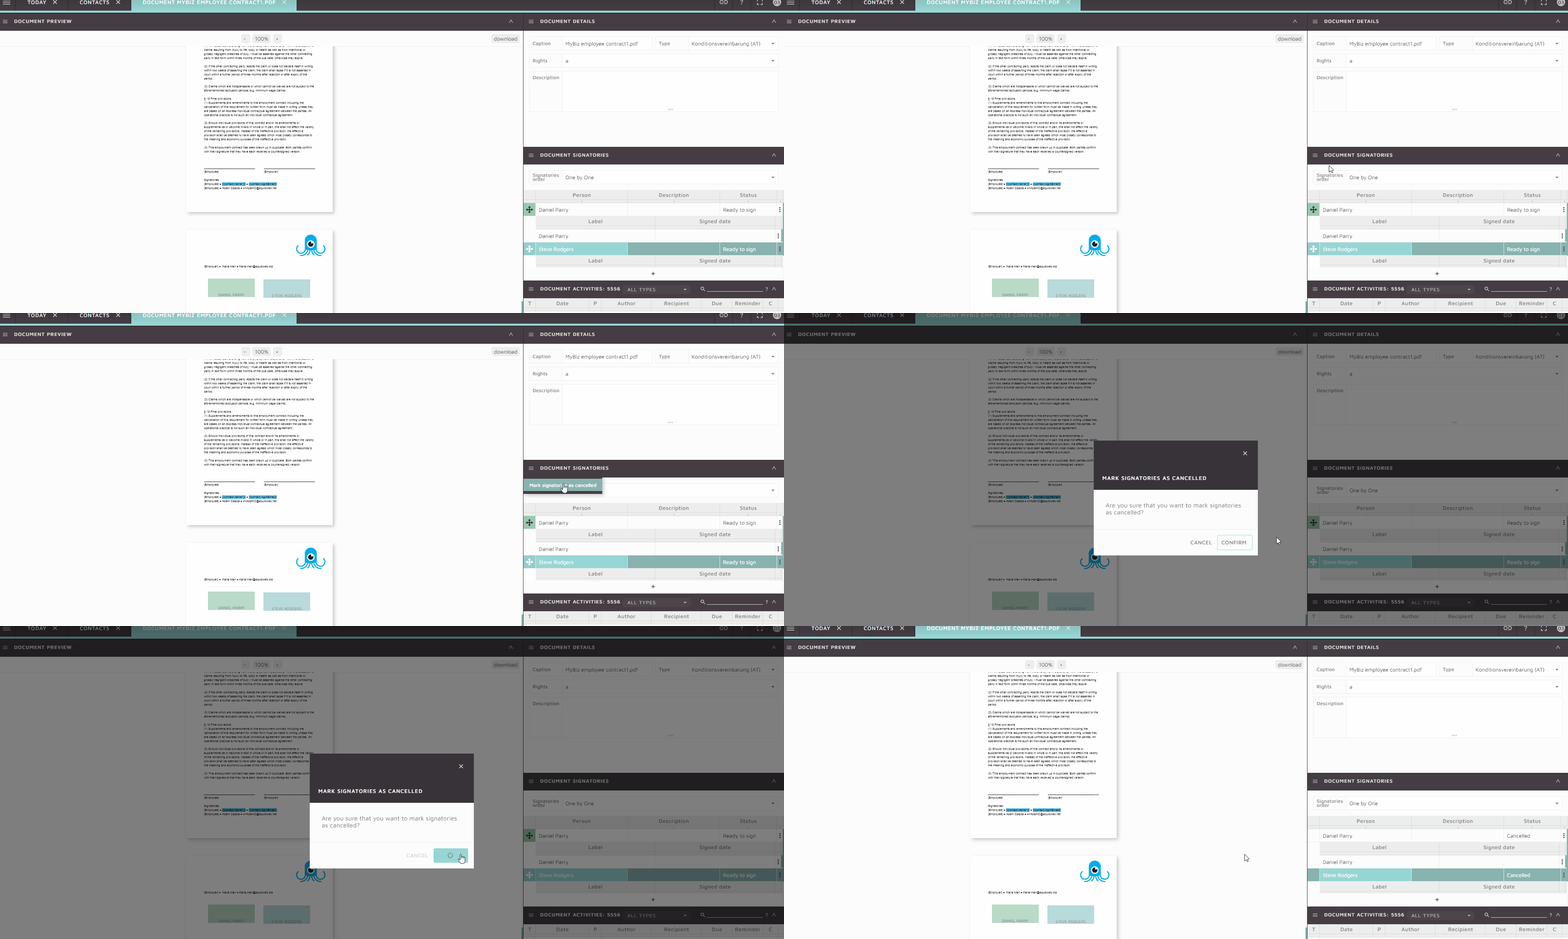
Select the “Mark signatories as cancelled” option and confirm the action when prompted. The status of all signatories will be updated to “Cancelled” and any outstanding notification on the mobile app of the recipients will be removed.
Resources

EXAMPLE TEMPLATE DOCUMENT

SquidWeb WIKI


New features and updates:

  • Mobile app: Crew can now upload their own expense reports.
  • Mobile app: Vacation request can now be made via the app.
  • Vacation requests management tools – new container added to Today page allowing users to respond to vacation requests.
  • Forms: Videos can be embedded in form answers.
  • Documents: Digital signatories (beta).


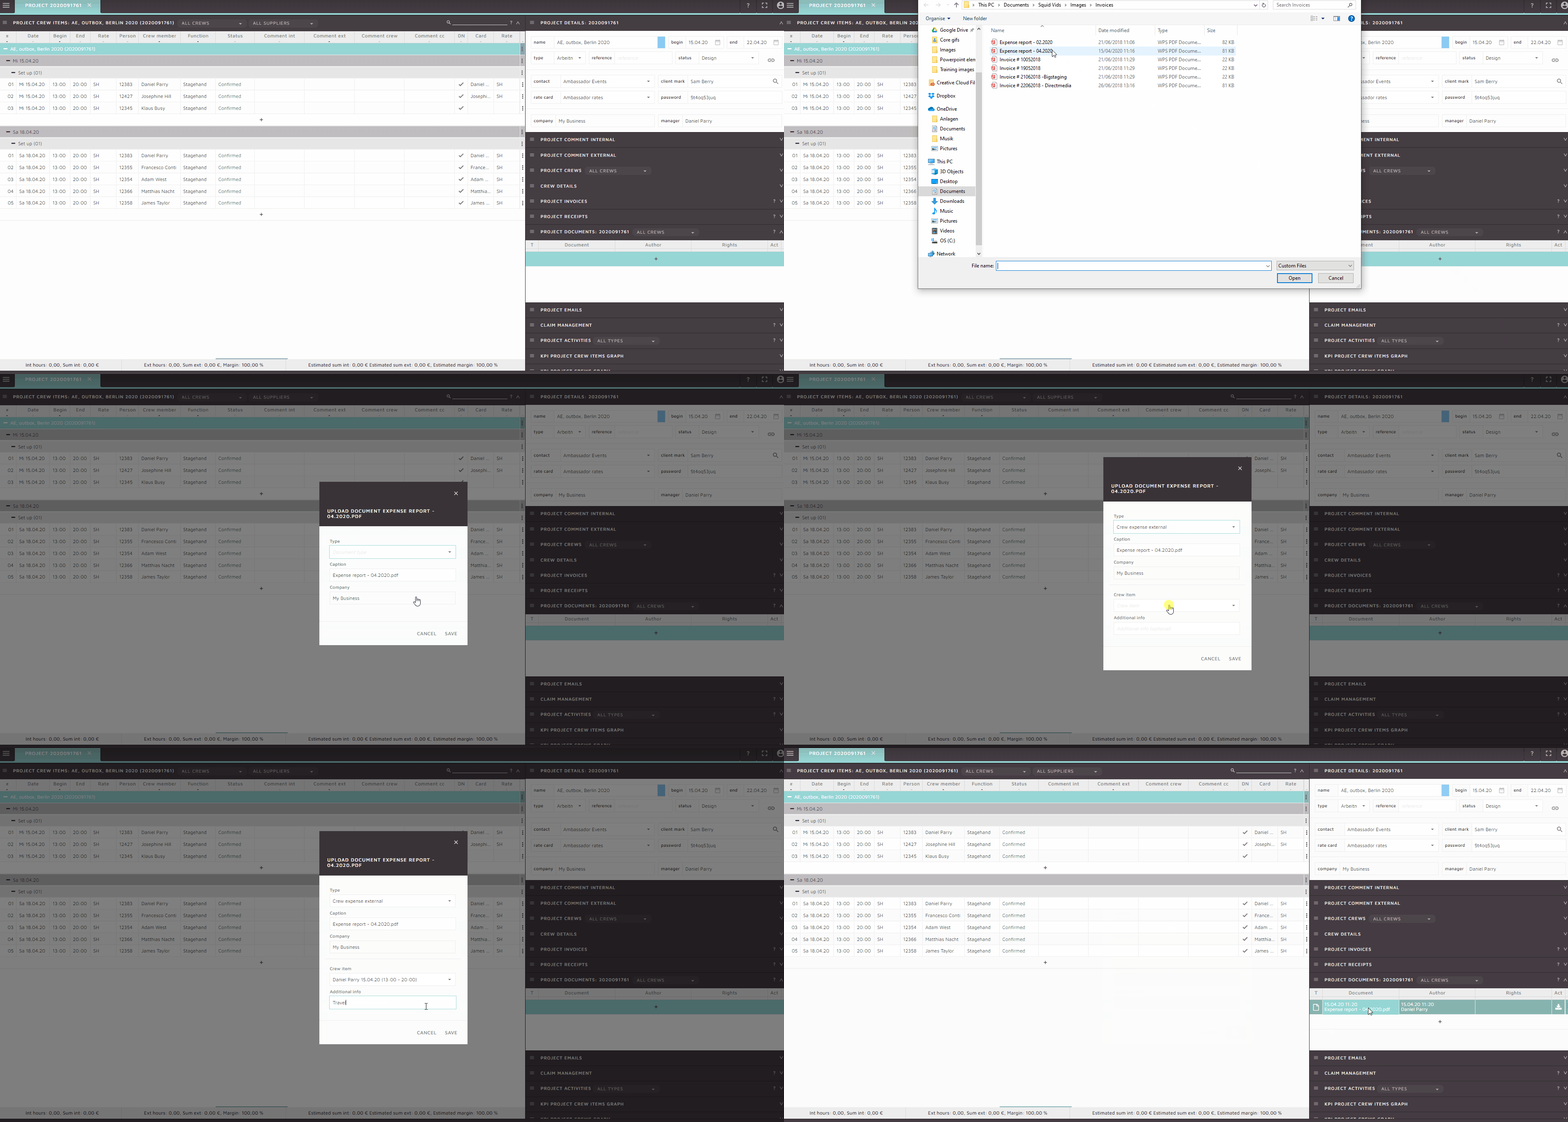
A crew member expense report is sent to an external payroll company when additional pay is required for an expenses such as parking or catering.  The expense report can be uploaded to the project in SquidWeb and then assigned to the related crew member (PCI).

To do this:

  • Upload a new document to the project documents container by selecting the ‘+’ icon or selecting “upload new document” from the container menu.
  • Select the file from your device.
  • Select document type “Crew expense external”, this will trigger the “crew item” and “additional info” fields to be displayed in the upload dialog.
  • Select the crew item (PCI) the expense report is for and add any additional info needed to explain what the expense is for.


Once the report is uploaded it will be available for preview and download in the project documents container.

Crew members may also upload their own expense report from the mobile app, a tutorial for how to do this will be available to send to crew member soon.

New features and updates:

Fixes:

  • Export receipts bug has been fixed.
  • Wrong account appearing in accounting page search has been fixed.

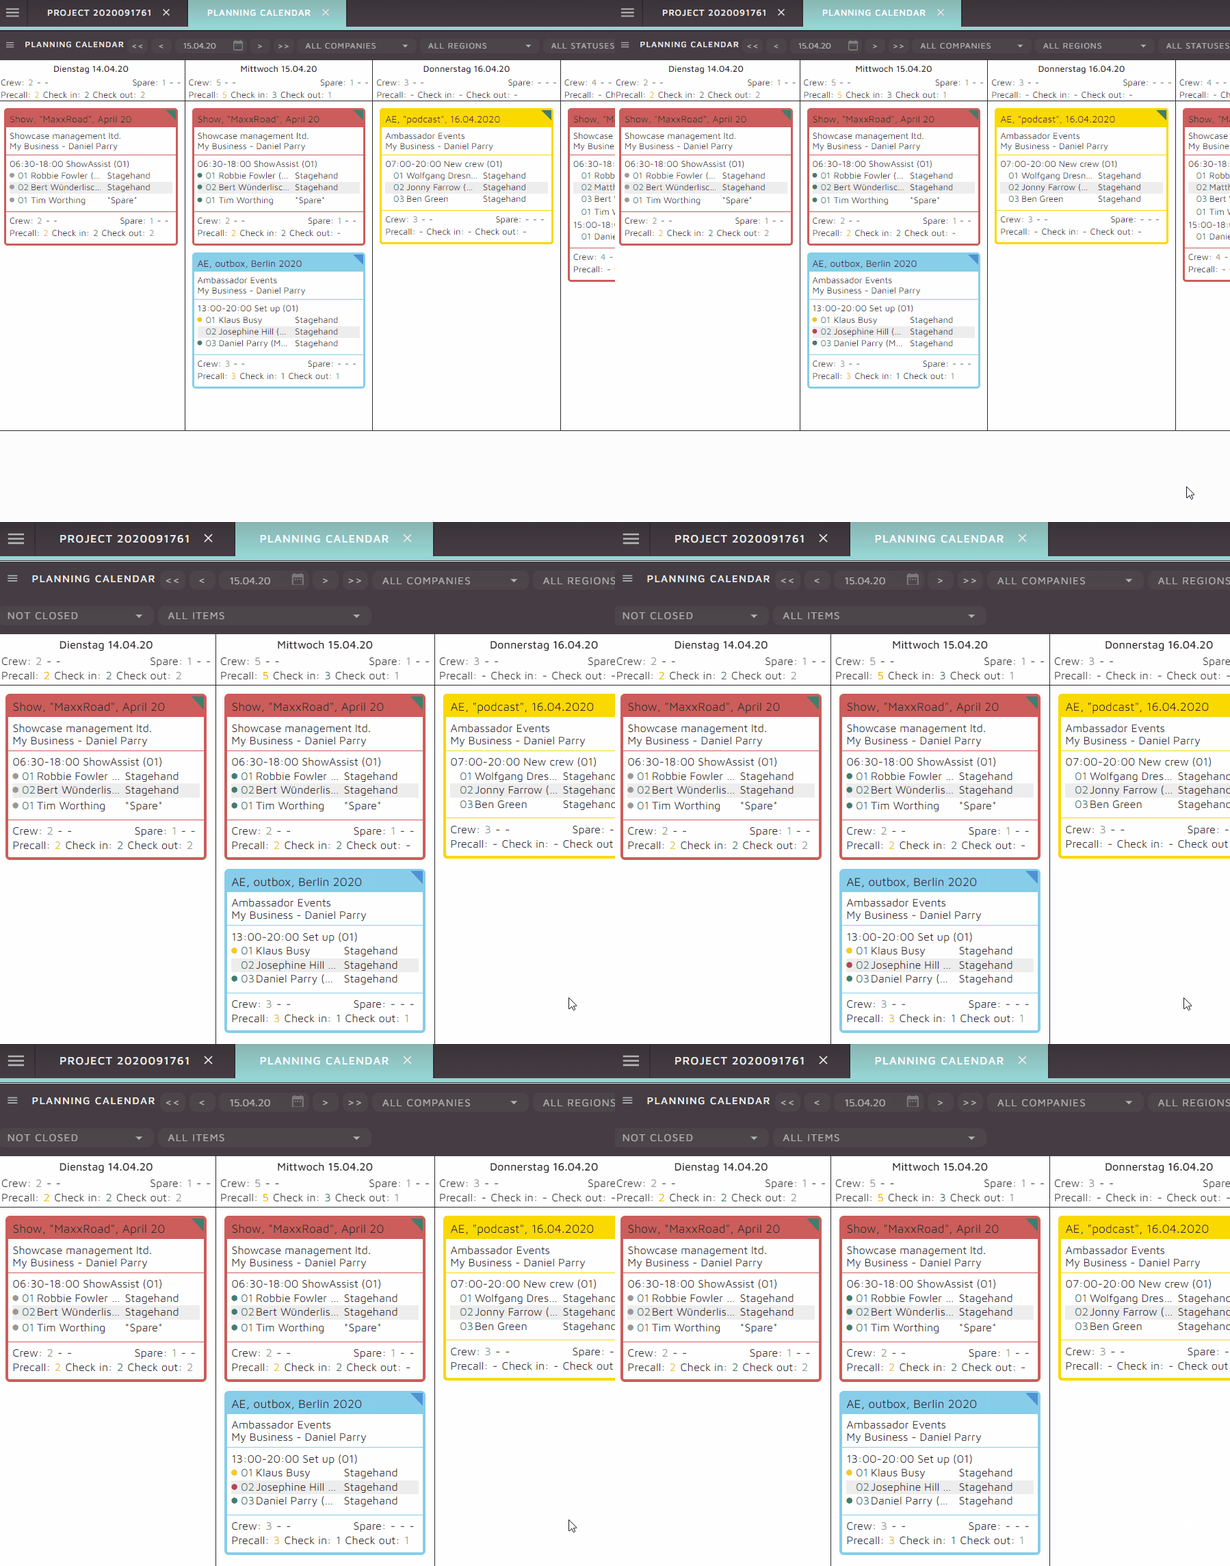
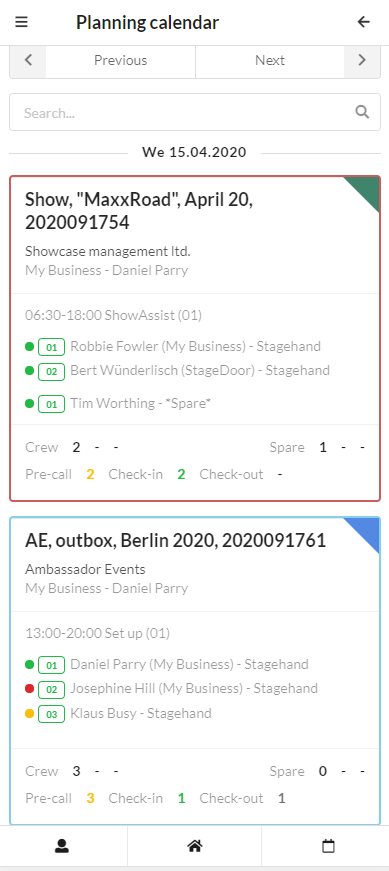
The pre-call indicator displays the current status of the crew member’s check in process. A colored circle will be displayed next to the crew members name, in both the mobile and desktop version of the planning calendar.

This will help planners stay abreast of the current situation without the need to contact the crew chief or act accordingly if any issue are identified by the status indicators.
The status indicator is located next to the crew members name in the planning calendar crew card.

This feature is available in the desktop and mobile version of SquidWeb (functionality is the same in both iterations).


The colors indicate the following status:
  • Empty dot – No action has been taken by the crew member
  • Yellow dot – Pre call done
  • Green dot – Checked in
  • Grey dot – Checked out
  • Red blinking – Something has gone wrong –
    (for example, pre call not been complete but check in has.)

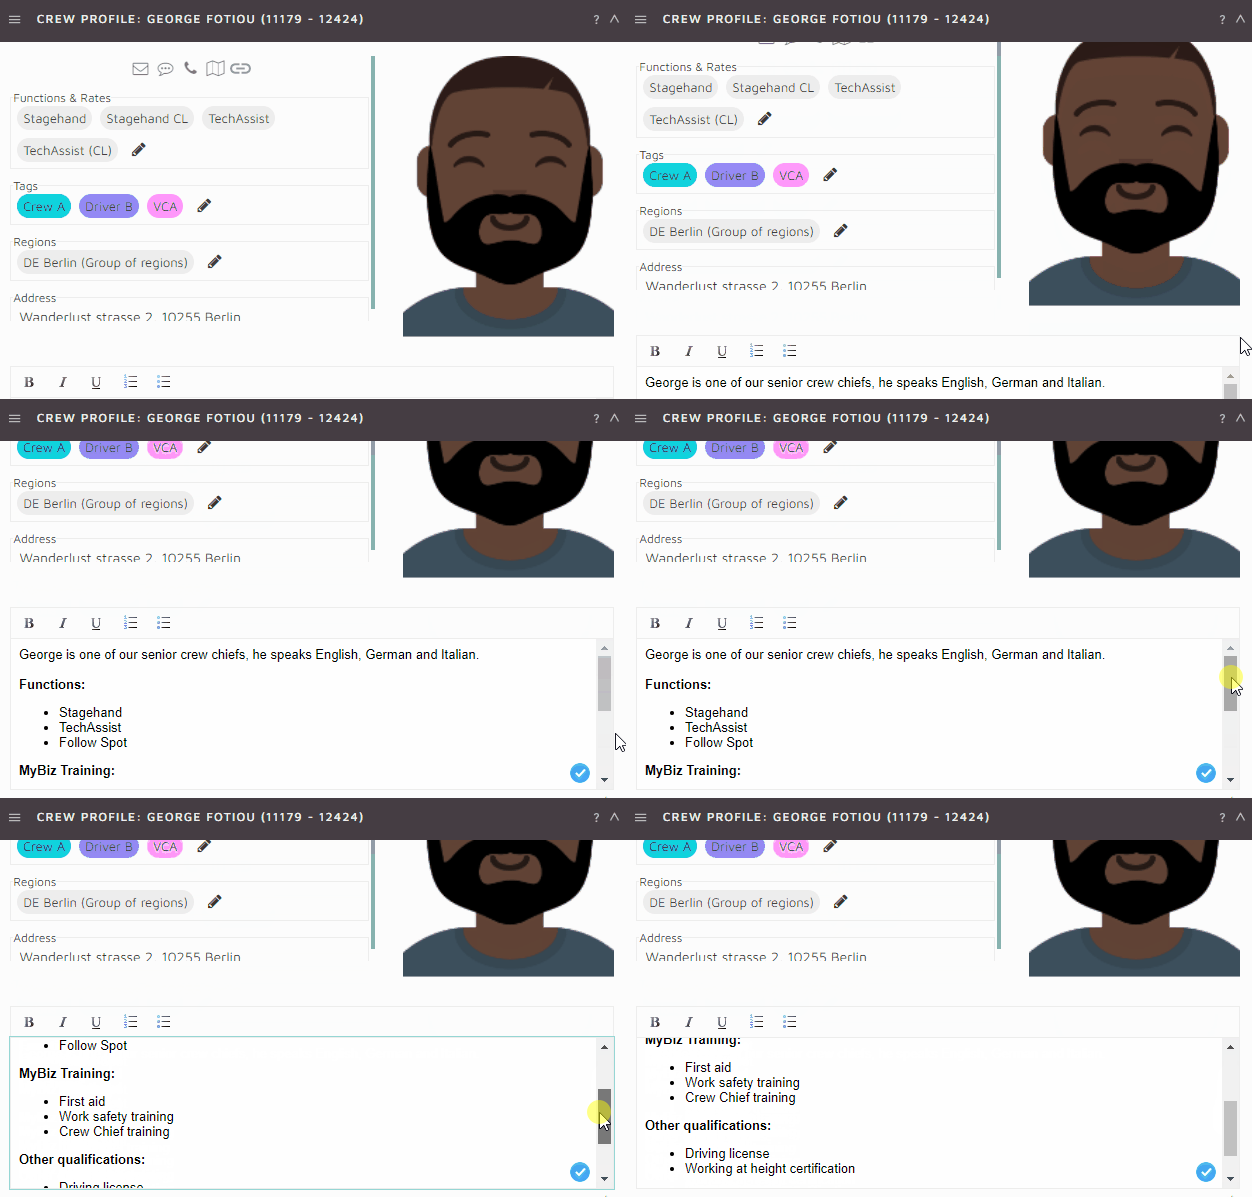
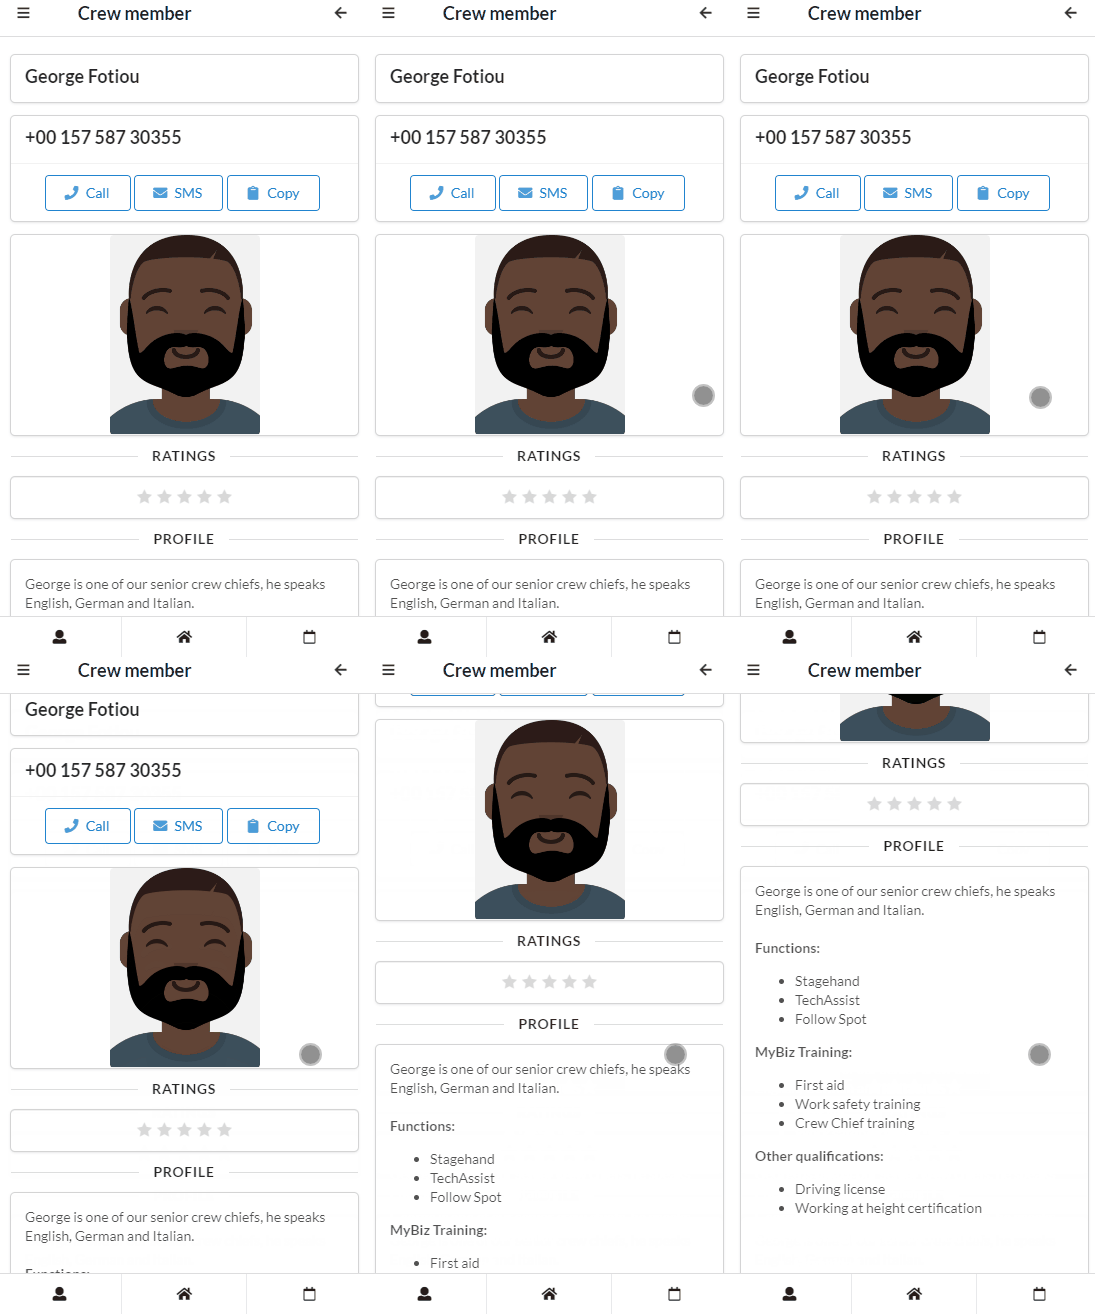
The crew profile comment field is located at the bottom of the crew profile container. Any information added to the crew profile comment will be displayed in the crew member details card in the mobile app for colleagues and clients to read.

This can be used to showcase the crew member’s functions, company trainings or any other qualifications they may have in order to give the client or crew leader an idea of whom the crew member is at a glance:


[The crew profile comment field as shown in the crew profile container in the crew calendar]


[The crew profile comment displayed in mobile app when the user selects the crew member from the crew list]

Update the crew comment
This field should be updated periodically by office staff after each meeting. It is important that this field is updated regularly as the crew member progresses and learns new skills to keep the clients and other crew members up to date on any new information.
The field can be edited or added to at any time from the crew profile container.

New features and updates:

  • Crew Planner: KPI crew and planning items are synced.
  • Filter by crew added to project documents container.
  • Filter by crew added to project crews container.
  • Payroll notification email template types updated.
    (full details in wiki https://wiki.squidweb.info/index.php?title=Templates#Payrolls or contact support for info)
  • Payrolls: Contract type filter added to payrolls container.
  • Payrolls: Quota h column added to payrolls container.
  • Mailbox: SMS from crew members are auto assigned.
  • Vacancies: branch filter added.
  • Forms: copy forms function added.

Fixes:

  • Delivery Note signature box adjustments.
  • Mobile: signed but not downloaded DNs no longer appear on homepages as unsigned.
  • Vacancies: mobile number of applicant is displayed in vacancies list.