Managing attendance, working hours and project sign-offs can vary significantly from one company to another. Some organisations rely on Crew Chiefs, others give responsibility to clients, while some prefer fully self-managed workflows through the mobile app.
Rather than enforcing a single process, SquidWeb allows companies to configure how these responsibilities are handled by using flexible Crew Modes.
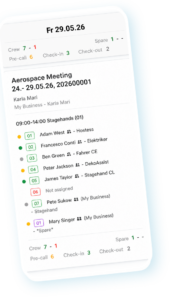
Each Crew Mode defines who is responsible for attendance tracking, working hours, check-ins, check-outs and sign-off processes throughout a project.
Configurable workflow settings
Crew Modes are not fixed workflows.
Each mode is built using configurable workflow settings that allow companies to adapt the system to their operational processes.
Depending on your requirements, you can configure parameters such as:
- Who manages attendance (Crew, Crew Chief or Client)
- Online or paper-based workflows
- Hybrid online + paper workflows
- Pre-call confirmation
- PPE checks
- Crew / Client / Planner sign-off permissions
Because these settings are fully configurable, companies can create workflows that match their existing operational procedures instead of adapting their processes to the software.
Example Crew Mode configurations
The following Crew Modes are example configurations included in SquidWeb.
Each one combines different workflow settings to support common operational scenarios.
Crew Chief, Check-In & Check-Out (Paper)
Short Name: CC-P
The Crew Chief manages crew attendance using paper-based workflows.
Characteristics:
- Crew Chief managed
- Paper workflow
- No online attendance tracking
Crew Chief, Check-In & Check-Out (Online + Paper)
Short Name: CC-O+P
The Crew Chief manages attendance online, while paper forms remain available as a backup.
Characteristics:
- Crew Chief managed
- Online workflow
- Paper backup available
Crew Chief, Check-In & Check-Out (Online)
Short Name: CC-O
The Crew Chief manages attendance completely online.
Characteristics:
- Crew Chief managed
- Fully digital workflow
- No paper forms required
Client + Crew Chief, Check-In & Check-Out (Online)
Short Name: C/CC-O
Attendance can be managed collaboratively by the Client and Crew Chief.
Characteristics:
- Client participation
- Crew Chief participation
- Fully digital workflow
Client, Check-In & Check-Out (Online)
Short Name: C-O
The Client is responsible for attendance management.
Characteristics:
- Client managed
- Fully digital workflow
Crew + Crew Chief, Check-In & Check-Out (Online)
Short Name: Crew/CC-O
Crew members and the Crew Chief participate in attendance tracking.
Characteristics:
- Crew self check-in
- Crew Chief visibility
- Geolocation support
- Fully digital workflow
Crew Chief + Crew + Client, Check-In & Check-Out (Online)
Short Name: CC/Crew/C-O
Attendance management is shared between Crew Chief, crew members and the Client.
Characteristics:
- Crew participation
- Crew Chief participation
- Client participation
- Fully digital workflow
Crew Chief + Crew + Client, Self-Managed (Online, No Pre-Call)
Short Name: CC/Crew/C-O/NoPc
Crew members manage their own attendance and working hours through the mobile app.
Characteristics:
- Crew self check-in
- Crew self check-out
- Working hours confirmation
- No pre-call confirmation
- Client sign-off available
- Fully digital workflow
Crew Chief + Crew + Client, Self-Managed ETT (Online, No Pre-Call)
Short Name: CC/Crew/C-O/NoPc/NoPPE
A variation of Self-Managed designed for ETT workflows.
Characteristics:
- Crew self check-in
- Crew self check-out
- Working hours confirmation
- No pre-call confirmation
- No PPE check
- Client sign-off available
- Fully digital workflow
| Mode | Short Name | Who manages attendance? | Online | Paper | Pre-Call | PPE Check |
|---|---|---|---|---|---|---|
| Crew Chief, Check-In & Check-Out (Paper) | CC-P | Crew Chief | No | Yes | Yes | Yes |
| Crew Chief, Check-In & Check-Out (Online + Paper) | CC-O+P | Crew Chief | Yes | Yes | Yes | Yes |
| Crew Chief, Check-In & Check-Out (Online) | CC-O | Crew Chief | Yes | No | Yes | Yes |
| Client + Crew Chief, Check-In & Check-Out (Online) | C/CC-O | Client + Crew Chief | Yes | No | Yes | Yes |
| Client, Check-In & Check-Out (Online) | C-O | Client | Yes | No | Yes | Yes |
| Crew + Crew Chief, Check-In & Check-Out (Online) | Crew/CC-O | Crew + Crew Chief | Yes | No | Yes | Yes |
| Crew + Crew Chief + Client, Check-In & Check-Out (Online) | CC/Crew/C-O | Crew + Crew Chief + Client | Yes | No | Yes | Yes |
| Crew Chief + Crew + Client, Self-Managed (Online, No Pre-Call) | CC/Crew/C-O/NoPc | Crew + Crew Chief + Client | Yes | No | No | Yes |
| Crew Chief + Crew + Client, Self-Managed ETT (Online, No Pre-Call) | CC/Crew/C-O/NoPc/NoPPE | Crew + Crew Chief + Client | Yes | No | No | No |
Flexible workflows for every operation
Every organisation manages workforce operations differently. That’s why SquidWeb’s Crew Modes are fully configurable rather than fixed.
By combining different workflow settings, companies can define who is responsible for attendance, working hours, sign-offs and operational processes while choosing between paper, digital or hybrid workflows.
Whether managing a small team or coordinating large-scale event operations, Crew Modes help ensure that the platform adapts to your business—not the other way around.