New features and updates:
- Crewplanner: days before contracts starts or after contracts ends are marked with grey background
- Payrolls: update A3 payroll export
- App: show toast to confirm, create event “CONFIRMED_DATE_BLOCKED” when cm block date on date that already has job confirmed by cm
- App: add precall/checkin/checkout on Home
- Projects: add delivery note report template with break column
- Projects: find the best person improvements
- Projects: add drag and drop shift tiles
Fixes:
- Application/Person: fix that event APPLICATION_WELCOME_CREW_MEMBER is not triggered correctly when executed on persons page
- Crewplanner: fix missing crew/spare filter
- Companysettings: fix download of project delivery note templates
A new tag has been added to SquidWeb to help track if a crew member is Covid-19 tested or vaccinated, the skill can be added to the crew member’s profile once they have submitted a valid vaccination certificated or negative test document.
The can be requested from SquidWeb and the crew member can upload it from their mobile or desktop device like any other document. We will use the COVID-19 Vaccination Certificate document request as an example to show you how to complete this process:
- Open the Personal Documents Container menu,
- Select “Request new document” and select “COVID-19 Vaccination Certificate”
- Select your company and click save to send the request to the crew member
The document will be marked yellow in the personal documents container until the crew member submits a document. The crew member will receive the request on their mobile app home screen and it will remain there until they upload their Covid-19 certificate.
Once the crew member has submitted a document it must be confirmed by the office before it is valid. The document will me marked blue in the personal documents container until it is confirmed by an office member. To confirm the document:
- Open the (blue) document from the personal documents container menu
- Check the document is indeed valid
- Select Mark as confirmed from the document details container menu
The skill will then be automatically added to the crew member’s profile container under “Documented skills”. This tag will inform all other planning staff that the crew member has vaccination documentation. If a job requires vaccination documentation, the tag filter can be applied to the crew planner to display only crew members with this skill tag present in their profile.
Some features in SquidWeb require you to grant permission for SquidWeb to access your Google account, but why do we need this access, and exactly what do we do with it?
SquidWeb only uses the access to your Google account to access or change information of items create from a SquidWeb feature – Template documents for example, allow you to generate a Google document of a pre-defined layout directly from SquidWeb, this document is created in Google documents and stored in your Google Drive, therefore SquidWeb requires permission to access these two features.
Allowing all requested permissions to your Google account will give SquidWeb the ability to use all its required features in connection with Google, those permissions are as follows:
- Google Drive Access: Allows Squidweb to add or remove template documents and spreadsheets to your Google Drive.
- Google Docs & Spreadsheet Access: Allows Squidweb to create template documents and spreadsheets from SquidWeb to your Google account.
- Google Calendar Access: Allows Squidweb to create events from SquidWeb planning features to your Google calendar.
- Apps Script projects: This allows SquidWeb to send PDFs from Google back into SquidWeb.
For full details on how these permissions are given in SquidWeb, see our short tutorial video here:
The default button will reset the project, including all filters, back to the original project view with a single click.

The button is located in the header of the project crew items container and once clicked, any crew filters or supplier selections you have made to the project since you started working on it will be reset to display all PCI’s and all crews in their original order.
SquidWeb’s template document allow you to generate a doc from SquidWeb with pre-filled variables to quickly produce bespoke files without any work. Now with the use of Google App Script, it is possible to upload those documents directly back to SquidWeb without the need to download it first.
To do this you must first activate Google App Script by visiting https://script.google.com/u/3/home/usersettings and connecting with SquidWeb. Once you have activated the function a new toolbar item “SquidWeb” will appear on your google docs and you can upload a completed template document back to its original location in SquidWeb.
Project Crew Items, Crews and Projects may be deleted from SquidWeb and then recovered again at any time.
To delete a Project Crew Item or an entire Crew, simply select it and hit thee delete button, once deleted the element may be recovered from the Trash page by selected the “Show Deleted” option in their respective container menus.
A deleted project may also be recovered from the project list container menu, however opening a deleted project does not return it to the project list right away, the project is instead reopened first, allowing users to check old bookings or project info before recovering it from trash.
Check out the tutorial for full details
A mailbox can be set as your default mailbox in SquidWeb settings, a public or private mailbox from the system can be assigned as your default. Once set, new mail will be set sent from this address unless specified otherwise.
Choosing a default mailbox is simple:
- Navigate to your profile settings in the top right corner of the dashboard
- Select ‘User Settings’
- Select your chosen mailbox from the ‘mailbox’ dropdown menu
- Save

The Find the best person container calculates the eligibility of all crew members for a selected shift (or shifts) and lists them in order of priority for you to add to the project.
SquidWeb takes into consideration the crew members contracted hours, current amount worked hours (monthly) and their travel time to the job location to provide you with a list of names to add to your project. 
A crew member can be added to the project as a placeholder or requested directly by right-clicking on their name in the container and selecting your preferred option. A crew member can even be added as a spare.
Check out our tip video here to show you how it works:
SquidWeb mailbox has a number of features designed to help you manage your mailbox quickly and easily. Here are a few of our recommendation to help you work quickly and efficiently:
Keyboard Shortcuts:
Select and email and press the following command to perform the action.
CTRL + A: Reply;
CTRL + C: Mark as spam;
CTRL + D: Mark as done;
CTRL + G: Refresh grid;
DELETE: Delete mail
Using keyboard shortcuts:
Move to done
If you have multiple emails that are “Read-only” in that they do not require a response or any further action from you or your colleagues, mark this as done right right away: Hold SHIFT to select multiple emails and press CTRL+D
Mark as Spam
Select multiple emails with SHIFT and press CTRL+X. The email status will change to “Deleted” but they will still be in the mailbox until the page is refreshed, press CTRL+G to refresh the grid and remove the marked spam. The page does not refresh automatically incase you make a mistake and need to change a status back from deleted or add additional mail to the spam list.
Reply quickly
To write a response, select the mail in the mailbox and press CTRL+A to instantly open the reply email dialog, type the body of text and when you are done simply press CTRL+ENTER to send the mail without needing to click.
Default mailbox
If you set a default mailbox, new mail will be sent from that address by default and you can filter the mailbox to display only your default mailbox by selecting the “Default” button in the header.
Choosing a default mailbox is simple:
- Navigate to your profile settings in the top right corner of the dashboard
- Select ‘User Settings’
- Select your chosen mailbox from the ‘mailbox’ dropdown menu
- Save
Mailbox filter, status indicators and search function
The mailbox filter allows you to manually select which mailbox is displayed whereas selecting the “default” button will show your chosen default mailbox. When opening the filter you will be able to select from all the mailboxes your user account has access to, both public and private mailboxes will be available to select.
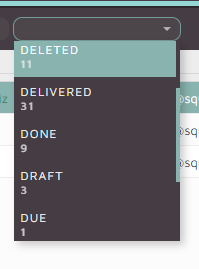
You will notice a list of numbers below each available mailbox, these numbers represent the amount of emails in each status in this order:
Received/Ongoing/Assigned/Auto-Assigned/Delivered/Done/Deleted
The amount of mails in the selected mailbox is also displayed in the status filter menu
The mailbox allows full text search which means sender, subject and email body search.
Additional tips
Drafts:
If you accidentally close your tab or the new email dialog, your mail will be automatically saved as a draft that can be accessed at any time. To find a draft email select the “Draft” from the status filter.
Show History:
To view only the email history between the selected mailbox and a specific contact, right click on any email from the contact and select “show history”, this will filter out any other mail from the mailbox that does not include this contact. There is also a container in the SidePanel titled ‘Email history’ that will display the same content.