When an applicant applies to one of your job vacancies, they will be asked to complete an application form and attach all required documents.

This new application will then displayed in the Vacancy applications container on the Vacancies page as well as the in Application page.
You can read the full application, review all documents and respond to the candidate directly from the applications page.

All applicants will be listed in the Application List Container, the rest of the SidePanel will display the information of the candidate you have selected in the Applications List Container. You can right click on a candidate and send them a reject email or an invitation email to an interview. You can contact the candidate by either right clicking on their name or opening the container menu of the application details container.


There are multiple contact templates available to send to a candidate:

  • Send received email – Thank the candidate for applying and tell them you will contact them soon.
  • Rejected email – Reject the candidate.
  • Onhold email – Tell the candidate there are currently no positions available but their profile will be saved for future.
  • Invitation email – Invite the candidate to the office for an interview.

If an applicant is successful, their personal information (entered during their application process) can be used to add them directly to the system as a contact. In order to do this, select “New contact” from the application details container. This will trigger the new contact and person dialog with the applicant’s details already filled, you can save them directly to your system without the need to add anything manually.

New features and updates:

  • Employee list: crew profile container added to Employee page.
  • Invoices: Export container values are the same as they are in the invoice list page.
  • Mobile app: vacation request can be made by Crew members via appointments page.
    (https://squidweb.info/how-to-make-a-vacation-request/)

Fixes:

  • Bank transfers: Issue that caused invalid file format is fixed
  • Bank transfer: SEPA file has been fixed for ES users.
  • Template Docs: Issue in which document would not be triggered are login to google has been fixed.
  • Forms: Section ordering fixed.
  • Forms: Formatting improved on PDF previews.
  • Payroll: Payroll status filter option doubles have been removed.

New features and updates:

  • Project calculations: Sort by crew option added.
  • Template documents: categories updated
    – Person details to Personal documents.
    – Contact details to Contact documents.
  • Digital Signatories: signature area can be moved.
    (https://squidweb.info/digital-signatories/)
  • Digital Signatories: Invite templates created.
  • Accounting: Periods filter is updated from date selection to financial period.
  • Accounting: Dates filter added.
  • Receipts: minus VAT options added for credit notes.

Fixes:

  • Items: group selection now works.
  • Mailbox: not able to assign receipts bug fixed
  • Receipts: VAT rounding issue fixed.
  • Mobile app: issue that made check in/out not possible has been fixed.
  • Templates: changing the company of templates no longer create error.
  • Templates: HTML editor toolbar options fixed.

Crew members can make a vacation request from the appointments page of the SquidWeb mobile app. Once the day is selected in the appointments calendar an option will appear at the bottom of the page to submit a vacation request.
Selecting “Request Vacation” will trigger the request dialog. The user can choose a period and which time of the day they want to request vacation time for. By default, the whole day (00:00-23:59) will be included in the request unless the crew member sets a specific time.

Once the request has been sent, it will be available in the “Vacation Request Container” on the SquidWeb desktop version Today page.
Right clicking on a request in this container will offer response options, selecting one of these options will trigger an email template, that should be set up in your templates page:

  • Reject – MSGVacationRequestReject template will be triggered, refusing the vacation – this template should include a reason.
  • Confirm – MSGVacationRequestConfirm template will be triggered, confirming the vacation has been granted
  • Confirm+PCI – MSGVacationRequestConfirmPCI template will be triggered, again confirming the request and also create a PCI in the vacation project.
  • Show Contact Person – Open the contact details page of the employee requesting the vacation.

Selecting the Confirm+PCI option will trigger an email dialog with additional options at the bottom to select the vacation project and confirm the PCI details.
The PCI section of the email dialog will be auto filled with the date and times requested by the employee but may be edited it needed.
The designated vacation project must be selected from the project field.

A crew member expense report is sent to an external payroll company when additional pay is required for an expenses such as parking or catering.  The expense report can be uploaded to the project in SquidWeb and then assigned to the related crew member (PCI).

To do this:

  • Upload a new document to the project documents container by selecting the ‘+’ icon or selecting “upload new document” from the container menu.
  • Select the file from your device.
  • Select document type “Crew expense external”, this will trigger the “crew item” and “additional info” fields to be displayed in the upload dialog.
  • Select the crew item (PCI) the expense report is for and add any additional info needed to explain what the expense is for.


Once the report is uploaded it will be available for preview and download in the project documents container.

Crew members may also upload their own expense report from the mobile app, a tutorial for how to do this will be available to send to crew member soon.

The pre-call indicator displays the current status of the crew member’s check in process. A colored circle will be displayed next to the crew members name, in both the mobile and desktop version of the planning calendar.

This will help planners stay abreast of the current situation without the need to contact the crew chief or act accordingly if any issue are identified by the status indicators.
The status indicator is located next to the crew members name in the planning calendar crew card.

This feature is available in the desktop and mobile version of SquidWeb (functionality is the same in both iterations).


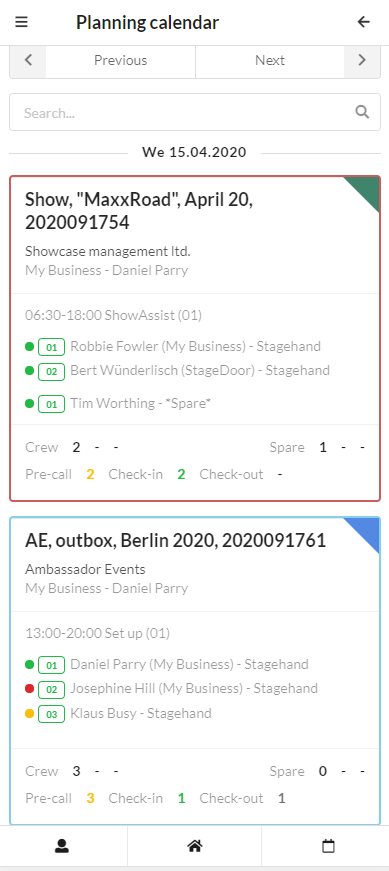
The colors indicate the following status:

  • Empty dot – No action has been taken by the crew member
  • Yellow dot – Pre call done
  • Green dot – Checked in
  • Grey dot – Checked out
  • Red blinking – Something has gone wrong –
    (for example, pre call not been complete but check in has.)

The crew profile comment field is located at the bottom of the crew profile container. Any information added to the crew profile comment will be displayed in the crew member details card in the mobile app for colleagues and clients to read.

This can be used to showcase the crew member’s functions, company trainings or any other qualifications they may have in order to give the client or crew leader an idea of whom the crew member is at a glance:


[The crew profile comment field as shown in the crew profile container in the crew calendar]


[The crew profile comment displayed in mobile app when the user selects the crew member from the crew list]

Update the crew comment
This field should be updated periodically by office staff after each meeting. It is important that this field is updated regularly as the crew member progresses and learns new skills to keep the clients and other crew members up to date on any new information.
The field can be edited or added to at any time from the crew profile container.

The Kurzarbeit form is a document that requires the one time signature of the employee.

The form will be available on the home page of the mobile app, opening this form will direct the user to the Kurzarbeit information for and allow them to both confirm they understand information and then sign the  document before returning it to the office and sending a copy to the user via email.

Work flow

  • Login to SquidWeb mobile,
  • Open the Kurzarbeit form,
  • Read the information,
  • Confirm receipt and understanding of the information,
  • A preview of the PDF will be generated for review,
  • Select “Sign Document”,
  • Enter signature in free text area and select “Confirm”,
  • A sign preview of the PDF will be generated,
  • Select “Upload and Send document”,
  • A copy of the signed document will be sent via email to the user,
  • A copy of the signed document will be saved in the users Personal Details container.

Crew tags can be assigned to a crew member from their crew profile. Tags are used to filter the crew into groups based – applying a tag filter will show only the crew members with that tag assigned to their profile.

New tag groups can now be created and edited anytime. New tag groups can be color coded and existing tag groups can be edited and customized.

Open the tags dialog from any crew member profile to access these option. Here is a quick guide to show you how:

A bulk, or group, email can be sent from SquidWeb in a number of ways. Skip to the bottom for our tutorial video.

  1. From the Crew Planner
    Select “Send email” from the crew calendar container menu to trigger a new email window. This email will be sent to every member of the currently selected crew, so be sure to filter the crew calendar to the crew members you wish to contact before selecting “Send email”.
  2. From the Employees list
    Similar to the crew planner, select “Send email”, this time from the employees list container menu, and a new email window will be triggered. This email will be sent to every employee in the current list, so be sure to have the correct company and period selected first.
  3. From the Project details page
    In the project container menu, the “Send email” option can be used to send a bulk email to all crew members entered into the project. If the position has a crew member assigned to it, and that crew member has an email address assigned to their contact details, they will be included in the mailing list.
  4. From the Mailbox
    From the Email list container menu, select “New bulk Email”, unlike the previous two methods an email dialog will not be triggered right away, first you will be asked to select a mailing list to send the email to.
    A mailing list must be created beforehand. Any mailing list can be created, such as ‘all employees’, ‘all clients’ or ‘all contacts in the city of Paris’, it is simply a list of persons from within your database.
    To create a new mailing list, please send a request to support with your requirements, ie “A new mailing list to all clients in Spain” and we will add it for you.

    This method should be used to send Newsletters or company announcements.
    Templates
    Like many things in SquidWeb, templates can be created to make things easier. Bulk email templates are created in the templates page with the template type “EmailMessage”.
    Bulk email templates are a little more complex then usual templates as HTML can be used to add images, coloring and logos. A tip video for this will be available soon.Our video below will show you how to work with each tool: